If you’ve had your chimney flashing patched once or twice and you’re still finding water stains on your ceiling after a hard rain, you’re not alone — and you’re not imagining things. Chimney leaks are among the most stubborn and misdiagnosed problems in residential roofing, and most repair attempts fail not because of bad workmanship, but because the underlying cause was never properly identified.
Here’s the honest truth most repair guides won’t tell you: chimney flashing doesn’t fail because it “wears out.” It fails because your chimney and your roof are two structurally independent systems that move at different rates, every single day, and the flashing between them has to accommodate that movement indefinitely. When a repair ignores that physical reality — whether it’s a bead of caulk or a partial patch job — the problem comes back.
This guide breaks down exactly why chimney flashing fails, what a thorough repair actually involves, and what to look for when you’re evaluating your options. Whether you’re a homeowner in Winston-Salem doing your homework before calling a contractor, or someone in Greensboro trying to understand why a recent repair didn’t hold, this is the information you deserve to have.
Most homeowners assume flashing fails because of rust, age, or a bad sealant job. Those can all be contributing factors. But the root cause of nearly every chronic chimney leak is differential movement — the constant, invisible stress that occurs where your masonry chimney meets your wood-framed roof.
A brick chimney and a wood roof deck don’t just look different — they respond to temperature and moisture in fundamentally different ways.
Brick and mortar expand and contract with temperature changes at one rate. Wood framing moves at a different rate, and unlike brick, it also swells and shrinks seasonally in response to humidity changes. In the NC Triad, where summers are humid and winters can bring hard freezes, that combination of thermal and moisture-driven movement is significant. The joint between your chimney and your roof is under constant micro-shearing stress, even on dry, calm days.
This is exactly why the standard chimney flashing system is engineered as two independent pieces, not one:
Each piece is designed to overlap the other while remaining free to shift independently. That overlap is the system’s engineered slip plane — and it’s non-negotiable.
When a repair strategy eliminates that slip plane — by rigidly bonding both pieces together with sealant, for example — it doesn’t fix the problem. It creates a new one. The bond holds briefly, then fractures under movement stress, often opening a gap that’s worse than the original failure. This is the most common reason homeowners find themselves making the same repair call two or three years in a row.

Treating all chimney flashing failures as the same problem is one of the most reliable ways to end up with a repeat leak. An experienced contractor should be diagnosing the type of failure before recommending any repair. Here’s what that distinction looks like in practice:
| Failure Type | What’s Happening | Common Cause | Repair Logic |
|---|---|---|---|
| Adhesion Failure | Sealant or caulk separates from the surface of the brick or metal | Differential movement; incompatible materials; surface contamination at time of application | Remove sealant entirely; address movement accommodation before resealing |
| Cohesion Failure | The sealant or flashing material splits internally, not at the bond line | UV degradation; material age; wrong product used for the application | Replace the failed material; select appropriate product for a dynamic joint |
| Mechanical Failure | Metal is cracked, fasteners have pulled through, or the flashing has physically separated from its anchor point | Metal fatigue from movement cycles; improper fastening; ice dam pressure | Full or partial flashing replacement; address underlying cause (e.g., ice damming) |
| Bypass Failure | Water enters through the masonry itself — above the flashing — rather than through the flashing joint | Deteriorated mortar joints; spalling brick; missing tuckpointing | Masonry repair (tuckpointing) is required before or alongside flashing work |
Bypass failure is particularly worth understanding. If your mortar joints are deteriorating, water can wick into the brick above the counterflashing line and travel down inside the chimney chase, never touching the flashing at all. This is how homeowners end up with “new flashing” that still leaks. The flashing isn’t the problem — the masonry above it is. Any honest diagnostic inspection should assess mortar joint condition alongside the flashing system itself.
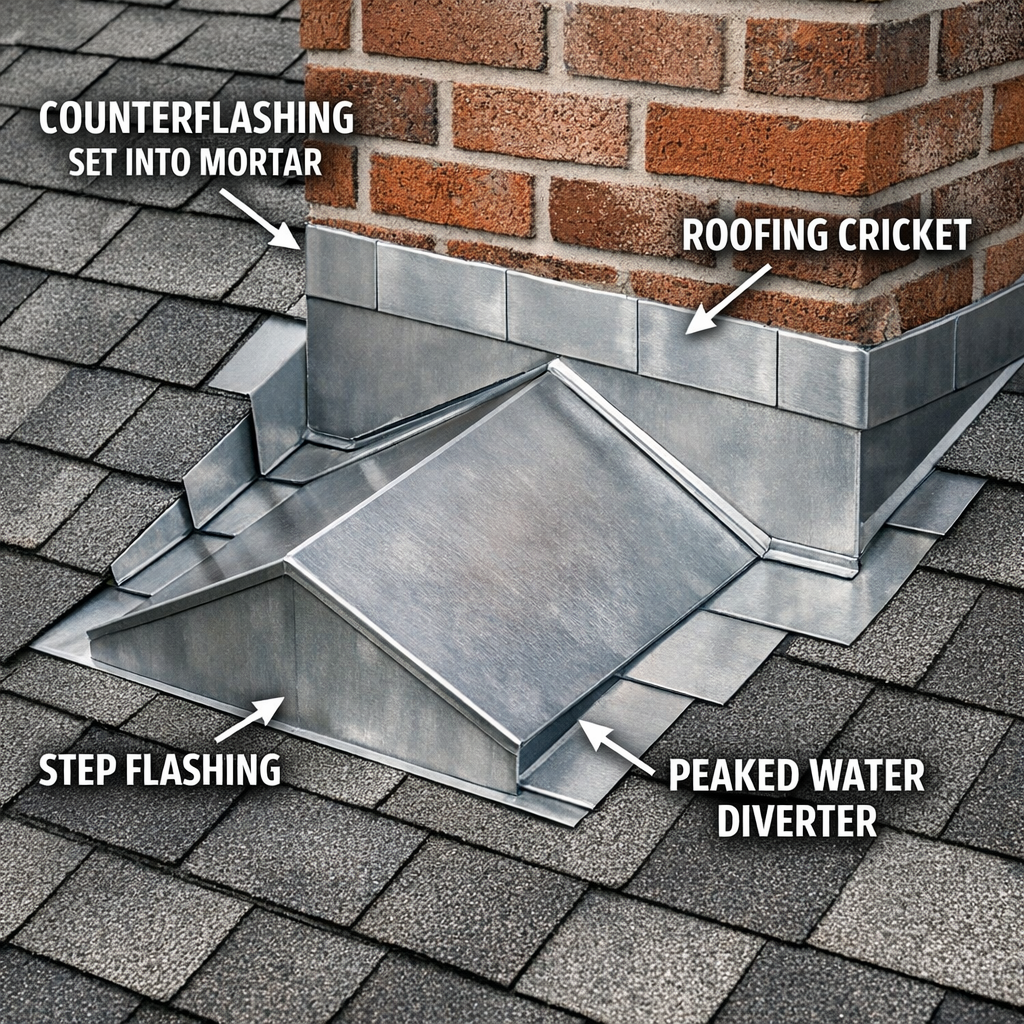
Before you can evaluate a repair, it helps to know what a complete, properly installed chimney flashing system includes. Here’s how the components work together:
On the sloped sides of the chimney, step flashing consists of individual L-shaped metal pieces woven into the shingle courses as they climb the roof. Each piece overlaps the one below it, directing water down and away from the chimney wall. Base flashing on the front (low) side of the chimney diverts water that runs down the chimney face, directing it under the adjacent shingle course.
This integrated weave is why step flashing should never be replaced without also addressing the surrounding shingle courses. Pulling and resetting shingles is part of the job, not an optional extra.
Counterflashing is the cap that overlaps the top edge of the base and step flashing, preventing water from getting behind it. It’s embedded into the chimney’s mortar joints — either in an existing mortar joint or in a saw-cut channel called a reglet.
The industry standard for reglet depth is a minimum of 1.5 inches. Shallow cuts — sometimes done to save time — don’t provide adequate mechanical support for the counterflashing, particularly as the chimney moves seasonally. The method of securing the counterflashing in the reglet also matters: lead wedges allow the flashing to shift slightly with movement while maintaining the seal, while sealant-only retention creates a rigid bond that’s subject to the same cracking cycle we discussed earlier.
On the upslope side of any chimney, water and debris accumulate between the back of the chimney and the roof. For chimneys narrower than 30 inches, this is typically managed with a simple back pan. For chimneys 30 inches wide or wider, the International Residential Code requires a saddle — commonly called a cricket — to divert water around the chimney rather than letting it pool.
That 30-inch threshold isn’t arbitrary. It’s based on the volume of water a wider chimney intercepts during a heavy rain event, which can exceed what standard back flashing is designed to handle, especially on lower-pitched roofs.
What most guides don’t tell you: having a cricket isn’t enough. An undersized cricket — one built at insufficient height relative to the chimney’s width and the roof’s pitch — can actually trap water rather than divert it, speeding up flashing deterioration at the back of the chimney. A properly sized cricket ridge height accounts for chimney width, roof pitch, and the required geometry to shed water cleanly to both sides. If you have an existing cricket and you’re still seeing back-of-chimney leaks, its proportional adequacy is worth evaluating alongside the flashing condition.
Here’s a point that separates a thorough chimney flashing repair from a surface-level patch: the mortar joints surrounding your counterflashing are as important as the flashing metal itself.
As mortar deteriorates — a normal process accelerated by freeze-thaw cycles, which the NC Triad sees regularly between November and March — two things happen that directly affect your flashing system:
Counterflashing loses mechanical support. Even if the metal is in perfect condition, deteriorated mortar allows the flashing to shift and work loose over time.
Water bypasses the flashing entirely. Porous or cracked mortar above the reglet line allows water to wick directly into the brick and travel down inside the chimney, producing leak symptoms that look identical to flashing failure.
A complete repair approach evaluates mortar joint condition before finalizing the scope of work. If tuckpointing is needed, it should be completed as part of the same project — not deferred. Replacing flashing while leaving compromised mortar joints in place is a predictable path to a repeat leak call. For a deeper look at what chimney-related repairs involve in this region, the article Chimney Repair Winston-Salem NC | Don’t Get It Wrong walks through the broader scope of common chimney issues local homeowners face.
When contractors mention copper, aluminum, and galvanized steel as flashing material options, the conversation often stops there. But material selection has functional consequences that are worth understanding.
The most common material used in residential flashing. Durable, cost-effective, and widely available. The protective zinc coating has a finite lifespan, however, and once it’s compromised — through mechanical damage, prolonged moisture exposure, or dissimilar metal contact — the steel substrate corrodes. In the NC Triad’s humid climate, this process is worth factoring into any long-term material decision.
Premium-grade and genuinely long-lasting. Copper develops a protective patina over time that actually improves its corrosion resistance. It’s also softer and more workable than steel, which allows for tighter, more precise fitting at complex angles. For homeowners who plan to stay in their homes long-term and want a flashing system they won’t need to revisit, copper is a legitimate investment.
Lightweight and corrosion-resistant in most applications — but with a specific caveat worth knowing. Aluminum in direct contact with pressure-treated lumber undergoes accelerated galvanic corrosion due to the copper compounds in modern ACQ-treated wood, which is commonly used in roof deck repairs and underlayment framing. If your roofer is using aluminum flashing and there’s any ACQ-treated lumber in the surrounding repair area, this compatibility issue should be addressed with an appropriate barrier or material substitution.
Ice and water shield is a self-adhering waterproof membrane that goes beneath the flashing system, providing a secondary water barrier at this vulnerable penetration point. Every reputable repair guide recommends it. What most don’t explain is where the field failures actually occur.
The critical detail isn’t just how far the membrane extends to each side of the chimney — it’s how the membrane integrates with the shingle courses at its termination edges. Specifically:
Getting this geometry wrong — even by a single shingle course — creates a point where water can travel horizontally beneath the shingles and find the membrane edge. This is a common source of leaks that gets misidentified as a flashing failure, because the entry point isn’t visible from above.
We mentioned earlier that a cricket on the upslope side of the chimney is code-required for chimneys 30 inches wide or wider. But the condition and proportionality of an existing cricket deserves attention on every inspection, not just new installations.
A cricket that was built undersized — or that has settled over time — can create a water dam on the upslope side of the chimney rather than diverting flow to the sides. Signs of an inadequate cricket include:
If any of these are present, evaluating cricket geometry — not just flashing condition — should be part of the diagnostic process.
In homes across the NC Triad, chimney-area leaks during winter or early spring aren’t always caused by flashing failure at all. Ice dam formation at the base of a chimney is a separate but commonly misidentified problem.
Ice dams form when heat escapes through the roof deck near the chimney chase, melting snow that then refreezes at the colder eave — or, in the case of chimney bases, at the cold masonry-to-roof interface. That refreezing water backs up under flashing and shingles, creating leak pathways that have nothing to do with flashing integrity. If you want to understand this process in more detail, the article How to Get Rid of Ice Dams covers the mechanics and remediation options thoroughly.
If you’re experiencing leaks specifically during or shortly after winter weather events, and your flashing appears structurally sound, attic insulation and ventilation near the chimney chase are worth evaluating before any flashing replacement is scheduled. Replacing flashing without correcting the thermal conditions that caused the ice dam will produce the same result the following winter.
This is the kind of diagnostic thinking that separates a contractor who fixes the symptom from one who fixes the problem. At Smithrock Roofing, our approach has always been to understand why a leak is happening before we recommend what to do about it — because homeowners in Kernersville or King shouldn’t have to call us back for the same issue two winters from now.
Pulling this all together, here’s what a complete, properly scoped chimney flashing repair looks like when it’s done right:
A flashing repair is only as durable as the materials used. At Smithrock Roofing, we don’t cut corners on material selection, and we back our work with a 5-year labor warranty alongside manufacturer coverage — because a repair that lasts is the only kind worth doing. You can review the full details of our coverage on our Warranty page.
Homeowners in Winston-Salem, Greensboro, High Point, Clemmons, Rural Hall, King, and Kernersville deal with a specific climate profile: hot, humid summers, moderate winters with regular freeze-thaw cycling, and periodic severe weather that tests every weak point in a roof system. Chimney flashing in this region takes on real thermal and moisture stress across all four seasons.
That local context shapes how we approach every inspection and repair — from material selection that accounts for humidity levels, to diagnostic questions that consider whether a January leak might be ice-dam related rather than a flashing failure. Experience in this specific region matters, and with 60-plus combined years serving these communities, we’ve seen every variation of this problem and what actually fixes it.
If you’re dealing with a chimney leak and want an honest evaluation — not a sales pitch — we’re happy to take a look. You can learn more about our roofing services at https://smithrock-roofing.com/roofing/, or explore our full exterior services at https://smithrock-roofing.com.
As chimney flashing problems evolve alongside aging housing stock and shifting weather patterns in the NC Triad, here are three specific steps worth prioritizing in the year ahead:
1. Schedule a Proactive Flashing Inspection Before Winter Sets In
Freeze-thaw cycling remains one of the most reliable accelerants of flashing deterioration in the Winston-Salem and Greensboro area. Booking a dedicated flashing inspection in late summer or early fall — before temperatures begin to cycle — gives homeowners the lead time needed to address problems before they become emergency repairs. Don’t wait for water stains on the ceiling to confirm what a visual inspection could catch months earlier.
2. Pair Any Flashing Repair With a Mortar Joint Assessment
In 2026, homeowners should treat chimney flashing repairs as a system-level project rather than an isolated fix. Brick mortar deteriorates on its own timeline, and compromised joints adjacent to newly installed flashing will undermine the repair within a few seasons. Requesting a combined evaluation — flashing integrity plus masonry condition — is the smarter scope of work.
3. Verify Contractor Credentials and Warranty Terms Before Work Begins
With increased storm activity bringing more out-of-area contractors into NC Triad markets, homeowners should confirm that any roofing contractor carries current licensing, general liability insurance, and offers a clearly documented labor warranty. A repair backed only by verbal assurance isn’t a repair worth paying for.
If the flashing metal is intact but has separated from the chimney or roofline, a targeted repair may be sufficient. However, if the metal shows significant corrosion, cracking, or deformation — or if the flashing has been coated repeatedly with sealant over the years as a substitute for real repair — replacement is almost always the more reliable outcome. A qualified inspector can distinguish between a flashing that’s worth preserving and one that has simply reached the end of its service life.
Sealant applied over deteriorated flashing is a temporary measure at best. It addresses surface symptoms without correcting the underlying failure — and in many cases it masks the problem long enough for water infiltration to cause secondary damage inside the roof assembly or wall cavity. If you’re using sealant to manage an active leak, treat it as a stop-gap while you arrange a proper inspection, not a finished repair.
The combination of hot, humid summers and moderate but consistent freeze-thaw cycling through winter puts chimney flashing under more varied thermal stress than climates that run consistently cold or consistently warm. Expansion and contraction across that temperature range works on every seam, fastener, and mortar joint over time. Add in the region’s periodic severe weather events and elevated humidity levels, and you have conditions that accelerate deterioration in materials that weren’t installed or selected correctly from the start.
A quality repair using appropriate materials — correctly sized step and counter flashing, properly embedded into reglet cuts, with a cricket installed where the chimney width and pitch require it — should provide many years of reliable service. Material lifespan varies depending on the metal selected, but correctly installed copper or quality galvanized steel flashing routinely outlasts the roofing materials surrounding it. The limiting factor is almost always installation quality, not the material itself.
Homeowners in Winston-Salem and High Point deserve a contractor who understands the specific demands this climate places on a chimney system — not a generalist estimating from a template. Smithrock Roofing brings more than 60 combined years of experience serving the NC Triad, and every flashing repair we do is backed by a clear labor warranty and honest diagnostic work from the first visit. If your chimney is showing signs of water intrusion or you simply want a professional set of eyes on your flashing before the next season arrives, we’re ready to help — Get a Free Estimate.
Smithrock Roofing © Copyright 2026 • All Rights Reserved • Privacy Policy • Maintained by Mongoose Digital Marketing