Most homeowners assume wind damage is obvious. A few shingles blown into the yard, a visible gap on the roof — easy enough to spot, right? The reality is more complicated, and the gap between what you can see from the ground and what’s actually happening on your roof can mean the difference between a simple repair and a much larger problem that develops quietly over the next six months.
Wind doesn’t damage roofs randomly. It follows physics, and your roof’s response to wind depends on far more than just how fast it’s blowing — things like the pitch of your roof, how your shingles were installed, what season they went on, and even which direction your slopes face all play into how your roof holds up under pressure. Understanding those factors doesn’t require an engineering degree, but it does require more than the standard “check for missing shingles after a storm” advice you’ll find almost everywhere else.
This guide is for homeowners who want to actually understand what’s happening — so they can make smarter decisions, ask better questions, and protect their home with confidence.
To understand wind damage, you need a basic picture of what wind does when it hits a house. Air flowing over a pitched roof accelerates as it’s forced up and over the surface. That acceleration creates a drop in pressure on the roof side — lower pressure above, higher pressure inside the attic below. The result is an upward suction force, commonly called uplift, that pulls the roof assembly away from the structure.
This is where the “Bernoulli’s principle” explanation most articles stop. But that’s only the beginning.
The uplift force on your roof is not evenly distributed. Pressure coefficients — the multipliers engineers use to determine actual wind load on a surface — vary significantly depending on where you are on the roof.
The most vulnerable zones are:
What almost no one mentions is how roof pitch interacts with this picture. A low-slope roof (2:12 to 4:12 pitch) generally experiences higher suction on the field because wind flows more parallel to the surface. A steeper roof (8:12 and above) develops higher positive pressure on the windward face and higher suction on the leeward face. The practical takeaway: the damage pattern on your roof can tell a trained eye a great deal about wind direction and intensity — if they know what to look for.
Building height and terrain exposure category also matter. A roof in an open field with no windbreaks is exposed to significantly higher effective wind loads than the same house surrounded by mature trees and neighboring homes, even at identical storm wind speeds.
Here’s something most homeowners — and frankly, a lot of general contractors — don’t fully appreciate: under normal wind loads, the factory sealant strip on an asphalt shingle does as much or more work than the fasteners to hold that shingle down. The nails anchor the shingle to the deck; the sealant strip bonds the overlapping shingle above to the one below, closing off the tab exposure and preventing the wind from getting underneath.
When that sealant bond is intact, the shingle behaves as part of a unified surface. When it isn’t, each shingle tab becomes an independent flap with wind trying to pry it open.
Factory sealant strips require heat to activate. The asphalt-based adhesive needs sustained surface temperatures — generally in the range of 50–70°F depending on the manufacturer — to soften, flow slightly, and create a proper thermal bond to the shingle below. This isn’t a design flaw; it’s intentional chemistry. Under normal conditions, a few weeks of warm weather after installation is all it takes.
But here’s the issue: that activation doesn’t always happen.
Shingles installed in late fall or winter in colder climates often go months before reaching sustained surface temperatures above the activation threshold. And the orientation of the slope matters enormously. A south-facing slope in October will hit that temperature window on the first sunny afternoon. A north-facing slope on the same house, receiving little to no direct sun, may not consistently reach activation temperatures until the following spring — or possibly longer.
This has real diagnostic consequences. If you have a north-facing slope with shingles that haven’t fully sealed, those tabs are more vulnerable to wind uplift from day one. And when a storm comes through and those shingles show evidence of lifting or poor adhesion, it doesn’t automatically mean the storm caused new damage — it may mean the sealant never properly bonded in the first place. This is one of the most commonly misclassified findings in both insurance claims and contractor assessments, and it’s entirely predictable when you know the installation season and the slope orientation.
For homeowners: if your roof was installed between October and March and you have north-facing slopes, it’s worth having a qualified roofer verify sealant adhesion during the first warm-weather inspection season after installation.
Every asphalt shingle manufacturer specifies a nail placement zone — a target band, typically about ¾ to 1 inch wide, where fasteners should be driven. It looks like a small detail. Under wind load, it’s anything but.
High-nailing occurs when a fastener is placed above the specified nail line, up into the exposure zone of the shingle. From the ground — or even from a casual rooftop look — a high-nailed shingle can appear perfectly fine. The problem is mechanical.
When a nail is driven too high, the distance from the fastener to the lower edge of the shingle’s exposed tab increases. Under uplift force, the tab acts as a lever arm pivoting over the nail head. The longer that arm, the greater the mechanical advantage wind has in peeling the tab up. A shingle correctly nailed in a four-fastener application can lose a disproportionate share of its wind resistance from a single high nail, because the moment force at that corner allows partial lifting — which then exposes the nail line of the shingle below.
Low-nailing is the opposite error — fasteners driven through or below the sealant strip. This physically disrupts the adhesive before it has any chance to activate, leaving a gap or puncture in the bond line. Even if the shingle is thermally well-positioned and the weather cooperates, a fastener through the sealant strip compromises the one adhesive connection that resists uplift across the full tab width.
Wind zone requirements in residential construction (governed by ASCE 7 loading standards and applied through the International Residential Code, Table R905.2.6.1) specify minimum fastener counts based on the wind exposure category of the building site. In higher-exposure zones, four fasteners per shingle are required rather than the standard two or three. But those code minimums assume correct nail placement. A four-nail installation where two nails are high and one is through the sealant strip doesn’t deliver the wind resistance of a properly driven four-nail installation — it delivers something considerably less, even though it passes a count-based inspection.
| Nail Placement Error | Primary Failure Mechanism | Wind Damage Pattern | Detectable by Visual Inspection? |
|---|---|---|---|
| High nail (above nail line) | Lever arm effect amplifies tab uplift | Tab lifting at far corner, partial peeling from bottom edge | Rarely — requires probing or knowledge of install records |
| Low nail (through sealant strip) | Sealant strip punctured/disrupted | Poor tab adhesion, lifting without visible fastener damage | No — sealant damage is hidden under overlapping shingle |
| Correct placement, insufficient count | Reduced aggregate holding force | Widespread tab lifting across field exposure | Partially — pattern of uniform lifting may suggest undercount |
| Correct placement, overdriven nail | Fastener head tears through mat | Shingle pulls free over nail head under sustained uplift | Sometimes — look for shingles displaced with intact nail holes |
When a shingle tab lifts and breaks free, the damage doesn’t stop with that one shingle. It starts a mechanical sequence that most storm damage writeups mention but never actually explain.
Here’s what happens:
Step 1: A tab on a marginal shingle — one with poor sealant adhesion, a high nail, or simply located in an edge zone — lifts under uplift pressure. The sealant bond breaks.
Step 2: The lifted tab now exposes the nail line of the shingle immediately below it. That nail line, previously protected and bonded, is now exposed to direct wind pressure.
Step 3: Wind acts on the exposed nail line of the lower shingle as a new secondary lever arm. That shingle’s sealant strip — previously intact — is now under load it was never designed to handle alone. It begins to fatigue.
Step 4: The second shingle lifts or loses adhesion. The process repeats downslope.
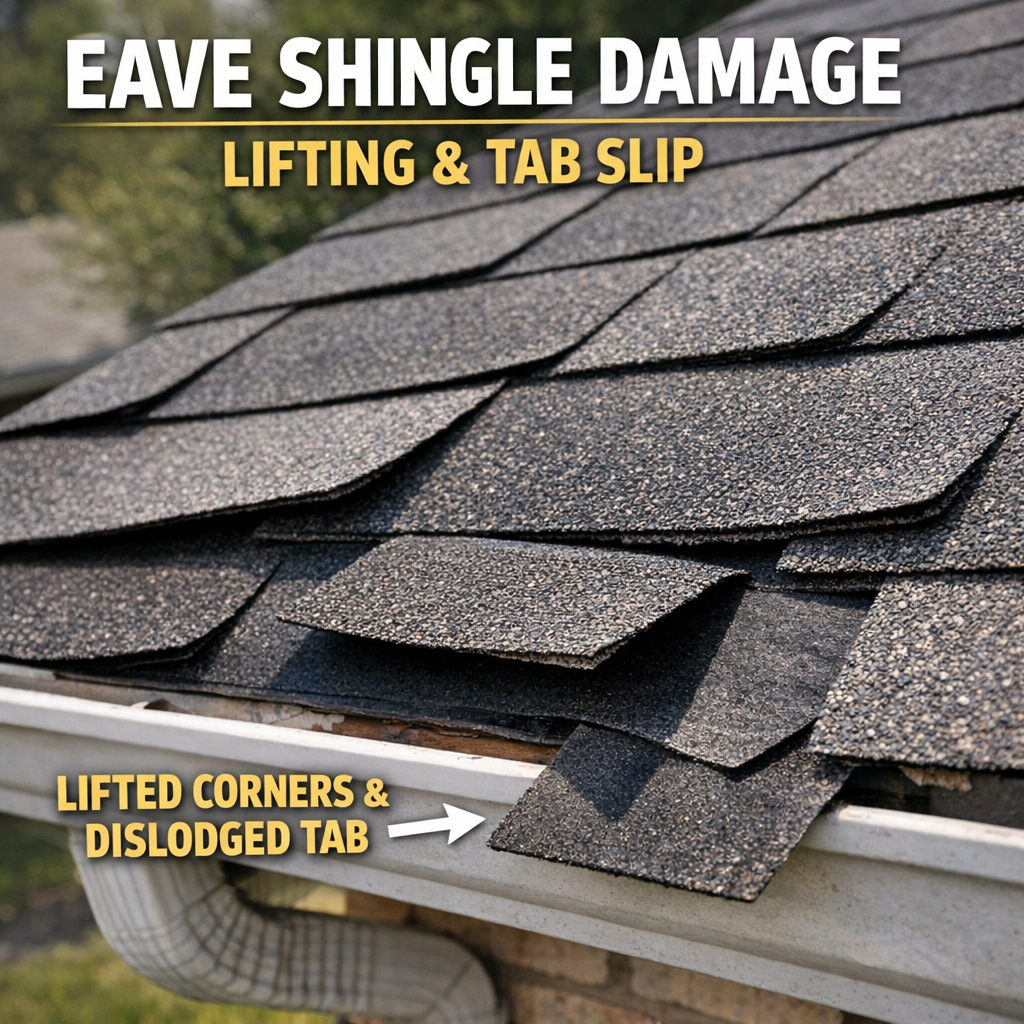
This is why one missing shingle in an eave zone, left unrepaired, can become five or ten missing shingles by the next storm — even a much weaker one. The first failure removed the mechanical protection that was keeping the next shingle in place. The roof has become progressively more vulnerable in a way that isn’t visible until the next event produces damage that looks far out of proportion to the storm’s actual intensity. For a deeper look at how progressive wind damage unfolds on residential roofs, the article The Silent Threat: Understanding Wind Damage to Your Home’s Roof covers the broader patterns homeowners should know.
This is one of the most contentious and least-discussed points in the entire wind damage conversation, and it affects nearly every insurance claim involving shingles.
There are two distinct conditions a shingle can be in after a wind event:
Functionally compromised but not yet leaking: The sealant bond has been broken, the tab has been flexed or partially lifted, but the shingle is still physically present and still sitting over the water-shedding surface below. Water isn’t getting in right now. But that shingle is no longer performing its design function — it’s a flap waiting for the next rain event or the next wind to complete the failure. A roofer who knows what they’re looking at will identify this; a quick visual drive-by will not.
Actively losing water-shedding capability: The shingle is missing, torn, or displaced to the point where underlayment or deck is exposed. Water intrusion is imminent or already occurring.
Insurance policies and adjusters often treat the first condition as “cosmetic” or “pre-existing” and the second as a covered loss. The problem is that the first condition is frequently a direct mechanical result of the same storm — the sealant was broken by wind-induced flexing, the shingle simply didn’t fly off. Leaving it unaddressed converts a covered wind damage event into an uncovered maintenance failure over the following months.
When you’re documenting damage after a storm, don’t only photograph missing shingles. Photograph lifted corners, creased tabs, and shingles that have clearly been disturbed from their original position. That documentation establishes the condition as storm-related, not age-related or maintenance-related. If you’re navigating the claims process, the article Don’t Get Ripped Off: The Essential Steps for Your Roof Insurance Claim walks through exactly what homeowners need to do to protect their position.
Here’s something almost no one tells homeowners or adjusters: the time of day and ambient temperature when you inspect a roof after a storm directly affects what you’ll find.
Asphalt shingles are not rigid materials. They soften as temperatures rise. On a south or west-facing slope on a summer afternoon with surface temperatures above 150°F — entirely normal on a dark shingle in direct sun — the asphalt matrix becomes pliable enough that shallow creases can partially flow closed. A crease that was clearly visible at 8 AM in 60°F temperatures may be nearly undetectable at 2 PM in 95°F heat.
This has been documented in forensic roofing research: wind-induced creases in newer, more pliable shingles sometimes required tactile probing — physically running a hand across the surface — to detect, rather than visual inspection alone. ASTM D3161, the standard laboratory test for wind resistance of shingles, is conducted in controlled temperature conditions. Field inspections after real storms are not.
An adjuster or roofer who shows up on a July afternoon and declares the roof undamaged after a major wind event hasn’t necessarily done a complete assessment — they may simply have inspected at the wrong time. Understanding how to start the roof inspection process can help homeowners know what a thorough assessment should actually look like.
Most articles point out that architectural (dimensional) shingles perform better in wind than three-tab shingles. That’s true as far as it goes. But the reasons matter, and the comparison is more nuanced than the standard “architectural shingles are thicker and heavier” explanation.
| Factor | Three-Tab Shingles | Architectural/Dimensional Shingles |
|---|---|---|
| Wind resistance rating | Typically 60–70 mph (standard) | 110–130 mph; premium lines rated to 150 mph |
| Tab structure | Three independent tabs, each with its own exposed free edge | Laminated layers — upper laminate reduces free-edge exposure |
| Sealant strip coverage | Single sealant line, one per tab | Multiple sealant points across wider laminate surface |
| Lever arm vulnerability | High — long, flat tab creates significant lever arm | Lower — dimensional profile disrupts uniform uplift |
| High-nail sensitivity | Very high — thin single layer amplifies lever arm problem | Moderately high — laminated thickness helps, but nail placement still critical |
| Post-storm crease visibility | Higher — thinner material creases more permanently | Lower — thicker material can recover from minor flex events |
| Chain reaction risk | Higher — simpler overlap means one lost tab exposes more nail line | Lower — laminate construction partially compensates for adjacent tab loss |
| Sealant activation sensitivity | Moderate | Moderate — same thermal window applies, but more sealant contact area helps |
The practical conclusion isn’t just “architectural shingles are better.” It’s that architectural shingles reduce vulnerability at multiple points in the failure chain simultaneously — sealant coverage, lever arm geometry, and cascade risk. That combination is why the performance gap is larger than shingle weight alone would predict.
The roofing industry is entering a period of accelerated change — storm intensity is increasing, insurance documentation requirements are tightening, and diagnostic technology is becoming more accessible to homeowners. Three specific steps position you ahead of those shifts.
Ground-level and even ladder-based inspections miss the subtler signs of wind damage that ultimately lead to failure: micro-lifting at tab edges, sealant separation that hasn’t yet produced visible gaps, and high-nail patterns invisible from below. Drone inspection services with high-resolution imaging are now widely available and can document your roof’s condition in a format that is directly useful for insurance claims. Schedule one before peak storm season — not after an event — so you have a verified baseline.
If you are re-roofing in 2026, ask your contractor to document not just the product’s rated wind speed but the full installation requirements that make that rating valid: nail pattern, nail gauge, starter strip specification, and hip-and-ridge cap method. The Fortified Roof™ program administered by the Insurance Institute for Business & Home Safety (IBHS) provides a third-party verification framework that some insurers now recognize for premium adjustments. Even if you don’t pursue full Fortified designation, aligning your installation with those standards closes the gap between a shingle’s rated performance and its real-world performance.
Attic pressure dynamics directly influence how wind uplift loads transfer to the roof deck and sheathing connections. Blocked or unbalanced ventilation creates differential pressure conditions that amplify wind load on the shingle layer. In 2026, building envelope diagnostics — including blower-door testing adapted for attic systems — are accessible through energy auditors and some roofing contractors. Adding this audit to your regular maintenance cycle addresses a failure driver that shingle upgrades alone cannot solve.
Wind damage does not always produce missing shingles. Look for creasing or buckling along tab edges, sealant strips that have separated (the shingle lifts slightly when gently pressed), granule loss concentrated near the tab edges rather than uniformly across the surface, and any shingle that lies noticeably flatter or at a slightly different angle than its neighbors. These signs indicate sealant bond failure or structural compromise that will worsen with the next wind event even though the shingle is technically still in place.
No. A manufacturer’s wind speed rating is achieved under controlled laboratory conditions and depends on full compliance with specific installation requirements — correct nail placement, correct nail gauge, proper sealant activation, and compatible starter strips. In real-world installations, deviations from any of those requirements can reduce actual performance well below the rated figure. A shingle rated to 130 mph installed with high-nailing or without adequate sealant activation may fail at significantly lower wind speeds. The rating is a ceiling achievable under ideal conditions, not a guaranteed performance threshold.
High-nailing refers to placing fasteners above the designated nailing zone marked on the shingle — typically above the sealant strip rather than through it. When a nail is placed too high, it no longer anchors the tab effectively because the mechanical advantage of wind uplift (the lever arm from the free tab edge to the fastener) increases significantly. The tab can rotate upward around the high nail as a pivot point, breaking the sealant bond and eventually tearing free. High-nailing is one of the most common installation errors and one of the most consequential for wind performance, yet it is invisible once the next course of shingles is laid over it.
Aerodynamic pressure is not uniformly distributed across a roof. Building science and wind engineering research consistently show that corners, eaves, and ridges experience significantly higher uplift pressures than field areas — sometimes two to three times higher. This occurs because wind accelerates as it flows around and over roof edges, creating localized low-pressure zones that generate strong suction. Shingles in these zones are subjected to forces well above what the field of the roof experiences in the same storm, which is why those areas require enhanced fastening and why failure there is often the first visible indicator of a broader installation or material vulnerability.
That decision depends on the extent of damage relative to your deductible and the long-term implications of the specific damage present. However, one important consideration is documentation: even if you choose not to file immediately, having a professional inspection performed and the damage documented creates a timestamped record that can be valuable if damage progresses or if a future storm causes additional loss. What appears to be minor wind damage — a few displaced tabs, minor sealant separation — can represent systemic vulnerability that accelerates in subsequent storms. A documented inspection ensures your options remain open.
A functional three-tab roof that is performing well and was installed correctly does not require immediate replacement solely to upgrade wind resistance. The case for upgrading strengthens under specific conditions: if the existing installation shows signs of improper fastening, if your area has experienced increasing storm frequency or severity, if your insurer has changed wind damage coverage terms, or if the roof is approaching the midpoint of its service life and re-roofing planning is already underway. The performance gap between three-tab and architectural shingles is real and meaningful, but the decision should be based on a full assessment of your current roof’s condition and your local risk environment rather than on material comparison alone.
Wind damage to shingles is rarely a single-event failure. It is the cumulative result of material selection, installation precision, roof geometry, and maintenance history intersecting with storm conditions. Understanding where in that chain your roof is most vulnerable — whether at the sealant bond, the fastener placement, the perimeter zones, or the ventilation balance — is what separates a reactive repair cycle from a genuinely resilient roof system.
If your roof has experienced a recent wind event, shows any of the early warning signs discussed in this article, or has not been professionally inspected within the past few years, the most practical next step is a documented professional assessment before the next storm season begins.
Smithrock Roofing © Copyright 2026 • All Rights Reserved • Privacy Policy • Maintained by Mongoose Digital Marketing