A ceiling leak has a way of stopping everything. One moment you’re going about your day, and the next you’re staring at a spreading stain, a dripping seam, or a bubble of trapped water sagging toward the floor. The panic is understandable — and it’s exactly why most homeowners grab their phone and start calling people before they have a clear picture of what’s actually happening.
Here’s the honest truth: the most expensive mistake you can make with a ceiling leak isn’t waiting a few hours to act. It’s calling the wrong professional first. A plumber who finds no burst pipe, a roofer who sees no obvious roof damage, and a second appointment two weeks later — that cascade costs real money and lets water keep doing damage in the meantime.
This guide is built around closing that gap. We’ll walk you through how to read a ceiling leak’s behavior, why the drip point almost never marks the actual source, and how to triage the situation intelligently before anyone picks up a tool. The goal isn’t just to stop the water — it’s to understand it well enough to solve the problem the first time.
Every guide on ceiling leaks tells you to identify the source. What almost none of them tell you is why that’s genuinely difficult — and what makes it so easy to get wrong.
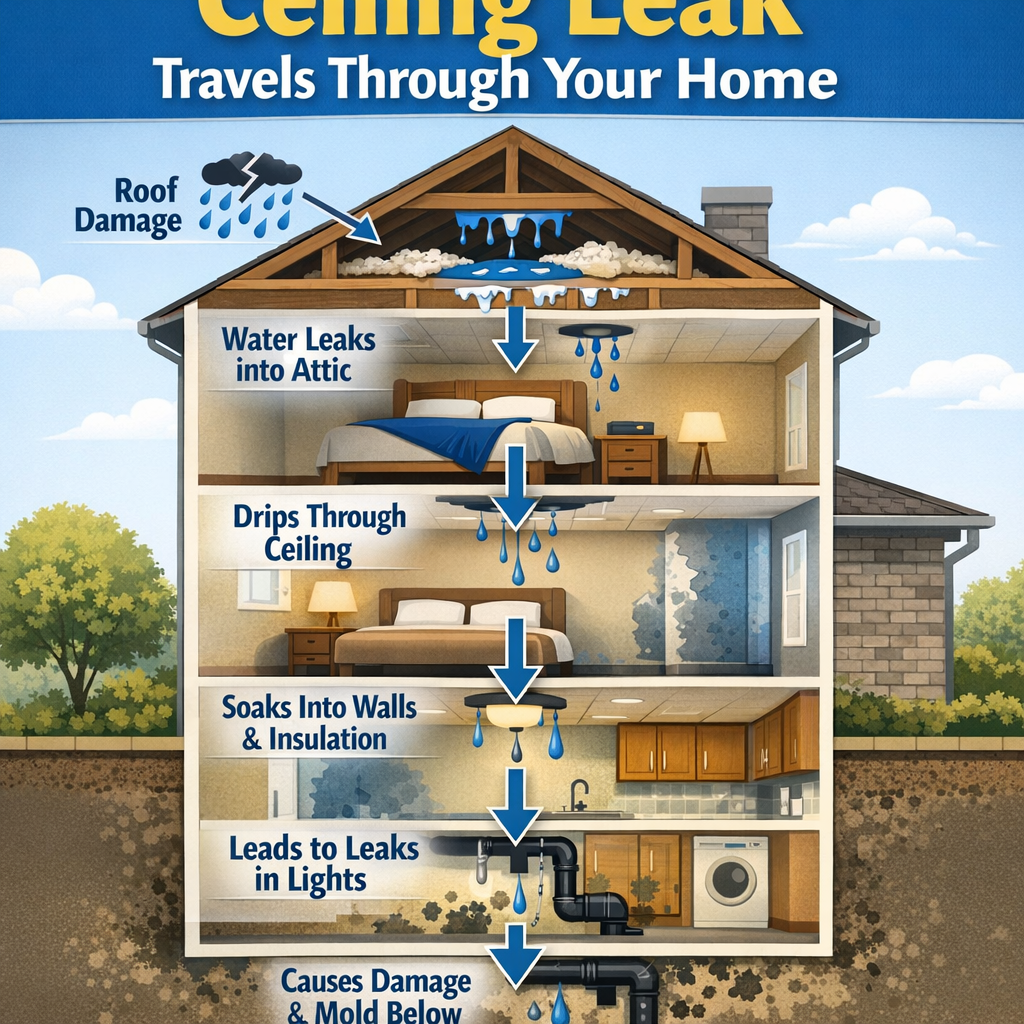
Water does not fall straight down through a structure. The moment moisture enters your home through a breach in the roof, a failed pipe fitting, or an overflowing HVAC condensate pan, it immediately starts following the path of least resistance. That means it travels along roof sheathing on a diagonal, wicks down pipe insulation before dripping off at a fitting several feet below, pools at low points in vapor barrier seams, and runs along joists horizontally before finally letting go somewhere that has nothing to do with where it entered.
Among experienced roofing contractors and home inspectors, there’s a working rule of thumb that rarely makes it into homeowner-facing content: the visible drip point and the actual source are typically displaced by 4 to 6 feet — and in multi-story homes, the entry point can be an entire room away from where the ceiling stain appears.
This is the single most important physical reality of ceiling leaks, and it explains why so many DIY source-finding attempts fail. If you go into your attic and look directly above the stain, you may find perfectly dry insulation. The actual breach — a lifted shingle, a cracked piece of step flashing, a loose pipe collar — could be several rafter bays to the left, or on the opposite pitch of the roof entirely.
When investigating from above, treat the visible stain as a starting point, not a destination. Expand your inspection radius to at least 4 to 6 feet in every direction before drawing any conclusions.
The most practical thing you can do before calling anyone is to observe when and how the leak behaves. Leak behavior is diagnostic. A leak that appears six hours after rain stops tells a completely different story than one that shows up only when the upstairs shower runs. Getting this right means you call the right professional first — and that alone can save you significant time and frustration.
Use this framework as your first triage step:
| Leak Behavior Pattern | Most Likely Source | Secondary Possibility |
|---|---|---|
| Appears only during or immediately after rain | Active roof breach or failed flashing | Clogged gutter overflow soaking fascia |
| Appears 6–24 hours after rain stops | Slow roof infiltration through insulation | Ice dam melt in winter months |
| Appears with no rain, below a bathroom or kitchen | Wax ring, supply line, or drain failure | Shower pan liner failure |
| Appears only in morning hours | HVAC condensate overflow or blocked drain line | Attic condensation drip from temperature swing |
| Appears after freezing temperatures | Frozen pipe burst | Ice dam formation at eaves |
| Steady drip with no correlation to weather or fixture use | Supply line pinhole leak | Slow joint failure at a fitting |
| Appears during or after high humidity periods | HVAC condensate line blockage | Attic humidity saturation dripping through insulation |
Take note of timing, weather conditions, and which fixtures (if any) were in use when the leak appeared. Even a few observations over 24 to 48 hours can dramatically narrow the field before you pick up the phone.
One source that gets chronically under-diagnosed in ceiling leaks is a blocked HVAC condensate drain line. This is worth its own mention because it consistently mimics a roof leak — it often appears in upper-level ceilings or near the attic, tends to worsen during humid weather, and leaves no obvious pipe connection for a homeowner to associate it with.
Every central air conditioning system produces condensate water as it dehumidifies the air. That water drains through a condensate line. When that line gets clogged — which happens gradually as algae and debris accumulate — the overflow pan beneath the air handler fills and eventually spills over. The result looks exactly like a slow roof leak, and it’s one of the main reasons homeowners cycle through a plumber visit and a roofing inspection before finding the real answer.
If your ceiling leak behaves like a roof leak but your roofer comes back clean, ask about your HVAC system. Check whether the air handler has an accessible overflow pan, and look for standing water or moisture staining around it. This simple check step can short-circuit a long and expensive diagnostic process.
Here’s something that almost never appears in standard ceiling leak guidance: the construction type of your ceiling directly affects how quickly the situation becomes dangerous, how water behaves once it gets inside, and what repair approach makes sense. Treating all ceiling leaks identically because you assume drywall is a mistake that can lead to structural surprises.
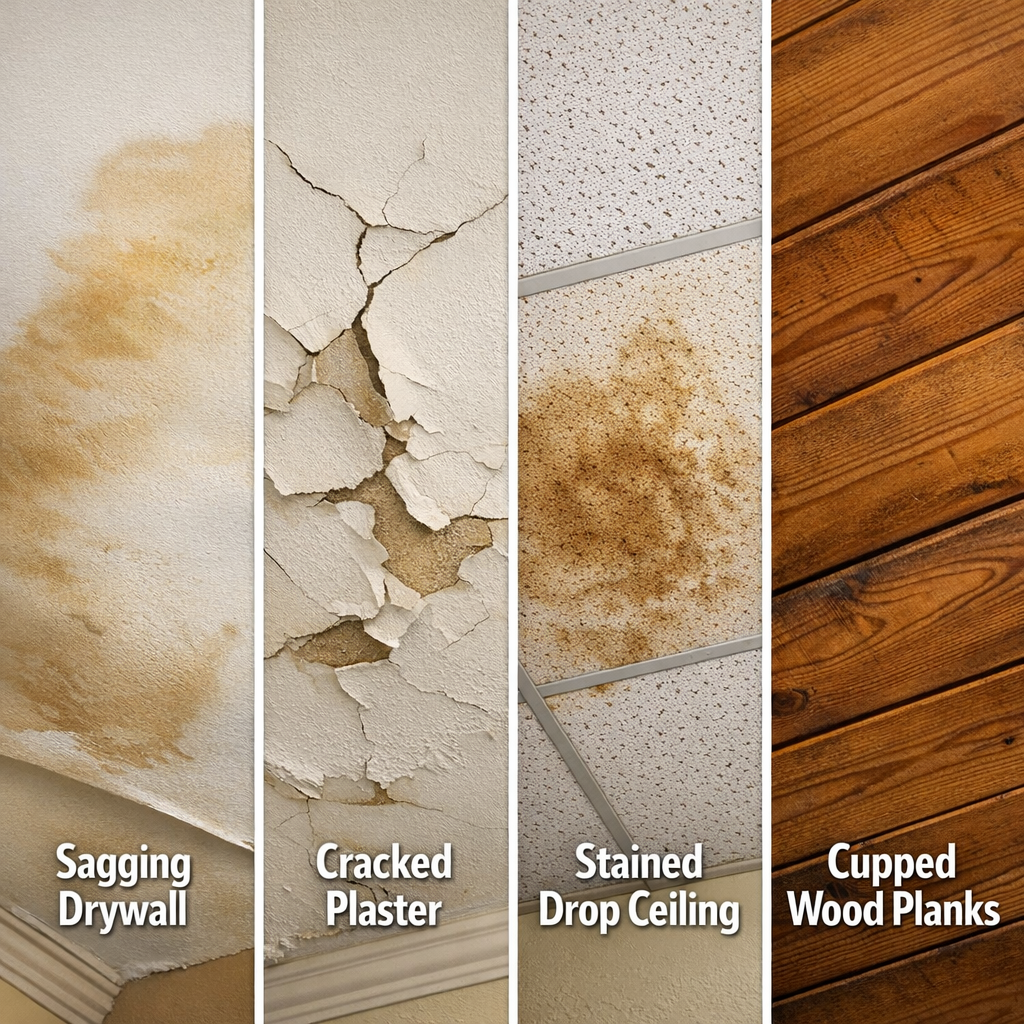
Drywall is the most common ceiling material in homes built or remodeled after the 1970s. It absorbs water rapidly and loses structural integrity quickly once saturated. A visible sag can develop within hours of significant moisture exposure, and once drywall begins to bow, it needs to be replaced — not dried in place. Drying saturated drywall in place causes permanent warping and creates a mold-harboring environment within the paper facing that no amount of surface treatment fully addresses.
If your drywall ceiling is bulging and holding water, it’s safer to puncture the lowest point with a screwdriver to release the trapped water in a controlled way than to wait and risk a sudden collapse. Have buckets ready.
Older homes — particularly those built before the 1950s — commonly have plaster ceilings over wood lath strips. Plaster is initially more water-resistant than drywall, but its failure mode is more dangerous. Plaster bonds to lath through small keys that interlock with gaps in the lath strips. When moisture penetrates and those keys degrade, the plaster delaminates — and it can do so suddenly, without the gradual sagging warning you get with drywall.
Plaster weighs significantly more per square foot than drywall. A section of plaster ceiling that lets go without warning is a serious safety hazard. If you see bulging or hear a hollow sound when you tap a plaster ceiling, treat it as urgent and keep people out of the area until it can be properly assessed.
Drop ceiling tile systems are common in finished basements and commercial-style renovations. The good news is that suspended tiles act like an early warning system — they stain and sag visibly before damage reaches the structural ceiling above. The tiles themselves are inexpensive and straightforward to replace.
What gets overlooked is the metal grid framework that holds the tiles. Extended exposure to moisture causes the grid channels to rust, which can compromise the integrity of the entire suspended system even after the leak source is repaired. If a ceiling tile leak has been ongoing for a while, inspect the grid hardware carefully before assuming a simple tile swap is the whole fix.
Wood plank ceilings are the most resistant to immediate collapse under moisture exposure, but they’re often the most deceiving. The boards may remain structurally sound while black mold penetrates deeply into the grain, or while cupping and warping develop in ways that require full board replacement regardless of how the surface looks. If water has reached a wood tongue-and-groove ceiling, a surface inspection isn’t enough — the boards need to be assessed for moisture content and mold presence before concluding the damage is minimal.
The “mold can grow in 24 to 48 hours” warning appears in nearly every ceiling leak article online. What those articles don’t do is tell you how to actually use that information.
The 24 to 48 hour figure applies to active mold colonization under warm, moist conditions. It matters most in the first hours after a sudden, significant water event — a burst pipe, a major roof breach during a storm, a catastrophic HVAC overflow. In those situations, the clock is real and aggressive drying is genuinely time-sensitive.
But if you’re looking at a ceiling stain that’s been slowly developing over weeks or months, the 24 to 48 hour warning is no longer a prevention tool. You’re past that window. The question shifts from “how do I prevent mold” to “how do I assess whether mold is already present.” Musty odor, visible dark spotting at the stain margins, and worsening air quality in the room are all indicators that the situation has moved from water damage into mold remediation territory.
The EPA standard commonly referenced by professional restoration contractors puts 10 square feet as the threshold. Mold growth covering less than 10 square feet may be addressable by a careful and properly equipped homeowner. Growth beyond that threshold — or any growth that involves HVAC components, wall cavities, or structural framing — warrants professional remediation. This is a specific, actionable standard, and it’s the one to use when deciding whether to handle cleanup yourself or bring in a professional.
One of the most frustrating — and financially draining — ceiling leak scenarios is what happens when the source doesn’t fall neatly into a single trade’s domain. A homeowner calls a plumber. The plumber checks every accessible pipe and finds nothing. A roofer is called. The roofer sees no obvious breach. Two service visits, two fees, and the ceiling is still dripping.
This pattern is more common than most people realize, and it happens because the actual source — a cracked pipe collar around a plumbing vent stack, a failed piece of step flashing at a chimney transition, a saturated soffit from a gutters backup — sits at the intersection of what different trades look for. No one professional owns the whole picture.
There are also important distinctions around what each licensed trade is actually authorized to repair. A plumber is licensed for pipe work. A roofer is licensed for roof systems. Neither is typically licensed for the structural carpentry involved in opening a ceiling cavity, cutting through framing, and restoring the finished surface. That work falls under general contractor licensing, and it’s a coordination gap that homeowners rarely know to anticipate.
When a ceiling leak resists easy attribution — when one professional comes back without a clear answer — the most efficient next step is often a licensed home inspector or an experienced general contractor who can assess the building system as a whole rather than looking only at their trade’s components.
Working with a roofing contractor who also handles gutters and exterior systems, for example, means a single set of eyes can assess whether a roof breach, a flashing failure, a soffit gap, and a gutter overflow are working together to create the problem — rather than having each trade look at their piece in isolation and come back clean.
Ceiling leaks are increasingly complex diagnostic challenges, and the tools and strategies available to homeowners and professionals have meaningfully improved. Three specific next steps stand out as worth prioritizing heading into 2026.
1. Commission a Thermal Imaging Inspection Before Opening Walls or Ceilings
Infrared thermography has become more accessible and more accurate than it was even a few years ago. A licensed inspector using a thermal imaging camera can detect temperature differentials caused by moisture intrusion without a single cut into drywall. This is especially valuable in cases where the drip point and the actual source are separated by several feet of ceiling cavity — which is more common than most homeowners expect. Requesting thermal imaging as the first diagnostic step, rather than an afterthought, saves time, reduces unnecessary damage, and produces a visual record that is useful for insurance documentation.
2. Use a Single General Contractor as the Coordinating Point of Contact
Given the multi-trade coordination problem described above, the most efficient approach in 2026 is to engage a licensed general contractor as the project lead before any trade-specific work begins. The GC’s job is to understand the full scope — roof system, structural framing, plumbing penetrations, insulation, and finished surfaces — and to sequence the work across licensed subcontractors. This eliminates the scenario where a plumber and a roofer each come back clean while the leak continues, because no single professional was responsible for the whole picture. It also ensures that when walls or ceilings are opened, the restoration work is part of the same contract rather than an afterthought requiring a separate hire.
3. Request Written Moisture Documentation Before and After Any Repair
Moisture meters are standard equipment for any qualified water damage or restoration contractor. Before any ceiling leak repair is closed up, request a written report showing baseline moisture readings at the affected area and adjacent structural materials. After the repair is complete and sufficient drying time has passed, request a follow-up reading confirming the moisture content has returned to an acceptable range. This documentation protects homeowners from the scenario where a repair is sealed over damp framing or insulation — creating conditions for mold growth that won’t be visible for months. It also provides a record that is materially useful if an insurance claim or a dispute with a contractor arises later. For additional guidance on navigating roof-related insurance claims, the article Don’t Get Ripped Off: The Essential Steps for Your Roof Insurance Claim covers the documentation and notification process in detail.
Water travels along framing members, insulation batts, and vapor barriers before it finds a low point and drips through the ceiling surface. This means the entry point can be several feet — sometimes many feet — away from where you see the stain or the drip. The most reliable way to locate the true source without opening large sections of ceiling is a thermal imaging inspection performed by a licensed home inspector or a certified moisture remediation contractor. Infrared cameras detect the temperature differential created by wet materials and can map the moisture pathway from the drip point back toward the entry. A plumber’s inspection and a roofer’s inspection may both come back clean because neither trade is looking at the full pathway — which is why a whole-building assessment is often necessary when the source isn’t immediately obvious.
Not every ceiling leak requires immediate emergency response, but the window for treating it as a non-urgent problem is narrower than most homeowners assume. The critical threshold is roughly 24 to 48 hours — that is the period after which wet organic materials like wood framing, drywall paper, and insulation create conditions favorable for mold colonization. If the leak is active and the ceiling is visibly wet, sagging, or bowing, it should be treated as urgent: wet drywall can fail structurally and come down with little warning, and a sagging ceiling is a sign of significant water accumulation above. If the leak appears to have been slow and historical — a stain without active moisture — you have more time to schedule a diagnostic inspection, but it should still be addressed within days, not weeks, to rule out ongoing hidden moisture damage.
The most useful diagnostic question is whether the leak correlates with rain or weather events, or whether it appears independently of weather. A roof-sourced leak — whether from a failed shingle, a cracked flashing, a compromised pipe boot, or a gutter overflow — will almost always have a relationship with precipitation. You may notice the drip during a storm or in the hours immediately after. A plumbing-sourced leak tends to be more consistent and weather-independent: it may appear after someone takes a shower, after the dishwasher runs, or with no obvious event trigger at all. Condensation from an HVAC system or a poorly insulated duct can also produce ceiling staining that looks like a roof or plumbing leak but follows its own seasonal pattern. Keeping notes on when the leak appears — and what happened in the building just before — is one of the most useful things a homeowner can do before a professional inspection.
Contact your insurer as soon as you have confirmed that active water damage is present — do not wait until you know the full source or scope. Most homeowner’s policies require prompt notification of a loss, and delaying the call can complicate a claim even if the underlying damage is covered. When you call, document the conversation: write down the date, time, and the name of the representative you spoke with. Before any contractor opens walls or ceilings, ask your insurer whether they require an adjuster visit first. Many policies cover sudden and accidental water damage but exclude damage resulting from long-term neglect or gradual leaking — a distinction that makes early documentation of when you first noticed the problem genuinely important. Photographs and written notes taken on the day you discover the leak are your most valuable assets if a coverage dispute arises later.
The honest answer depends on which part of the problem you are addressing. Placing a bucket, removing standing water from a ceiling cavity, and drying out the affected area are reasonable self-help steps that do not require a license. Replacing a section of damaged drywall — once the source is confirmed repaired and moisture levels are verified — is within the skill range of a capable DIYer. However, repairing the source of the leak is a different matter. Roof work involving flashing, pipe boots, or structural sheathing carries fall risk and requires knowledge of building envelope systems. Plumbing repairs typically require a licensed plumber under most state and local codes. Any work touching structural framing generally falls under general contractor or carpentry licensing requirements. The practical guidance is this: limit DIY involvement to containment and surface restoration, and use licensed professionals for the source repair and any work that opens into building structure.
Drying time depends on how much water entered the building, how long it was present before the leak was addressed, what materials are involved, and the ambient conditions during the drying period. Drywall that absorbed a relatively small amount of water in a well-ventilated space may reach acceptable moisture levels within several days when aided by fans and a dehumidifier. Framing lumber, insulation, and subfloor materials that have been wet for an extended period can take weeks to dry fully, and in some cases the most saturated materials need to be removed and replaced rather than dried in place. The only reliable way to know when materials are actually dry — rather than just dry on the surface — is to use a calibrated moisture meter and verify that readings have returned to the normal range for that material type. Do not close up a ceiling repair over materials that have not been independently verified as dry.
A ceiling leak is rarely just a ceiling problem. It is a building systems problem — one that involves the interaction of the roof, the structure, the mechanical systems, and the finished living space, and one that demands a clear-eyed approach to diagnosis before any repair work begins. The homeowners who navigate these situations most successfully are the ones who resist the pressure to patch the visible damage before the source is confirmed, who document methodically from the moment they notice the problem, and who understand when the complexity of the situation calls for professional coordination rather than a single-trade fix.
If your ceiling is showing signs of water intrusion — whether that is an active drip, a growing stain, or a soft spot in the drywall — the time to act is now, before the problem compounds into something larger. For a closer look at what active roof leak repair involves and what to expect from the process, that resource covers the full scope from diagnosis through restoration. Contact Us to get a whole-building assessment from a team that understands how roofing, exterior systems, and building structure work together — and how to find the source the first time.
Smithrock Roofing © Copyright 2026 • All Rights Reserved • Privacy Policy • Maintained by Mongoose Digital Marketing