
Asphalt shingles remain the most common residential roofing material across the country for a straightforward reason: when every layer is installed correctly and in the right sequence, the system sheds water with remarkable reliability for decades. The challenge is that a proper installation involves far more than nailing shingles to a deck. It is a layered system where each component depends on the one beneath it, and where the order of operations is governed by a single physical principle that most installation guides introduce and then quietly abandon. Understanding how that principle works, and where it becomes complicated, is what separates a roof that performs for 30 years from one that starts showing problems in five.
This guide walks through the full installation sequence, explains the reasoning behind the decisions that installers make, and gives you the knowledge to evaluate the quality of any roofing proposal, whether you are in Winston-Salem, Greensboro, High Point, Kernersville, Clemmons, Rural Hall, King, or anywhere across the NC Triad.
Before touching a single component, it helps to understand why roofing systems are built the way they are. Asphalt shingles shed water through gravity. Water flows downhill, so every layer in the system is lapped over the layer below it, the same way fish scales overlap. The upper piece always covers the edge of the lower piece. This is the overlapping principle, and it is not just a description of how shingles look. It is a decision engine you can use to understand every installation sequence and every exception.
Here is where most guides stop. They state the principle and then describe each component as if it stands alone. What they miss is that the overlapping principle also explains the exceptions, including the ones that appear to contradict it.
Wind-driven rain does not travel straight down. It moves at an angle, and in some situations it moves nearly horizontally. When water is driven by wind rather than gravity alone, the same overlapping logic still applies, but the direction shifts. Think of wind as horizontal gravity. Any edge where wind can drive water upward or laterally needs to be lapped in the opposite direction from what pure gravity would require. Keep this in mind, and the most confusing parts of a shingle installation begin to make sense.
Everything starts at the decking. Most residential roofs use oriented strand board or plywood sheathing, and before any waterproofing material goes down, the deck needs to be structurally sound, flat, and dry. Soft spots, rot, and protruding fasteners all compromise the layers above them. A good installer walks the deck, probes for soft areas, and replaces damaged sections before proceeding. Skipping this step is one of the most common ways a roofing job fails long before the shingles wear out.
Drip edge is a metal flashing profile installed along the roof’s perimeter. Its job is to direct water that reaches the edge of the roof away from the fascia and into the gutter rather than allowing it to wick behind the trim. The installation sequence for drip edge is one of the most misunderstood details in residential roofing, and getting it wrong is surprisingly easy.
At the eaves (the horizontal lower edges), drip edge goes under the ice and water protector and underlayment. Water at the eave flows downward, so the overlapping principle applies in the standard direction: the membrane on top sheds water onto the drip edge below it.
At the rakes (the sloped side edges), drip edge goes over the underlayment. This reversal is deliberate. Wind striking a gable end drives rain up the rake edge and beneath anything that does not cover it from above. The drip edge at the rake must lap over the underlayment so that wind-driven water is directed away from the edge rather than channeled beneath the membrane. It is the same principle applied to a different direction of water travel.
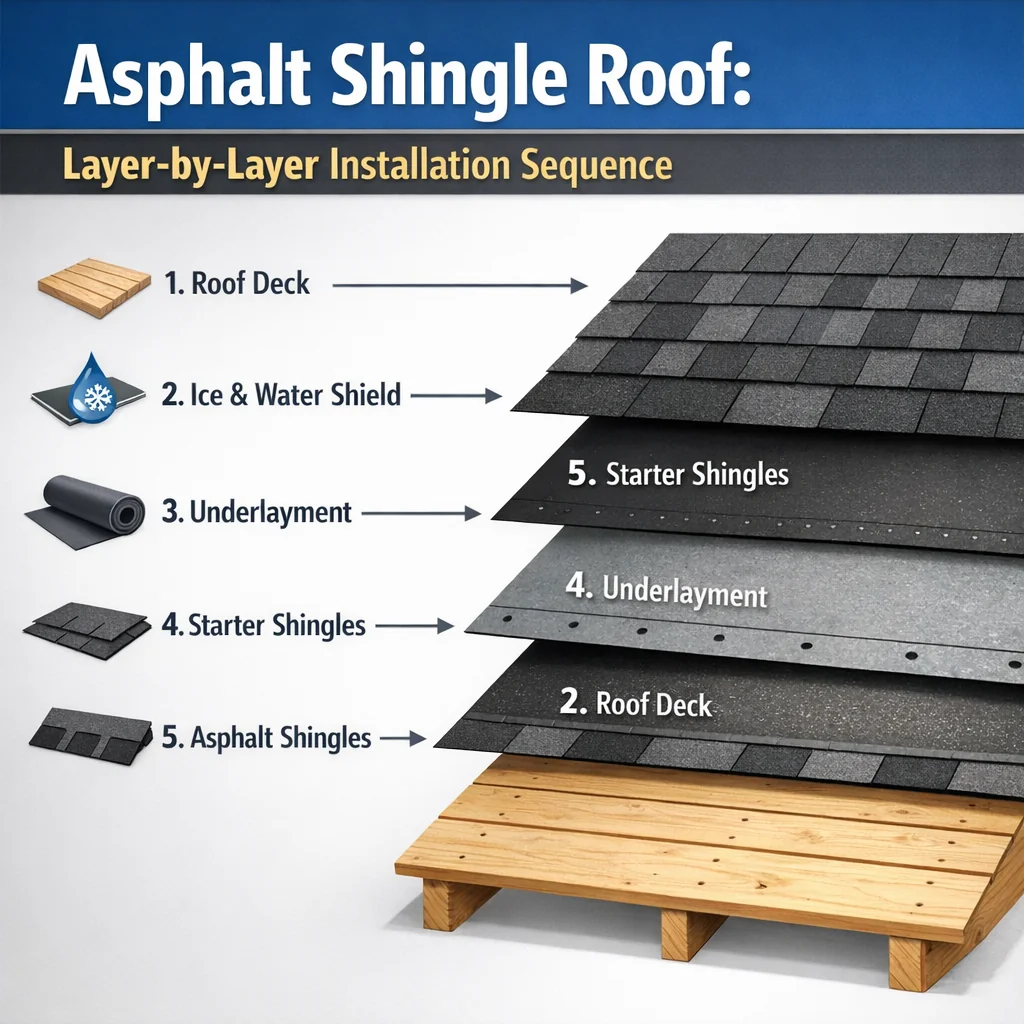
Ice and water protector is a self-adhering rubberized membrane applied at the eaves, valleys, and any other area where water might be forced uphill. Its two critical properties work together. First, it bonds directly to the decking without mechanical fasteners in its field, creating a continuous barrier. Second, its rubberized asphalt coating seals tightly around the shanks of any fasteners that penetrate it from above, which means the nails driven through the overlying shingles do not create open holes through the membrane.
The 24-inch interior wall extension requirement is where this product’s logic becomes most important for homeowners to understand. Ice dams form when heat escaping from a conditioned attic warms the roof surface above the eave, melting snow, and that meltwater runs downslope until it reaches the cold overhang where it refreezes. As the dam grows, water pools behind it and is forced uphill under the shingles. The membrane must be positioned far enough inboard that its self-sealing zone covers the area where water is being pushed in the wrong direction. Twenty-four inches past the interior wall line is the minimum distance to achieve that. On low-slope roofs or roofs with wide eave overhangs, additional coverage may be warranted, because the at-risk zone is proportionally larger.
Underlayment serves as a secondary drainage plane for water that makes it past the shingles. Traditional felt and modern synthetic underlayments both lap uphill over downhill courses, consistent with the overlapping principle. Overlap requirements increase on lower-slope roofs because slower-moving water has more time and opportunity to work backward under a seam.
Flashing seals the transitions: where the roof meets a wall, where two roof planes meet in a valley, and where pipes or other penetrations break the surface. Proper flashing is step-flashed at vertical wall intersections, meaning individual metal pieces weave between each course of shingles and the wall’s weather-resistant barrier. This creates a shingled joint rather than a single continuous piece of metal, which is far more resistant to the movement that comes from thermal expansion.
Need a hand with this in Winston-Salem, Greensboro and the Triad? Call (336) 971-0464 or request a free estimate. Honest answers, no pressure.
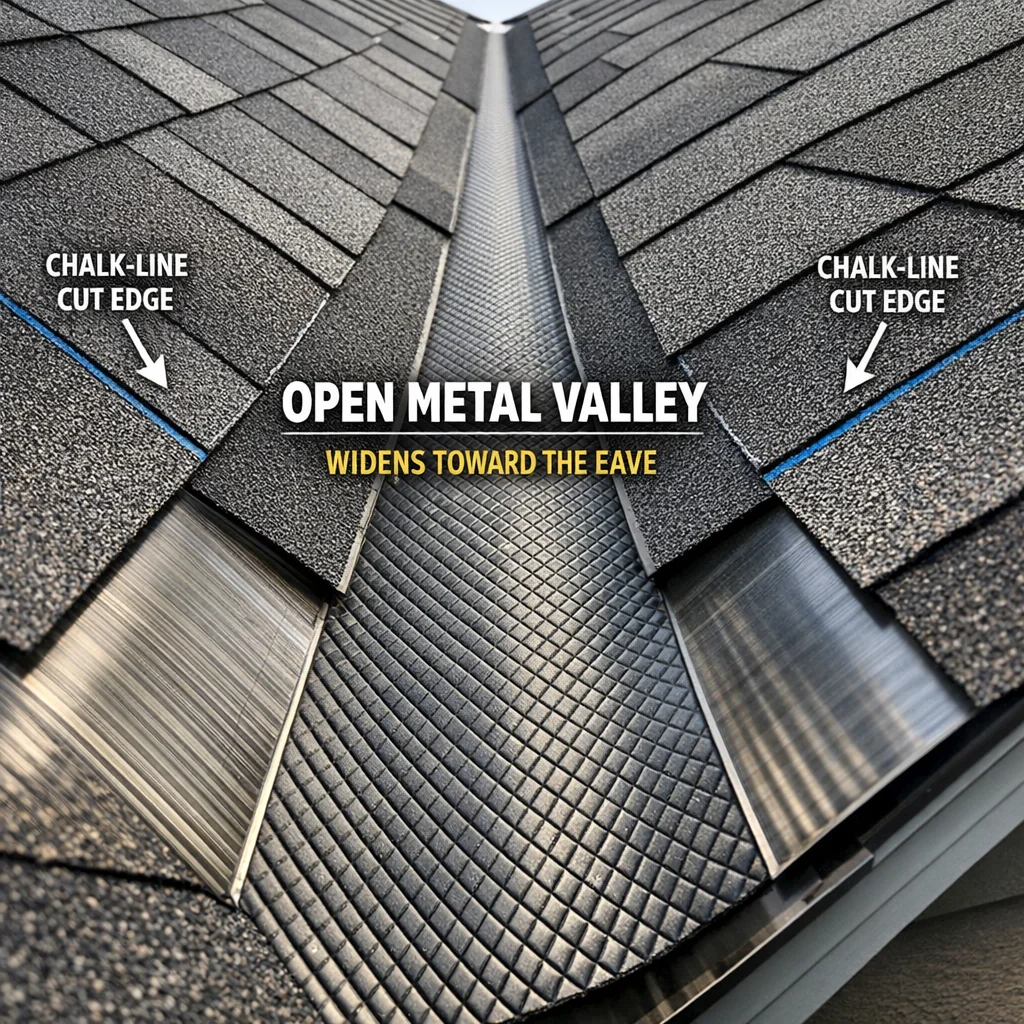
Open metal valleys are generally the preferred approach for sloped residential roofs. A metal liner runs the full length of the valley, and the shingle courses from each roof plane are cut to a chalk-line boundary on either side. The chalk lines start approximately three inches from the valley center at the ridge and widen by one-eighth of an inch for every foot of run toward the eave.
Most guides present this measurement as a rule to follow. What they leave out is the reason it exists.
A valley collects runoff from two roof planes at once. As water travels toward the eave, it is continuously joined by more runoff from higher on both planes. By the time water reaches the lower section of a valley, it is moving at greater volume and velocity than it was at the top. If the valley stays the same width from top to bottom, that increasing volume has no additional room to move. Water backs up, velocity drops, and slow-moving water has time to creep beneath the shingle edges. The widening geometry solves a flow-rate problem. It is not an aesthetic choice.
The triangle cut at the upper corner of each valley shingle serves the same logic. Cutting that corner prevents the shingle tab from creating a small dam directly across the valley’s water channel.
Fastener placement in valleys is equally deliberate. Nails stay at least two inches back from the chalk line, keeping penetrations outside the active water channel. The self-sealing membrane beneath would protect nails within its coverage zone, but keeping fasteners away from the centerline entirely is a cleaner solution.
The first layer at the eave is a starter course, a strip of shingles with the tabs removed or a purpose-made starter product. It sits underneath the first full shingle course and fills the gaps between the cutouts of the course above, preventing direct water penetration to the deck through those joints.
Every shingle manufacturer specifies a nailing zone, typically a printed line or band on the shingle surface indicating where fasteners should be placed. Nails above this zone fail to catch the top of the underlying shingle, reducing wind resistance. Nails below this zone penetrate the exposed face of the shingle and create unprotected holes in the weather surface. Following the nailing zone is not a technicality; it directly affects both the shingle’s wind rating and the warranty’s validity. If you want to understand how wind forces affect individual shingles once they are installed, our article on wind damage shingles covers the signs that nail placement and storm exposure have created a serious problem.
Each course of shingles offsets from the previous by a set amount so that the joints between shingles never align vertically between adjacent courses. Aligned joints create a direct water path to the deck. The offset amount depends on shingle type, with architectural shingles typically requiring a larger offset than three-tab products.
Shingle color is not perfectly uniform across production batches. Two bundles from different lots may look identical in a warehouse and noticeably different once installed side by side on a roof in full sunlight. This is normal manufacturing variation, not a defect. The solution is straightforward: check the lot number printed on each bundle before installation begins and confirm all bundles on the job share the same number. The lot number is typically stamped on the bundle’s packaging label. Any bundles from a different lot should be flagged and set aside before a single course goes down, not discovered after the job is complete.
The table below maps each component to its failure consequence and the installation error that most commonly causes it.
| Layer | Primary Function | Common Installation Error | Resulting Failure |
|---|---|---|---|
| Decking | Structural foundation for all layers | Skipping soft-spot repair | Shingle depression, fastener pull-through |
| Drip Edge (Eave) | Directs edge water away from fascia | Installing over ice & water protector | Water wicks behind membrane to fascia |
| Drip Edge (Rake) | Shields edge from wind-driven water | Installing under underlayment | Wind-driven water enters beneath membrane |
| Ice & Water Protector | Seals around fasteners; resists uphill water | Stopping at the wall line, not 24″ past it | Ice dam water penetrates inside conditioned space |
| Underlayment | Secondary drainage plane | Insufficient overlap on low-slope sections | Water tracks under seams during heavy rain |
| Step Flashing | Seals roof-to-wall transition | Using continuous counter flashing only | Water enters behind siding at wall joint |
| Valley Flashing | Channels concentrated runoff | Uniform-width valley, nails too close to center | Backup, seam penetration at high-flow sections |
| Starter Course | Seals eave joints under tab gaps | Omitting or using field shingles reversed | Direct water path to deck through tab cutouts |
| Shingles | Primary weather surface | Nails outside manufacturer’s nailing zone | Shingle blow-off, voided wind warranty |
No layer in this stack is optional, and the consequences of skipping or incorrectly installing any one of them are specific and predictable. When you are reviewing a proposal or evaluating an estimate, the right questions are about what each layer includes, what materials are being used for each component, and how the installer handles the edges, valleys, and penetrations where failures most commonly start.
There is a meaningful difference between a contractor who installs the same products and one who has earned a manufacturer’s certification to do so. Smithrock Roofing holds CertainTeed PREMIER ShingleMark Master Certified status, which places us among the top tier of CertainTeed-certified contractors nationally. That certification is not a marketing designation. It reflects training, installation standards, and accountability that allows us to back our work with both a 5-year labor warranty and access to the limited lifetime manufacturer warranty on CertainTeed Landmark shingles.
With more than 350 five-star reviews and more than 60 combined years of experience across our crews, our roofing service covers homes of every shape and complexity across Winston-Salem, Greensboro, High Point, Kernersville, roofing in Clemmons, Rural Hall, King, and the surrounding communities. That experience is what allows our technicians to recognize deck problems before they become membrane problems, to catch lot number mismatches before the first course goes down, and to explain what they are doing and why at every step of the job.
If you are ready to have a licensed, insured, certified crew evaluate your roof, reach out to Smithrock Roofing for a straightforward, no-pressure assessment. We are here to protect your home and your investment, and we will be honest about what your roof needs.
Most residential asphalt shingle installations are completed in one to two days, depending on the size and complexity of the roof. Steeper pitches, multiple valleys, skylights, and other penetrations add time because each of those areas requires careful detailing. Weather is always a factor as well, since shingles should not be installed in wet or freezing conditions. Your installer should give you a realistic timeframe before work begins, not a best-case estimate.
A thorough inspection before tear-off is the starting point, but the real evaluation happens once old material is removed. Soft spots, visible rot, delamination in plywood panels, or boards that flex underfoot are signs that the deck needs attention before anything else goes on top. Skipping deck repairs to save time or money is one of the most common reasons a new roof fails ahead of schedule. Any reputable installer will walk you through what they found and why a repair is necessary before proceeding.
Traditional felt underlayment, often called tar paper, has been used for decades and provides a basic secondary moisture barrier beneath the shingles. Synthetic underlayment is manufactured from polypropylene or polyethylene and offers better tear resistance, improved slip resistance for installers working on the deck, and greater resistance to moisture absorption if the roof is exposed before installation is complete. Many manufacturers now specify or prefer synthetic underlayment as part of their warranty requirements, so it is worth confirming which product is included in your installation. For a broader look at how underlayment and other material choices compare across shingle types, the article on best roofing materials for Winston-Salem homes is a useful reference.
Yes, nail placement is one of the most consequential decisions made during installation and one of the most commonly done wrong. Each shingle has a defined nailing zone printed directly on the back. Nails placed too high miss the structural connection between layers and allow shingles to lift in wind. Nails placed too low can penetrate through the tab cutouts of the course below, leaving exposed fastener heads that act as direct water entry points. Manufacturers void wind warranties for improper fastener placement, and the physical consequences show up quickly in the first significant storm.
Asphalt shingle installation done correctly is the product of trained hands, proper materials, and an unwillingness to cut corners where corners are easiest to cut. Smithrock Roofing brings that standard to every home we work on across Winston-Salem, Greensboro, and the surrounding communities, backed by CertainTeed PREMIER ShingleMaster certification, a 5-year labor warranty, and more than 350 five-star reviews from homeowners who trusted us with one of their most important investments. If your roof needs an honest evaluation from a licensed and insured crew that will tell you exactly what it needs and why, call us at (336) 971-0464 or Contact Smithrock Roofing to schedule your free estimate.

Smithrock Roofing © Copyright 2026 • All Rights Reserved • Privacy Policy • Maintained by Mongoose Digital Marketing
