That water stain spreading across your ceiling near the fireplace isn’t something to keep an eye on. It’s something to act on. And more often than not, the culprit isn’t your chimney itself — it’s the flashing system that bridges your chimney and your roof.
Chimney flashing repair is one of the most misunderstood areas of residential roofing. Homeowners frequently underestimate it, contractors sometimes shortcut it, and the internet is full of advice that treats every situation the same way. The reality is more nuanced, and understanding what actually drives repair cost — and complexity — puts you in a far better position to make a smart decision about your home.
This guide covers the real factors behind chimney flashing repair cost, including things most articles skip entirely: why flashing fails in the first place, what separates a lasting repair from a temporary fix, and how to know you’re hiring the right professional for the job. If you’re in Winston-Salem, Greensboro, High Point, Kernersville, Clemmons, Rural Hall, King, or anywhere across the NC Triad, this is written with your home and your climate in mind.
Before you can evaluate a repair quote or understand what’s driving the cost, it helps to understand what flashing is doing — and why it eventually stops doing it.
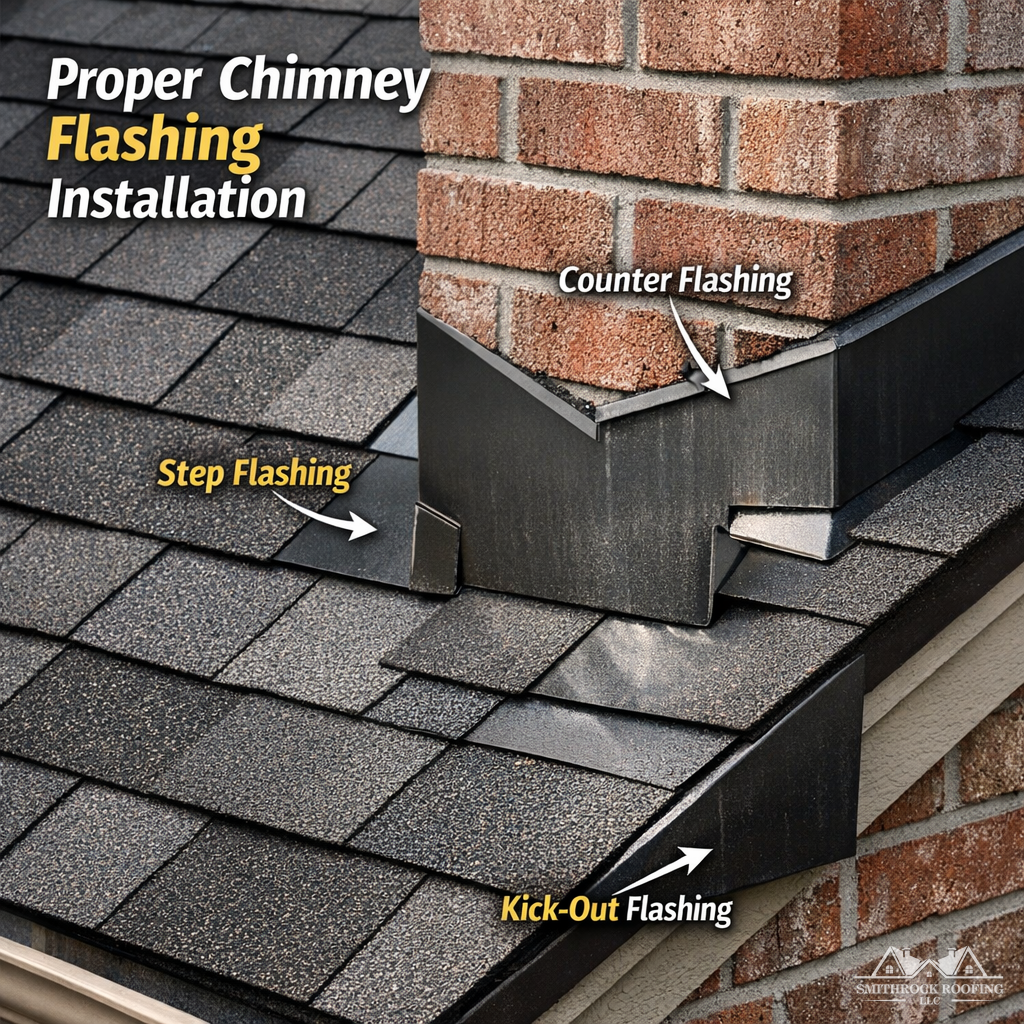
Chimney flashing is a layered metal system installed at the point where your chimney meets your roof. Its purpose is to direct water away from that joint so moisture never gets the chance to enter your home. A complete system includes several components:
When all of these components are present, properly sized, and correctly integrated with each other and with the roof underlayment, the system works. When any one of them is compromised — or was never installed correctly to begin with — water finds a path.
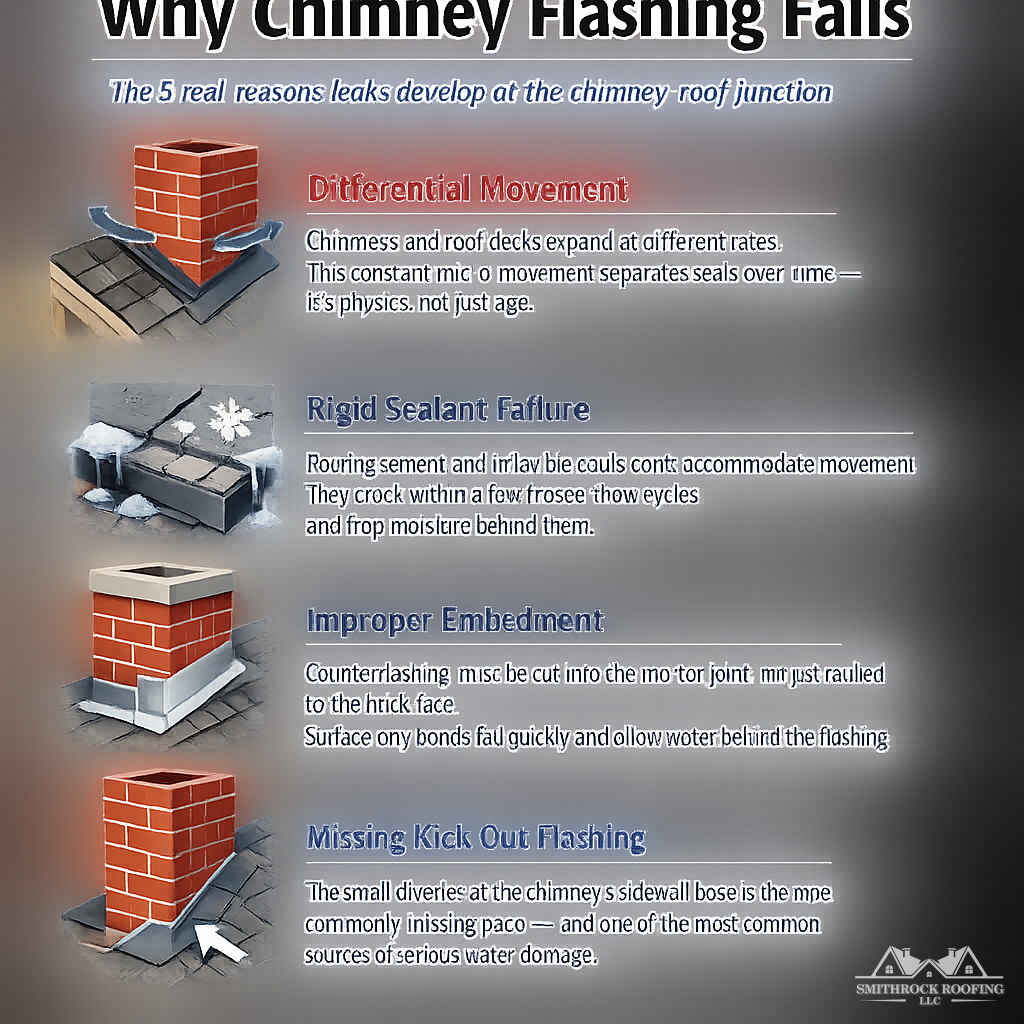
Here’s something no homeowner should have to learn the hard way: your chimney and your roof deck are made of completely different materials, and they move at measurably different rates when temperatures change.
A masonry chimney — brick, mortar, and stone — has a thermal expansion coefficient of roughly 3.3 × 10⁻⁶ per degree Fahrenheit. Wood roof decking moves at nearly double that rate, and it responds to moisture changes on top of temperature changes. What this means in practice is that every time the temperature swings — which happens constantly across the NC Triad, where we can see frost in the morning and sixty-degree afternoons in the same week — your chimney and your roof deck are shifting in slightly different directions and at different speeds.
That constant micro-movement is the primary mechanical reason flashing seals break. It isn’t just age. It isn’t just weather. It’s physics. Rigid sealants can’t keep up with that movement cycle; they crack and separate within a few seasons. Properly designed counterflashing systems account for this movement by staying flexible and using embedment methods that accommodate expansion and contraction rather than fighting them.
Any repair that doesn’t acknowledge this movement cycle will fail again — regardless of the material quality used.
(https://www.gaf.com). Poor sequencing during installation voids most manufacturer warranties.”; footer=”Smithrock Roofing — Serving the NC Triad”]
No two flashing repairs are the same. What makes one job straightforward and another significantly more involved comes down to a set of specific variables. Understanding these helps you evaluate proposals honestly rather than just comparing bottom-line numbers.
A narrow chimney on a simple gable roof is a straightforward job. A wide chimney — anything over approximately 24 inches across — should have a saddle (also called a cricket) installed behind it to divert water. Without one, water and debris pool at the chimney’s back edge, accelerating deterioration. If a cricket needs to be built or repaired as part of your project, that adds meaningful scope.
The number of exposed sides also matters. A chimney centered on a roof ridge has flashing on all four sides. One positioned on a slope with an adjacent wall has more transition geometry to navigate. More surface area and complexity mean more labor and more material.
Not all flashing metals are equal, and the choice affects both upfront cost and long-term performance. Here’s a clear comparison:
| Material | Typical Lifespan | Key Strengths | Considerations |
|---|---|---|---|
| Galvanized Steel | 15–20 years | Affordable, widely available, familiar to most contractors | Prone to rust over time; coating integrity matters significantly |
| Aluminum | 20–30 years | Lightweight, corrosion-resistant, easy to work with | Can react with certain masonry cleaners; softer metal |
| Lead-Coated Copper | 50–70+ years | Extremely durable, conforms well to irregular masonry surfaces | Higher material cost; requires experienced installation |
| Copper | 50–100+ years | Premium longevity, develops protective patina, highly malleable | Highest material cost; galvanic corrosion risk if paired with dissimilar metals |
| Stainless Steel | 50+ years | Excellent corrosion resistance, very strong | Harder to work with; typically more expensive than aluminum |
A note on galvanic corrosion: This is a real failure mode that most articles don’t address, but experienced contractors encounter it regularly. When dissimilar metals contact each other — copper flashing against aluminum gutters, for example, or copper flashing attached with steel fasteners — an electrochemical reaction accelerates corrosion in one or both metals. If you’re upgrading to copper flashing, your contractor should also review the fasteners and any adjacent metal components for compatibility. This detail separates an expert installation from a beginner one.
Flashing failure rarely damages only the flashing. Water that’s been entering the chimney-roof junction for months or years can affect:
Every layer of collateral damage discovered during the repair adds scope and cost. The longer a leak has been active, the more likely these secondary repairs are necessary. This is the most honest argument for addressing flashing problems early rather than watching them. If you’re already seeing water intrusion signs, the article Ceiling Leak? Find the Real Source Before You Call Anyone walks through how to trace the origin of interior water damage before you pick up the phone.
Not every flashing problem requires the same response. The range of repairs from least to most involved includes:
Steeper roofs require more safety equipment, slower work, and more physical effort. High-slope roofs in the NC Triad aren’t uncommon, and a chimney positioned on a steep section of a two-story home takes longer and costs more to access safely than the same job on a low-slope ranch. Accessibility — ladders versus scaffolding, simple versus obstructed site conditions — factors into any honest labor estimate.
Permit requirements vary by municipality. In Winston-Salem, Greensboro, High Point, and surrounding Triad communities, the scope of the work and whether structural elements are involved typically determines whether a permit is needed. A reputable contractor will be straightforward with you about permitting requirements upfront rather than bypassing them to lower the quote.
There’s a widespread assumption — reinforced by a lot of online content — that resealing is a reasonable first response to chimney flashing problems. Sometimes it is. Often it isn’t.
Applying sealant over deteriorated step flashing doesn’t fix the flashing. It buries the problem. Caulk or roofing cement layered over corroded or improperly embedded metal traps moisture between the sealant and the substrate. That trapped moisture accelerates the rot and corrosion it was supposed to stop. Worse, it makes the actual repair harder and more expensive when it’s eventually done — because now you’re removing degraded sealant on top of the original problem.
The diagnostic question your contractor should be answering before any sealant is applied: Is the flashing structurally sound and properly installed, with only a minor seal failure at a specific point? If the answer is yes, a targeted sealant repair with the correct elastomeric product can be appropriate. If the answer is no — if the flashing is corroded, improperly embedded, or showing widespread failure — sealant is a short-term cosmetic patch over a structural problem.
Homeowners should be cautious of any contractor who leads with sealant as the solution without inspecting the full flashing system first.
This is a question almost no article answers directly, and it matters enormously. Hiring the wrong trade professional is one of the most consistent reasons chimney flashing repairs fail prematurely. Here’s a clear breakdown:
Best qualified when:
– The primary failure is in the base flashing or step flashing — the components that integrate with the shingles and roof deck
– The roof underlayment needs to be replaced or resequenced around the chimney
– A complete reflashing is needed as part of a broader roof repair or replacement
– The kick-out flashing is missing or improperly installed
A roofer understands how the flashing system integrates with shingles, underlayment, and the roof deck. That integration — the correct sequencing of materials, the proper overlaps — is what protects the sheathing below.
Best qualified when:
– The mortar joints are deteriorated and need tuckpointing before counterflashing can be reembedded
– The chimney crown is cracked or the masonry is showing signs of structural compromise
– The issue involves the chimney’s structural integrity as much as its flashing
The Chimney Safety Institute of America (CSIA) certifies chimney professionals specifically for this scope. A roofer who patches step flashing without identifying that deteriorated mortar joints are allowing water infiltration independently hasn’t solved the whole problem.
Best qualified when:
– The reglet cut — the channel into the mortar joint where counterflashing is embedded — needs to be properly recut and tuckpointed
– There’s significant masonry rebuilding required that goes beyond what a roofer or chimney sweep is licensed to perform
The practical takeaway: For most residential chimney flashing repairs, a licensed roofing contractor with documented chimney flashing experience is the right call. But that contractor should be honest with you if the mortar joint condition is beyond their scope, and should coordinate with or refer to a masonry professional when necessary. A contractor who takes on work outside their competency to avoid losing a job isn’t serving your interests.
One of the most reliable ways to evaluate a proposed chimney flashing repair is to ask a simple question: How is the counterflashing being attached to the chimney?
There are two approaches:
Reglet-cut counterflashing: A saw or angle grinder cuts a channel (the reglet) approximately one inch into the mortar joint. The counterflashing’s top edge is inserted into this channel and locked in place with an elastomeric sealant. This is the correct method. It creates a mechanical connection that’s protected by the masonry, accommodates thermal movement, and doesn’t rely on surface adhesion alone.
Surface-mounted counterflashing: The counterflashing is simply pressed against the brick face and caulked or cemented in place. This is faster and cheaper for the installer. It’s also a repair that typically fails within one to three freeze-thaw cycles, because a surface bond on masonry has no mechanical resistance to the thermal movement cycles described earlier.
The National Roofing Contractors Association (NRCA) guidelines address counterflashing embedment standards specifically. When you’re reviewing a proposal, ask whether the counterflashing will be embedded into raked mortar joints or surface-mounted. A contractor who can answer that question directly — and explain why embedment matters — is demonstrating the kind of expertise that produces repairs that last. For more on what separates contractors who know this work from those who don’t, the Roofing Cost Guide for NC Triad Homeowners covers key evaluation criteria alongside realistic pricing expectations for the region.
This is one of the most common questions homeowners bring to an inspection, and the answer hinges on how the damage occurred.
Generally covered:
– Flashing damage resulting from a specific, sudden event — a storm, wind damage, falling debris, or hail impact — is typically considered a covered peril under standard homeowners insurance policies
– Water damage to interior finishes caused by sudden flashing failure may also be covered, depending on your policy terms
Generally not covered:
– Damage attributed to gradual deterioration, deferred maintenance, or age-related wear
– Flashing that was improperly installed at the time of original construction (considered a construction defect, not a covered loss)
– Preventive repairs or replacements performed before a covered event occurs
The practical implication: if a storm damaged your flashing, document it immediately with photographs and contact your insurer before repairs begin. If the flashing has been deteriorating over time, you’ll likely be managing this as a maintenance expense. Either way, a reputable contractor can provide the documentation your insurer needs — inspection reports, photo evidence, a clear scope of work — to support your claim accurately.
There’s a detail about chimney flashing that very few articles address, but that directly affects the durability of any repair and your roofing warranty coverage: the relationship between flashing and ice-and-water shield underlayment.
Ice-and-water shield — a self-adhering modified bitumen membrane — is required in most climates at specific distances from chimneys, valleys, and eaves. In the NC Triad, where we see freezing temperatures in winter months, this underlayment serves as a critical secondary barrier beneath the flashing system. If the flashing fails, ice-and-water shield is what keeps water out of the roof deck.
The installation sequence matters. Base flashing must integrate with the underlayment in the correct order — underlayment layers lapping over flashing at certain points, flashing lapping over underlayment at others — following the water flow down the slope. When this sequencing is done incorrectly, even new, premium flashing won’t perform as designed. More importantly: improper flashing-to-underlayment sequencing voids most roofing manufacturer warranties, including the type of limited lifetime warranties that give homeowners long-term protection on their investment. You can learn more about what those warranties actually cover through Smithrock’s Warranty information.
When your contractor scopes a chimney flashing repair, the condition and configuration of the surrounding underlayment should be part of that conversation.
The climate across Winston-Salem, Greensboro, High Point, and the surrounding region isn’t extreme by national standards, but it creates a specific set of conditions that are hard on chimney flashing:
These conditions aren’t reasons to panic — they’re reasons to take the condition of your chimney flashing seriously and address problems before they compound.
If you’re seeing signs of a chimney leak — water staining on ceilings near the fireplace, a musty smell after rain, visible rust streaks on brick, or degraded caulk around the chimney base — here’s what a thorough inspection should include:
A contractor who completes this scope before presenting a repair recommendation is giving you an honest picture of what you’re dealing with. One who quotes a repair after a five-minute look at the exterior is guessing.
Chimney flashing repair isn’t the most glamorous home maintenance topic, but it’s one of the most consequential. A small, ignored leak at the chimney base can become thousands in structural and interior damage over a single winter. Understanding what drives the cost — and what separates a repair that lasts from one that doesn’t — gives you the information to make a confident decision and choose a contractor who earns your trust rather than just your signature.
If you’re heading into a new season and want to stay ahead of chimney flashing issues, these three steps are worth prioritizing:
1. Schedule a Post-Winter Inspection Before Roofing Season Gets Busy
Spring is when roofing contractors’ schedules fill fast. Booking an inspection in late winter — before the rush — means you’ll have time to evaluate findings, get a second opinion if needed, and schedule repairs without pressure. Ice storms and freeze-thaw cycles common to the Triad are hard on flashing seals, and catching damage early in the year prevents a full rainy season from making it worse.
2. Request a Documented Inspection Report With Photographs
In 2026, any reputable contractor should be able to provide a written summary of findings with photos. Ask for this specifically before work begins. This documentation protects you during the repair conversation, helps you compare quotes accurately, and creates a baseline record if you ever need to file a homeowner’s insurance claim related to water intrusion.
3. Consider a Whole-Roof Assessment, Not Just the Chimney
Flashing problems often accompany other aging roof components — deteriorating pipe boots, worn valley metal, or compromised ridge capping. A comprehensive roof evaluation while a contractor is already on your roof costs you nothing extra and gives you a full picture of what’s working and what isn’t. Making one informed decision is better than scheduling three separate service calls over two years.
If the flashing metal itself is intact but the sealant has dried, cracked, or pulled away from the chimney or roof surface, a targeted repair is often sufficient. If the metal is corroding, visibly bent or torn, was improperly installed without step flashing, or has been patched multiple times with caulk over the years, replacement is usually the more cost-effective long-term solution. A contractor who walks you through the specific condition of your flashing — not just the symptom of the leak — will help you make that call with confidence.
Minor sealant touch-ups are within reach for a handy homeowner comfortable working on a roof safely. However, anything involving the metal flashing itself — removing and resetting counterflashing, installing step flashing alongside shingles, or addressing a saddle/cricket — requires roofing experience to do correctly. Improper flashing installation is one of the most common causes of recurring chimney leaks, and a repair that looks finished from the ground can still fail within a season if the underlying integration isn’t done right.
It depends on the cause. Sudden damage from a storm — wind lifting flashing, a falling branch, or hail damage to a metal saddle — is often covered under a standard homeowner’s policy. Gradual deterioration from age or lack of maintenance typically is not. If you suspect storm damage contributed to your flashing problem, document the condition with photographs and contact your insurance provider before scheduling repairs. Your contractor’s written inspection report can support that conversation.
A properly installed metal flashing system — using appropriate materials, full step flashing integration, and correctly embedded counterflashing — should last many years without requiring attention beyond periodic sealant maintenance. The lifespan depends on material choice, installation quality, and local weather exposure. In the Triad, where temperature swings and storm activity are part of the seasonal pattern, using higher-grade materials and ensuring proper installation from the start is worth prioritizing over the lowest-cost option.
When your chimney is showing signs of a leak, the right response isn’t to wait and see — it’s to get an honest assessment from a contractor who knows what to look for and stands behind their work. Smithrock Roofing proudly serves homeowners across Winston-Salem, Greensboro, High Point, and Kernersville, and our team brings the same thorough, transparent approach to every inspection and repair. If you’re in the Greensboro or Winston-Salem area and ready to stop guessing about what’s happening around your chimney, Get a Free Estimate and let us take a proper look.
Smithrock Roofing © Copyright 2026 • All Rights Reserved • Privacy Policy • Maintained by Mongoose Digital Marketing