
Replacing your home’s windows sounds straightforward until you’re standing in a showroom comparing glass packages you don’t fully understand, or receiving bids that are thousands of dollars apart with no clear explanation why. For homeowners across Winston-Salem, Greensboro, High Point, and the surrounding NC Triad, window replacement is one of the most significant exterior investments you’ll make, and it’s one where the details buried in the installation process matter far more than most people realize.
This guide cuts past the surface-level advice. We’ll explain what actually happens structurally during a proper installation, why certain decisions that look like contractor preferences are actually building science requirements, and how to read the performance numbers on a window label so you’re choosing glass that actually fits the NC Triad’s climate, not just a generic “energy efficient” sticker.
Whether you’re replacing one drafty unit or upgrading every window in the house, understanding the process puts you in a much stronger position to make confident decisions and ask the right questions before any work begins.
Nearly every window guide you’ll find online presents full-frame and insert (pocket) replacement as two equally valid options you simply pick between based on budget or preference. That framing is misleading and, in some cases, can cost homeowners significantly down the road.
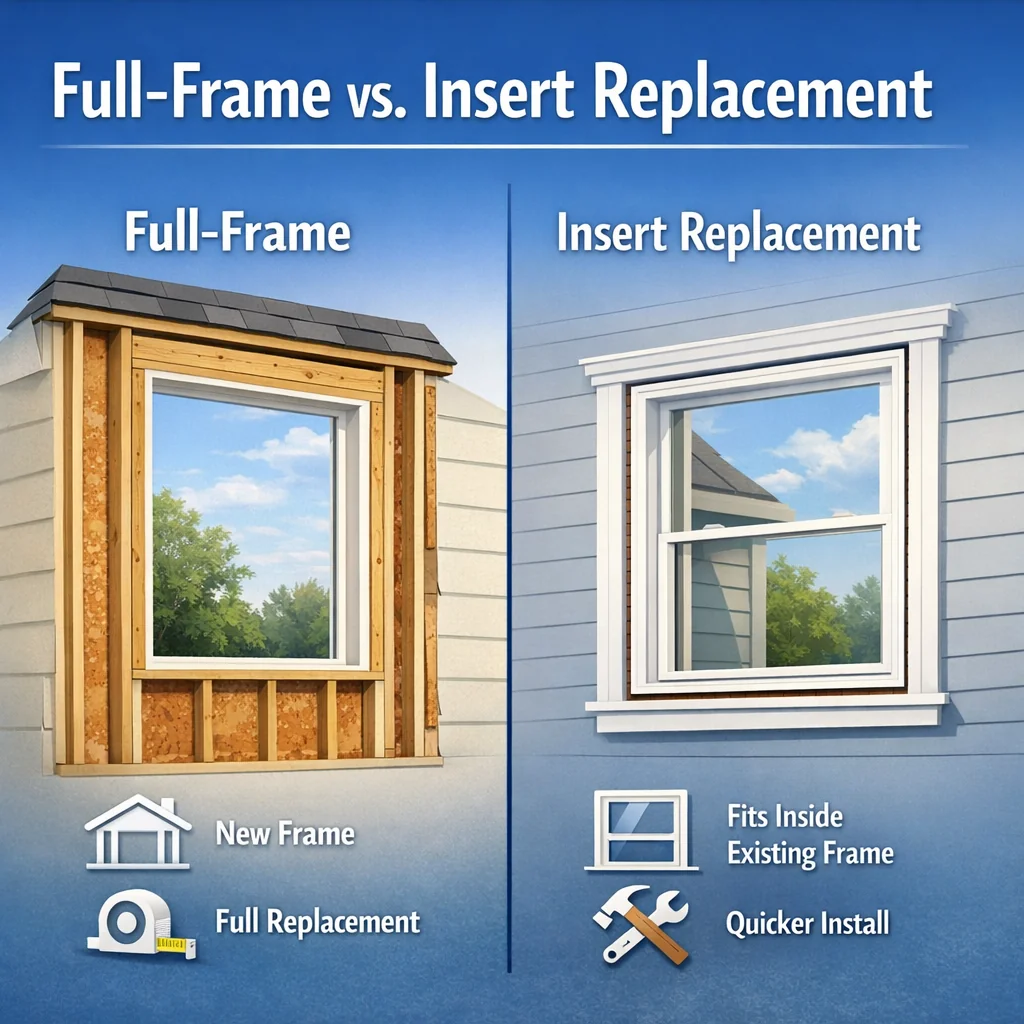
Insert replacement (also called a pocket replacement) involves removing only the sashes and interior stops from your existing window while leaving the original frame, jambs, and exterior trim in place. A new window unit is then fitted into the existing frame opening. This method works well when the existing frame is structurally sound, free of rot, properly square, and dimensionally consistent.
Full-frame replacement means removing the entire window assembly, frame, sill, jambs, and exterior casing, back to the rough framing of the wall. A new window unit is then installed from scratch into the rough opening. This approach restores full weather protection from the wall structure outward and allows proper integration with the drainage plane and house wrap system.
Here’s what the standard guides skip: before any installation method is chosen, the rough opening itself must be assessed. A qualified installer will check for:
If any of these conditions are present, insert replacement isn’t a shortcut, it’s a mistake. Installing a pocket replacement into a frame with hidden rot traps the moisture problem behind your new window, where it continues doing damage invisibly.
In the NC Triad, where summer humidity is sustained and heavy rain events are common, moisture infiltration around aging window frames is not rare. Any installer who quotes insert replacement without physically inspecting the existing frames and rough opening condition first is skipping a foundational step.
Need a hand with this in Winston-Salem, Greensboro and the NC Triad? Call (336) 971-0464 or request a free estimate. Honest answers, no pressure.
If you ask a homeowner what causes window leaks, they’ll usually say a failed seal or a defective window. In reality, improper flashing sequencing during installation is the primary cause of concealed water damage around residential windows, damage that can progress silently for years behind drywall before it becomes visible as staining, mold, or structural rot.
Your home’s exterior wall system is designed to function as a continuous drainage plane, a series of overlapping layers that direct any water that penetrates the outer surface down and out, away from the framing. House wrap (the WRB, or water-resistive barrier) is the backbone of this system on most modern homes.
When a window is installed, it creates an interruption in that drainage plane. Proper flashing restores continuity by integrating the window with the WRB in a specific sequence, think of it like shingles on a roof, where each layer overlaps the one below to shed water outward.
The correct sequence is:
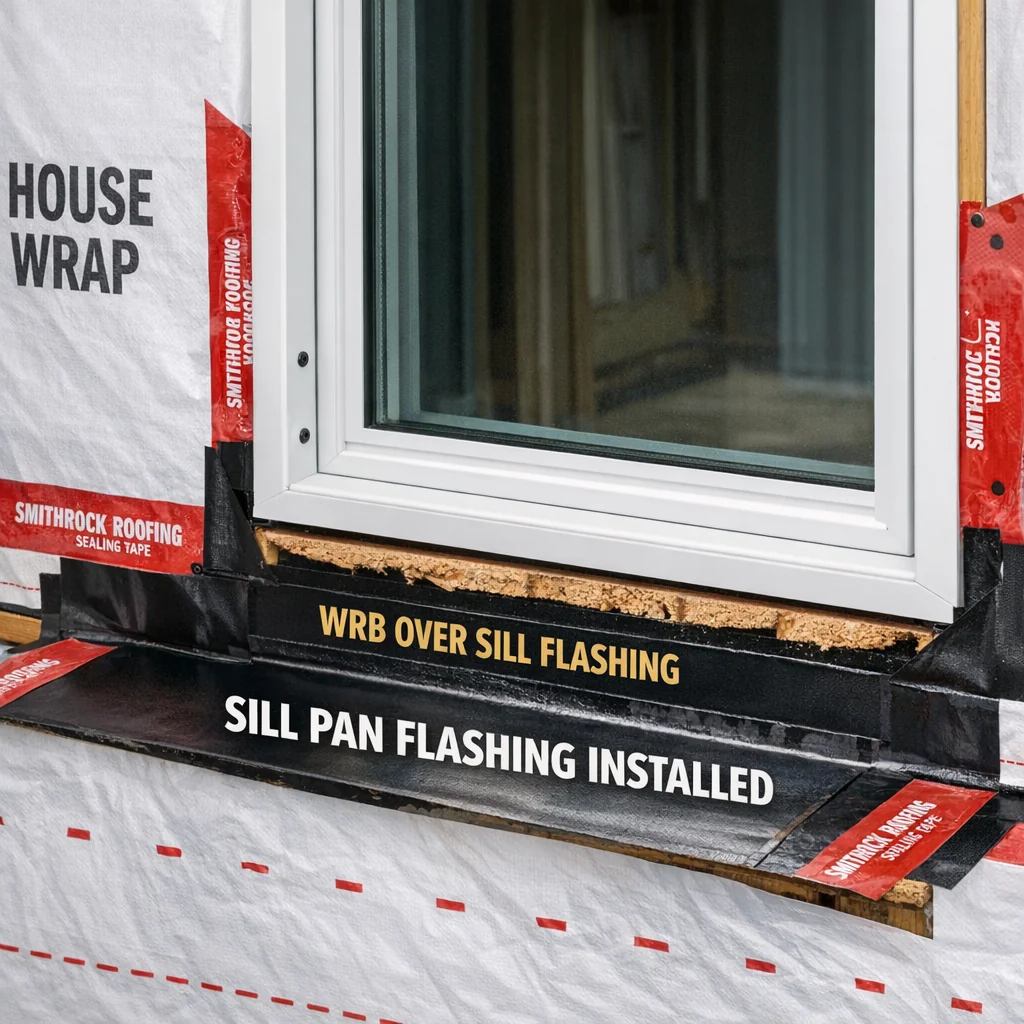
Sill pan flashing deserves its own conversation because it’s both the most protective element and the most commonly omitted one. A properly formed sill pan slopes slightly toward the exterior so that any incidental water that penetrates the window-to-wall junction drains outward. Without it, water pools at the base of the rough opening, where it can saturate the framing, travel down the wall cavity, and eventually appear as damage well below the window, making the source difficult to diagnose.
In our area, where summer storms can drive significant rain against the west and southwest faces of a home, sill pan flashing isn’t optional. Ask any contractor you’re considering whether sill pan flashing is included in their scope of work, and ask to see it during installation before the window is set.
Tape-based flashing systems work reliably on flat, clean surfaces, but corners and irregular substrates present a challenge, tape can bridge gaps rather than conform to them, leaving voids that water will eventually find. Liquid-applied flashing membranes, which cure to a flexible, seamless barrier, are increasingly the preferred approach at corners and penetrations for this reason. They conform completely to the surface geometry and eliminate the bridging risk that tape introduces at inside corners.
Most online resources tell you window installation takes about an hour per window. That’s not wrong as a rough average, but it tells you nothing about what should be happening during that hour. Understanding the key steps gives you a way to evaluate quality, and to recognize when corners are being cut.
Before the window unit is lifted into place, the rough opening must be:
If the opening is out of square, shimming during installation can compensate for minor variance, but larger deviations require framing correction. Shimming a window into an out-of-square opening and relying on the window frame to absorb the error is a documented cause of sash binding, locking mechanism failure, and accelerated seal degradation.
Once the opening is prepared, the window is set into position from the exterior. Proper shimming is not a casual step, it’s how the installer transfers the window’s weight to the rough framing and ensures the unit sits perfectly level, plumb, and square regardless of any minor imperfections in the opening. Shims are placed at the sill corners, mid-height on the jambs, and at any other location where fasteners are driven.
Fasteners must be driven into the rough framing, not just the sheathing, to provide structural support. The window frame is not designed to carry its own weight at the fastener points alone; the shims distribute that load to the surrounding structure.
After the window is secured and flashed, the gap between the window frame and the rough framing is filled with foam. This is one of the most consequential and least discussed steps in the entire installation process.
Standard expanding spray foam is not appropriate for window cavities. It expands with enough force to bow vinyl and composite frames inward, permanently distorting the sash channel. The result is a window that won’t open, close, or lock correctly, a failure mode that’s often misidentified as a defective window when the actual cause is incorrect foam application during installation.
Low-expansion window-and-door foam is specifically formulated to fill the cavity without generating bowing pressure. It should be specified explicitly in any installation scope.
There are two additional foam application details worth understanding:
Walk into any window showroom and you’ll see “energy efficient” applied to nearly every product on the floor. The term is so broadly used it has lost most of its meaning without the underlying numbers. Here’s how to read the NFRC label, the standardized performance rating system, and what each value means for a home in Winston-Salem, Greensboro, or High Point.
| Rating | What It Measures | Better Direction | NC Triad Guidance |
|---|---|---|---|
| U-Factor | Rate of heat loss through the entire window assembly | Lower is better | Target 0.30 or below for mixed-climate performance; high-performance units reach 0.22 or lower |
| Solar Heat Gain Coefficient (SHGC) | Fraction of solar heat that passes through the glass | Depends on orientation and climate | See explanation below, this is not a simple “lower is better” choice |
| Visible Transmittance (VT) | Amount of natural light transmitted | Higher means more light | Lower-VT glass can leave rooms feeling dark, worth evaluating room by room |
| Condensation Resistance (CR) | Resistance to interior condensation formation | Higher is better | Especially relevant during NC Triad winters when indoor humidity meets cold glass |
This is where a lot of homeowners get sold a blanket solution that doesn’t serve their home well.
SHGC measures how much solar heat passes through the glass. In a hot climate, you generally want a lower SHGC to reduce cooling loads. But the NC Triad sits in a mixed-humidity climate zone, we have hot summers and genuinely cold winters. That seasonal variation creates an opportunity that a low-SHGC-everywhere approach actually eliminates.
On south-facing windowsa moderately higher SHGC allows passive solar gain during winter, sunlight passes through the glass and warms the room, reducing heating loads during the months you need it most. When winter ends and the sun angle rises higher in the sky, roof overhangs naturally limit that same gain during summer, provided the overhangs are adequately sized.
Installing low-SHGC glass on south-facing windows eliminates that free winter heat benefit. For north-facing windows, where direct solar gain is minimal regardless of season, prioritizing a lower U-factor over SHGC makes more sense.
The practical takeaway: ask your installer whether the glass specification varies by window orientation, or whether the entire job is quoted with a single glass package. A knowledgeable contractor will discuss this trade-off. A contractor who hasn’t considered it may be applying a one-size-fits-all specification to a problem that rewards a more thoughtful approach. For a deeper look at how glazing technology affects home performance, the article Seeing Clearly: The Magic of Dual Pane Low-E Glass walks through how these coatings work in practice.
ENERGY STAR certifies windows by climate zone, Northern, North-Central, South-Central, and Southern. The NC Triad falls in the North-Central zone for ENERGY STAR purposes, which has specific U-factor and SHGC thresholds that differ from what’s required in the Southern zone.
A window marketed as ENERGY STAR certified may be certified only for the Southern zone, which has less stringent U-factor requirements because cold-season heat loss is less of a concern farther south. That same window, installed in your home, may not deliver the performance you’re expecting during winter.
When reviewing any window proposal, ask specifically for the ENERGY STAR climate zone designation on the glass package. It’s a simple question that immediately tells you whether the specification is matched to your actual conditions.
Standard advice says to ask for references and look for certifications. That’s not wrong, but it stops well short of what actually protects you.
Installation certifications from window manufacturers are not simply brand affiliations. When a manufacturer provides certified installer status, it typically means the contractor has received product-specific training on that manufacturer’s installation requirements, which matter because improper installation of a certified product can void the product warranty. If your contractor isn’t certified for the windows they’re installing, a warranty claim related to installation method may be denied.
At Smithrock Roofing, we bring 60+ combined years of exterior installation experience and maintain the certifications that keep manufacturer warranties intact for our customers. That’s not a minor detail, it’s the difference between a warranty that holds and one that has conditions buried in the fine print that work against you.
Window installation contracts frequently omit scope items that homeowners reasonably assume are included. Before signing anything, confirm in writing whether the following are included:
A bid that comes in dramatically lower than others is worth scrutinizing against this list. The most common way to cut a window installation bid is to skip weatherproofing steps and interior finishing work, savings that transfer real long-term risk to the homeowner.
Before work begins, ask the contractor: “What will you do if you find rot or structural damage in the rough opening once the old window is removed?”
This question accomplishes two things. First, it tells you whether the contractor has a clear plan for the scenario, because it happens regularly on homes more than 20 years old. Second, it reveals whether the original bid accounts for any contingency, or whether you’ll be making a pressured decision on the fly while your wall is open and exposed.
A trustworthy contractor has a clear answer, a defined process, and an honest conversation about what additional scope might look like if underlying damage is found. That conversation should happen before the job starts, not after the window is out.
Homeowners in Winston-Salem, Greensboro, High Point, Kernersville, Clemmons, Rural Hall, King, and surrounding communities deal with a climate that challenges windows from multiple directions.
Summer brings sustained high humidity, extended periods above 90°F, and storm events capable of driving rain horizontally against the west-facing sides of homes. Winter delivers genuine cold snaps, enough to create significant temperature differentials across a window assembly and make U-factor performance real and measurable in your heating bills. The shoulder seasons bring rapid temperature swings that accelerate thermal cycling of window frames and sealants.
This climate profile means that every element of a proper installation, sill pan flashing, drainage plane continuity, correctly specified foam, calibrated glass performance values, has a real, local reason behind it. These aren’t abstract best practices from a generic industry manual. They’re responses to what the weather in this region actually does to a home year after year.
When Smithrock Roofing installs windows across the Triad, we’re thinking about how your home performs through summer heat and winter cold, and making sure the installation holds up through both.
The window unit itself is only part of what determines whether a window replacement succeeds for the long term. How it integrates with the wall, how it’s sealed against water, how the foam is applied, how the performance specifications match your climate and window orientation, these are the decisions that separate a window installation that protects your home for 20 years from one that creates problems within five.
Ask detailed questions. Request a written scope that covers weatherproofing explicitly. Understand the performance numbers before you approve a glass package. And work with a contractor who welcomes those questions rather than deflecting them.
If you’re ready to talk through window replacement for your home anywhere in the NC Triad, Smithrock Roofing is here to walk you through the process honestly, from the first conversation to the finished installation.
For most single-family homes in the NC Triad, a full window replacement, assuming standard sizing and no major structural surprises, is typically completed within one to two days for an average-sized home. Larger homes, custom sizing, or windows that reveal significant rot or water damage in the rough opening can extend the timeline. A reliable contractor will give you a realistic schedule after a proper site assessment rather than committing to a specific timeframe before seeing the conditions.
A pocket installation, sometimes called an insert replacement, places a new window unit inside the existing frame, leaving the surrounding trim and exterior casing in place. This works well when the existing frame is structurally sound and free of rot or water damage. A full-frame replacement removes everything down to the rough opening and starts fresh, which allows for complete inspection of the drainage plane, flashing, and framing condition. In the NC Triad’s humid climate, full-frame replacement is often the more appropriate choice for older homes because it’s the only way to verify and correct what’s happening behind the frame.
The federal Inflation Reduction Act includes a tax credit under the Energy Efficient Home Improvement Credit for windows that meet ENERGY STAR Most Efficient criteria. This credit has specific eligibility conditions and annual limits, so reviewing the current IRS guidance or speaking with a tax professional before your project is worthwhile. Some utility providers serving the Triad area also offer rebate programs for qualifying energy-efficiency upgrades. Your contractor should be able to tell you which products meet the threshold for these programs, but confirm the details directly with the IRS or your utility before making decisions based on them.
There are several warning signs you can look for on your own before a contractor visit. On the interior, soft or discolored drywall below the window sill, paint bubbling near the trim, and visible mold or mildew growth are all indicators of water intrusion. On the exterior, look for cracked or missing caulk at the frame perimeter, paint failure on the surrounding siding, and any visible softness when you press against the wood trim. During a proper site assessment, an experienced installer will probe the sill and surrounding framing directly, this is a step you should expect from any contractor giving you a replacement recommendation. If you’re also seeing related deterioration on your home’s exterior, the article Average Cost to Replace Windows: What You Must Know covers how discovered damage can affect overall project scope and pricing.
Window replacement done well is one of the most durable investments you can make in your home’s performance, comfort, and long-term structural health, but the quality of the installation matters as much as the quality of the product. Smithrock Roofing brings hands-on experience to every project, whether that’s a single window in a High Point bungalow or a full replacement across a newer home in Kernersville. If you’re ready to get honest answers and a detailed scope from a team that stands behind its work, we’d be glad to start that conversation. Get a Free Estimate

Smithrock Roofing © Copyright 2026 • All Rights Reserved • Privacy Policy • Maintained by Mongoose Digital Marketing
