You’ve probably searched for a number. A ballpark. Something to tell you whether the contractor quote sitting on your kitchen counter is reasonable or completely out of left field. That’s fair — this is your home, and you want to spend wisely.
Here’s the honest answer: roof vent installation cost isn’t a product price. It’s a system price. And until you understand what that system actually requires for your specific home, no number — from us or anyone else — gives you the clarity you’re looking for.
What this guide will do is walk you through the real factors that drive scope and cost, including the ones most roofing guides skip entirely. By the time you’re done reading, you’ll know what questions to ask, what a thorough quote should include, and what red flags suggest a contractor is pricing a unit instead of engineering a solution.
That’s the difference between a roof that breathes properly for decades and one that looks fine from the street while quietly building up moisture damage in your attic.
Most cost guides lead with a breakdown by vent type — ridge vents, soffit vents, gable vents, power vents — as if selecting a product is the first step. It isn’t.
The first step is understanding how much ventilation your attic legally and structurally requires. Everything else flows from that.
Every roof vent has a Net Free Area (NFA) rating — typically measured in square inches — stamped somewhere on the product label. This rating describes the actual unobstructed opening through which air can move. Two vents that look identical on a store shelf can have meaningfully different NFA values based on their internal baffle design, screen mesh size, and louver configuration.
Why does this matter for cost? Because building codes — specifically the International Residential Code (IRC) — don’t specify a number of vents. They specify a required total NFA based on your attic’s square footage. The number of individual vents needed to hit that total is what drives material quantity, labor hours, and ultimately the project scope.
Here’s how the IRC framework works:
This distinction is significant. The difference between these two rules can literally halve the number of vents your home legally requires. A homeowner who doesn’t know which rule applies to their attic could accept a quote that installs twice as many vents as necessary — or, just as damaging, accept a quote that installs half as many as code demands, leaving them exposed to future warranty disputes or insurance claim complications.
When you’re getting quotes, ask each contractor which ventilation standard they’re designing to and how they calculated the required NFA for your specific attic. If they can’t answer clearly, that tells you something important.
Here’s where most homeowners — and, frankly, many contractors — go wrong.
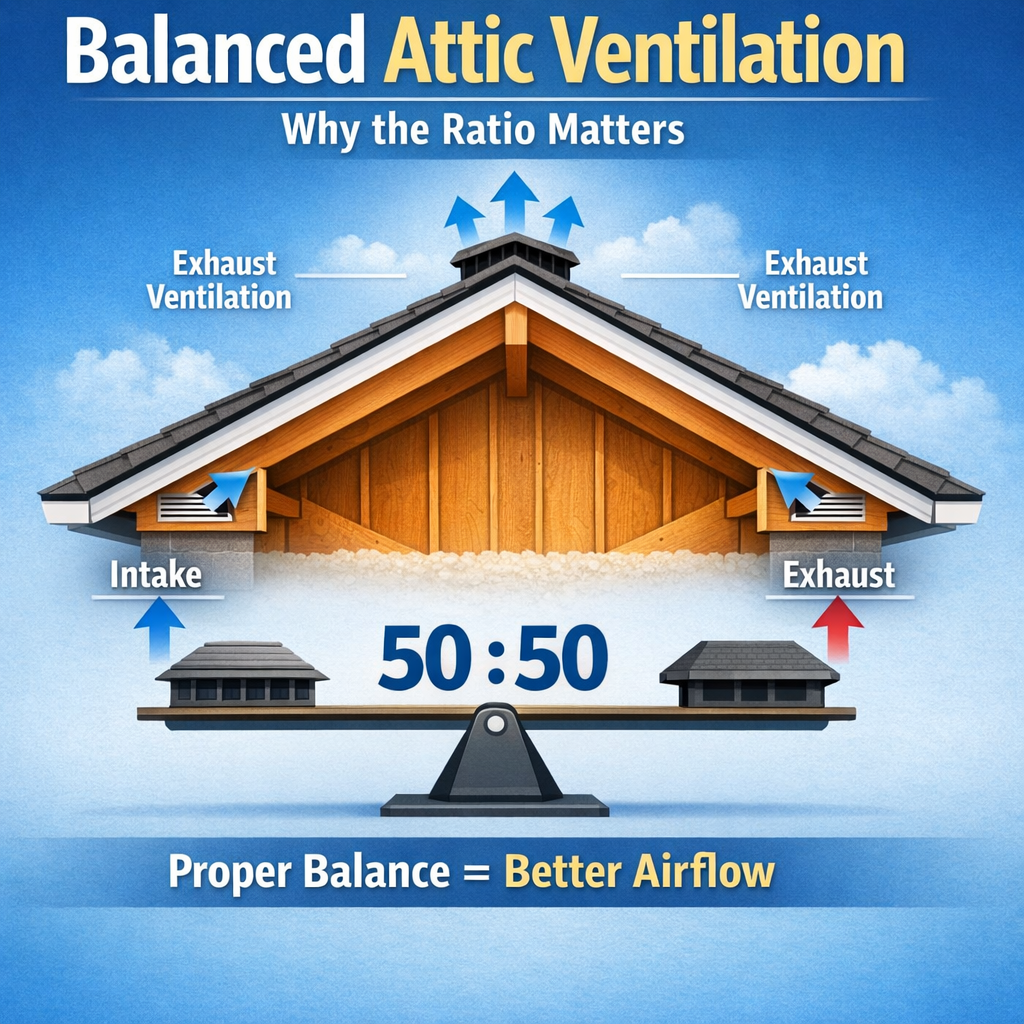
Roof ventilation isn’t just about exhaust. Hot air and moisture need a pathway out, but outside air also needs a clear pathway in. These two halves of the system — intake (typically soffit vents) and exhaust (typically ridge or power vents) — must be deliberately balanced against each other.
The industry standard, supported by ASHRAE guidance and the installation specifications of every major shingle manufacturer, calls for intake ventilation to meet or slightly exceed exhaust ventilation. A good working target is a 50/50 split, or slightly intake-heavy.
When exhaust capacity significantly exceeds intake capacity, the attic develops negative pressure relative to the living space below. Under these conditions, the ventilation system starts pulling conditioned air from inside your home — through ceiling light fixtures, attic hatches, recessed lighting gaps, and other penetrations — up into the attic space. The consequences compound quickly:
This isn’t a rare edge case. Imbalanced attic ventilation systems are common precisely because intake and exhaust vents are often quoted and installed as separate line items rather than as a coordinated system. A contractor who installs a powerful ridge vent without verifying that soffit intake is adequate has potentially made your attic’s thermal performance worse, not better.
Signs your existing system may be imbalanced:
– Frost or condensation visible on the underside of roof decking in winter
– Ice dams forming at the eaves (common in NC Triad’s colder winters)
– Unusually high cooling bills despite adequate insulation
– Excessive heat radiating through upper-floor ceilings in July and August
– Musty odor in the attic even without visible water intrusion
Before any vent is selected, ordered, or installed, a thorough attic inspection should happen. This step is frequently bypassed on re-roofing projects, which is exactly why “simple” vent jobs sometimes expand into larger repairs once work begins.
Here’s what a proper pre-installation inspection evaluates:
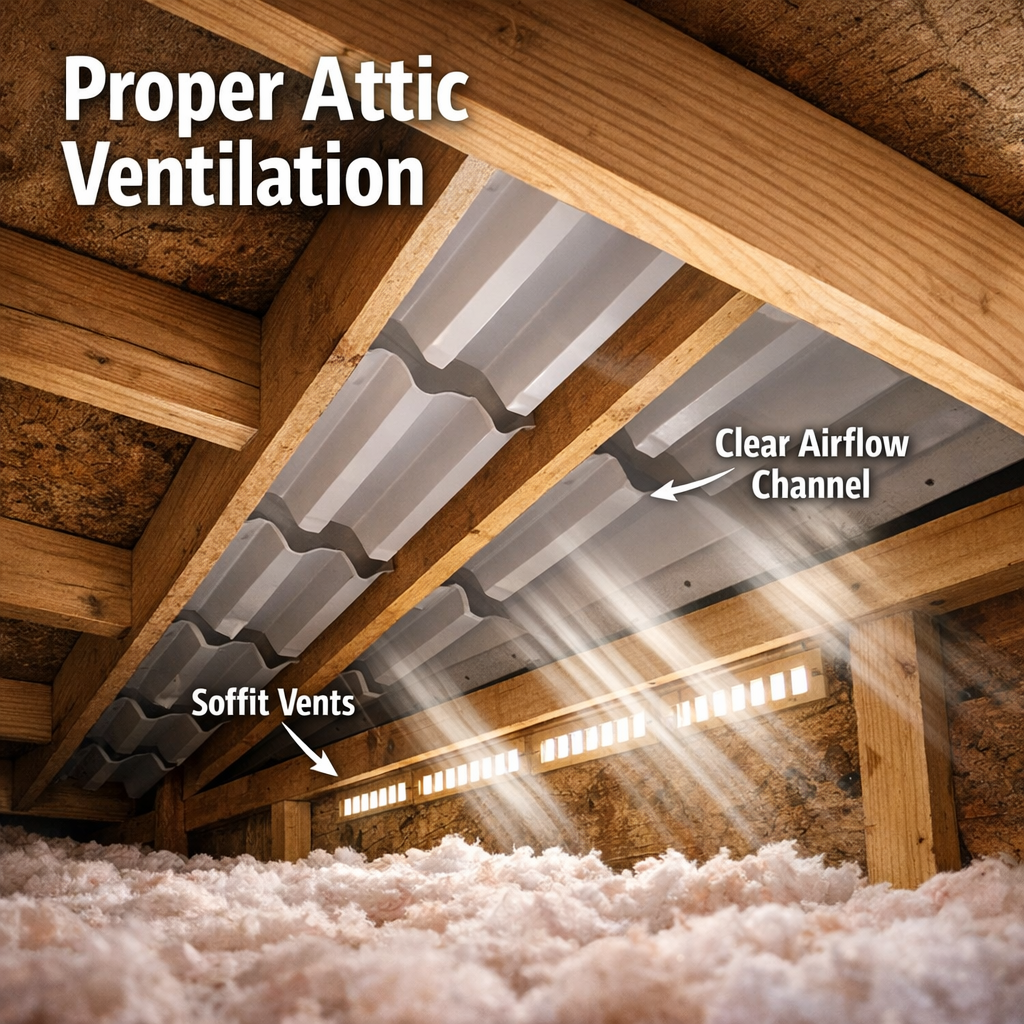
Soffit vents are the most common intake option — and they’re functionally useless if insulation has been blown or laid directly over the eave area, sealing off the pathway from the soffit to the open attic space.
Correcting this requires insulation baffles (sometimes called rafter vents) — channels that run from the soffit vent opening up to the open attic, maintaining a continuous, unobstructed airflow corridor. This is a code requirement under IRC Section R806, but it is routinely omitted, particularly on projects where no one enters the attic to verify conditions before the job is quoted.
A soffit vent installation that doesn’t include verification and correction of the baffle situation is, at best, incomplete. At worst, it’s a line item you paid for that provides zero real-world ventilation benefit.
If the attic already has evidence of moisture — discoloration on decking, soft spots on rafters, mold growth on sheathing — that damage must be assessed before ventilation is addressed. Installing new vents over compromised decking doesn’t solve the structural problem; it just improves airflow around damaged wood.
Any contractor who quotes vent installation without asking to see inside the attic is pricing a unit, not scoping a project.
Older homes in the NC Triad frequently have a mix of ventilation approaches installed over the years — gable vents added at some point, a power vent installed later, and then a new ridge vent proposed during a re-roof. Mixing these systems without understanding how they interact creates competing pressure zones that reduce total effectiveness.
Specifically, active power ventilators and passive ridge vents should not coexist on the same roof without careful engineering — the power vent can short-circuit airflow through the ridge vent, drawing air in through the ridge (an exhaust point) rather than pushing it out. This is a common, easily avoided installation error that no amount of quality product selection can correct.
Not every home is a candidate for every vent type. This is one of the most practically important things to understand when evaluating quotes, and it’s something competitors almost never address.
Ridge vents work by running a continuous vented strip along the peak of the roof. They’re highly effective when the geometry supports them — but on hip roofs, the usable ridge length is significantly shorter than on gable-end roofs of the same footprint. This reduced ridge length limits the total exhaust NFA a ridge vent system can provide.
On a hip roof with extensive dormers or a short central ridge, a ridge vent alone may not deliver adequate exhaust capacity regardless of product quality. The contractor who tells you a ridge vent is the best option for your hip-roof home without running the NFA numbers is giving you a preference, not an engineering answer.
Very low-slope roof sections (typically below a 3:12 pitch) are not good candidates for most ridge vent products. The low pitch reduces the stack effect that drives passive ventilation, and many ridge vent products have minimum pitch requirements in their installation specifications. Installing a ridge vent below its rated pitch threshold often voids the product warranty and reduces actual performance.
Roofs with multiple valleys, dormers, intersecting planes, or architectural features take significantly longer to work on safely and precisely. This is especially true for ridge vent installation, where the continuous slot cut must be carefully stopped at the correct distance from each hip or valley intersection to preserve structural integrity at those junctions.
The saw depth during a ridge vent slot cut is a precision operation — the cut must penetrate the decking without damaging the ridge board beneath it. Getting this wrong creates structural vulnerability at the highest point of your roof. It’s one of the clearest examples of why experienced labor commands a different price than an unlicensed crew working from a YouTube tutorial.
The table below outlines the primary residential vent types, their functional role, key compatibility considerations, and what the installation actually involves — beyond the surface-level descriptions most guides provide.
| Vent Type | Ventilation Role | Roof Geometry Compatibility | Key Installation Considerations | Common Failure Points |
|---|---|---|---|---|
| Continuous Ridge Vent | Exhaust — runs the full length of the ridge | Best on gable roofs with long, uninterrupted ridge; limited on hip roofs | Requires a precisely cut continuous slot; must stop 6″ from each end; saw depth must not penetrate the ridge board | Slot cut too wide or too narrow; improper end sealing; short-circuiting if paired with power ventilators |
| Soffit Vent (continuous or individual) | Intake — feeds outside air along the eave | Compatible with most roof styles; requires overhanging eaves | Must be paired with insulation baffles to maintain clear airflow channel; existing blockage must be corrected | Insulation blocking the eave pathway; inadequate NFA to match exhaust capacity; pest intrusion without proper screening |
| Gable Vent | Cross-ventilation (intake and exhaust depending on wind) | Best on gable-end roofs; ineffective on hip roofs | Wind-dependent and less reliable than ridge/soffit systems; should not be mixed with ridge/soffit without careful evaluation | Creates competing pressure zones when combined with ridge vents; ineffective in calm weather |
| Static Roof Vent (box vent) | Exhaust — individual fixed openings in the field of the roof | Compatible with most roofs; used when ridge length is insufficient | Multiple units required to achieve adequate NFA; each penetration requires proper flashing integration | Insufficient quantity for attic square footage; flashing failures at penetrations; staggered placement that disrupts airflow patterns |
| Power Attic Ventilator (PAV) | Active exhaust — electrically powered fan | Compatible with most roofs; requires adequate intake | Must have sufficient intake NFA to avoid backdrafting combustion appliances or pulling conditioned air from living space; thermostat/humidistat sizing matters | Installed without adequate intake (extremely common); can backdraft gas appliances; adds ongoing energy cost; conflicts with passive exhaust vents on the same roof |
| Solar-Powered Attic Fan | Active exhaust — solar-powered | Same as PAV; no electrical wiring required | Panel placement affects performance; same intake requirements as PAV apply | Insufficient intake pairing; shading reduces output; same backdraft risk as hardwired PAV if intake is inadequate |
This is the detail that most homeowners discover too late — often during an insurance claim or when a shingle warranty is denied.
Meeting the IRC ventilation minimum (1:150 or 1:300 depending on conditions) makes your installation legally compliant. It does not necessarily satisfy your shingle manufacturer’s warranty conditions.
Major manufacturers — including CertainTeed, whose products Smithrock Roofing uses and is certified to install — specify ventilation requirements in their warranty documentation. These requirements describe minimum NFA per square foot of attic space and often specify that the system must be balanced between intake and exhaust. An installation that meets code but falls short of the manufacturer specification may void coverage on the shingles themselves — meaning the cost of inadequate ventilation isn’t just measured in comfort or energy bills, but potentially in full shingle replacement without manufacturer contribution.
This is not a technicality that manufacturers overlook. Ventilation is one of the first things evaluated during a warranty claim inspection because inadequate airflow is a leading cause of premature shingle granule loss, blistering, and thermal cracking.
As a CertainTeed PREMIER ShingleMark Master Certified contractor, Smithrock Roofing installs to the specifications that protect not just code compliance but warranty integrity. That means every ventilation assessment considers both the IRC framework and the specific requirements tied to the product being installed. It’s the kind of detail that doesn’t show up on a low-bid quote — but shows up immediately when something goes wrong and a homeowner needs their warranty to perform.
Roof ventilation strategy is not one-size-fits-all across climate zones, and what works well in Phoenix looks different from what serves a home in Winston-Salem, Greensboro, or High Point.
The NC Triad sits in a mixed-humid climate (IECC Climate Zone 4A). This creates a dual-season attic challenge that homeowners in drier or more extreme climates don’t face in the same way:
Summer conditions drive significant heat gain into the attic — regularly into the 130–150°F range on the attic floor near the ridge on hot July and August afternoons. Proper exhaust ventilation is critical for limiting heat transfer into the living space and protecting shingle longevity. CertainTeed and other manufacturers cite heat buildup from inadequate ventilation as a primary cause of premature shingle degradation.
Winter conditions in the NC Triad are cold enough to create condensation risk. When warm, humid air from the living space migrates into an inadequately ventilated attic, it contacts cold roof decking and condenses. Over time, this moisture causes sheathing degradation, mold growth, and rafter damage — all of which significantly expand the scope and cost of eventual repairs. If your attic is already showing signs of this kind of heat and moisture damage, the Roofing Cost Guide for NC Triad Homeowners covers how ventilation-related deterioration typically affects overall re-roofing scope and budget.
The goal of a correctly designed ventilation system in this climate zone is year-round performance: exhausting summer heat and continuously diluting winter moisture before it can accumulate on structural surfaces.
This is why the intake-exhaust balance and the insulation baffle verification matter so much. A vent installation that addresses summer cooling without correcting winter moisture pathways — or vice versa — is solving half a problem.
When you collect estimates for roof vent installation, the scope of work described tells you as much as the number at the bottom of the page. Here’s what a thorough, trustworthy quote should address:
If a quote doesn’t address most of these items, it’s a product installation estimate, not a ventilation system proposal. Those are genuinely different things — and they produce genuinely different results.
At Smithrock Roofing, our approach to ventilation starts with a conversation and an attic inspection — not a product catalog. With more than 60 combined years of experience serving homeowners across Winston-Salem, Greensboro, High Point, Kernersville, Clemmons, Rural Hall, King, and the broader NC Triad, we’ve seen what happens when ventilation is treated as an afterthought and what proper system design does for a roof’s long-term performance.
Our CertainTeed PREMIER ShingleMaster certification isn’t just a credential — it reflects the installation standards we’re held to and the warranty protection our customers receive. And our A+ BBB rating alongside 312+ five-star reviews reflects how we actually work: straight answers, thorough assessments, and no pressure to make decisions before you’re ready.
If you have an existing ventilation system you’re not sure about, or you’re planning a re-roof and want to make sure the ventilation is done right the first time, we’re glad to take a look and give you an honest assessment of where things stand.
For homeowners who want to go deeper on the technical side of residential ventilation, two resources worth reviewing are the IRC Section R806 ventilation requirements and the ENERGY STAR guidance on attic and roof ventilation, which covers both performance and moisture management in mixed-climate homes.
If you’re approaching a ventilation project — whether it’s part of a full re-roof or a standalone inspection — here are three steps worth taking before you commit to anything:
1. Schedule a dedicated attic inspection, not just a roofing estimate.
Many homeowners receive ventilation quotes based on a visual scan from the driveway or a quick look in the attic hatch. In 2026, request that any contractor you’re evaluating actually enters the attic, measures the space, and documents what they find. An inspection that produces written notes and photos gives you something to compare across bids — and tells you whether a contractor is doing the work or guessing at it.
2. Cross-reference your current setup against IRC Section R806.
The International Residential Code’s ventilation requirements are publicly accessible and written in plain enough language for homeowners to follow. Before your contractor visit, look up the net free area requirements for your attic’s square footage. You don’t need to become a code expert — you just need enough familiarity to ask informed questions and recognize when an answer doesn’t add up.
3. Use your contractor’s warranty documentation as a vetting tool.
If a contractor is certified through a manufacturer like CertainTeed, ask to see what that certification actually covers and what installation standards it requires. Legitimate manufacturer certifications carry real accountability. If a contractor can’t produce documentation or explain what the certification means in practical terms, that’s useful information before you sign anything. The article How to Choose the Best Roofing Contractor in Winston-Salem, NC (And What Credentials Actually Matter) walks through exactly what those certifications mean in practice and how to evaluate them before you commit to anyone.
The most reliable indicators are ones you can often observe without any specialized tools. In winter, look for frost or condensation on attic sheathing, ice dams forming along roof edges, or insulation that feels damp to the touch. In summer, an attic that feels noticeably hotter than outside air — or rooms on your top floor that are difficult to cool — can point to ventilation that isn’t moving air effectively. A proper attic inspection by a qualified roofing contractor will give you a more definitive answer than surface observations alone.
Not necessarily. Ventilation performance depends on balance between intake and exhaust, not just the total number of vents installed. Adding exhaust vents without sufficient soffit intake can actually create negative pressure that draws conditioned air from living spaces into the attic — worsening both energy efficiency and moisture control. Any ventilation improvement should start with a calculation of your existing net free area across both intake and exhaust points before any new product is added.
Ridge vents run continuously along the peak of the roof and work with soffit intake to create a consistent airflow channel across the entire attic. Box vents — also called static vents or turtle vents — are individual units placed at intervals across the roof field. Ridge vent systems generally provide more uniform air distribution on standard gable roofs, while box vents may be more practical on hip roofs or roofs with complex geometry that interrupts a continuous ridge. The right choice depends on your specific roof configuration, not just product preference.
Improved ventilation can contribute to lower cooling costs by reducing heat buildup in the attic during summer months, which in turn reduces the load on your air conditioning system. However, ventilation works alongside — not instead of — proper insulation and air sealing. Homes with significant air leakage between living space and attic, or inadequate insulation levels, often see limited benefit from ventilation improvements alone. A complete attic assessment that looks at all three factors together will give you the most accurate picture of where real efficiency gains are available.
Getting roof ventilation right isn’t complicated, but it does require working with someone who takes the time to assess your specific attic before recommending a solution. Smithrock Roofing has built its reputation across Winston-Salem, Greensboro, and the surrounding NC Triad on exactly that approach — honest inspections, clear recommendations, and installations that hold up over time. If you’re ready to find out where your ventilation stands, Contact Smithrock Roofing and we’ll start with a straightforward conversation.
Smithrock Roofing © Copyright 2026 • All Rights Reserved • Privacy Policy • Maintained by Mongoose Digital Marketing