
You’re standing in your driveway looking at curling shingles, granules piling up in the gutters, and daylight starting to show through the ridge area. The decision is made: it’s time for a new roof. Now the follow-up question arrives, and it’s the one that actually determines whether you get thirty years of solid protection or a roof that starts causing problems in five. That question is whether the architectural shingles going on your home will be installed correctly, all the way through, not just on the surface where you can see.
This guide walks through how architectural shingles installation actually works, including the reasoning behind each step that most other explanations leave out. Whether you’re a homeowner in Winston-Salem, Greensboro, or anywhere across the NC Triad who wants to understand the process before hiring a contractor, or you simply want to know what questions to ask, this is the level of detail that matters.
Architectural shingles, also called dimensional or laminated shingles, are built from two separate layers of asphalt bonded together. That laminated construction is what creates the shadow lines and dimensional appearance that sets them apart from flat 3-tab shingles. It also introduces installation requirements that don’t apply to simpler shingles, and those requirements are where most installation errors occur.
The added thickness and weight of architectural shingles give them higher wind resistance ratings, but only when the installation follows exact mechanical requirements. A shingle rated for high wind resistance achieves that rating under specific fastening conditions. The product on the package and the installation method are inseparable. For a broader look at how material choice and installation method interact, the article on best roofing materials for Winston-Salem homes covers those tradeoffs in useful detail.
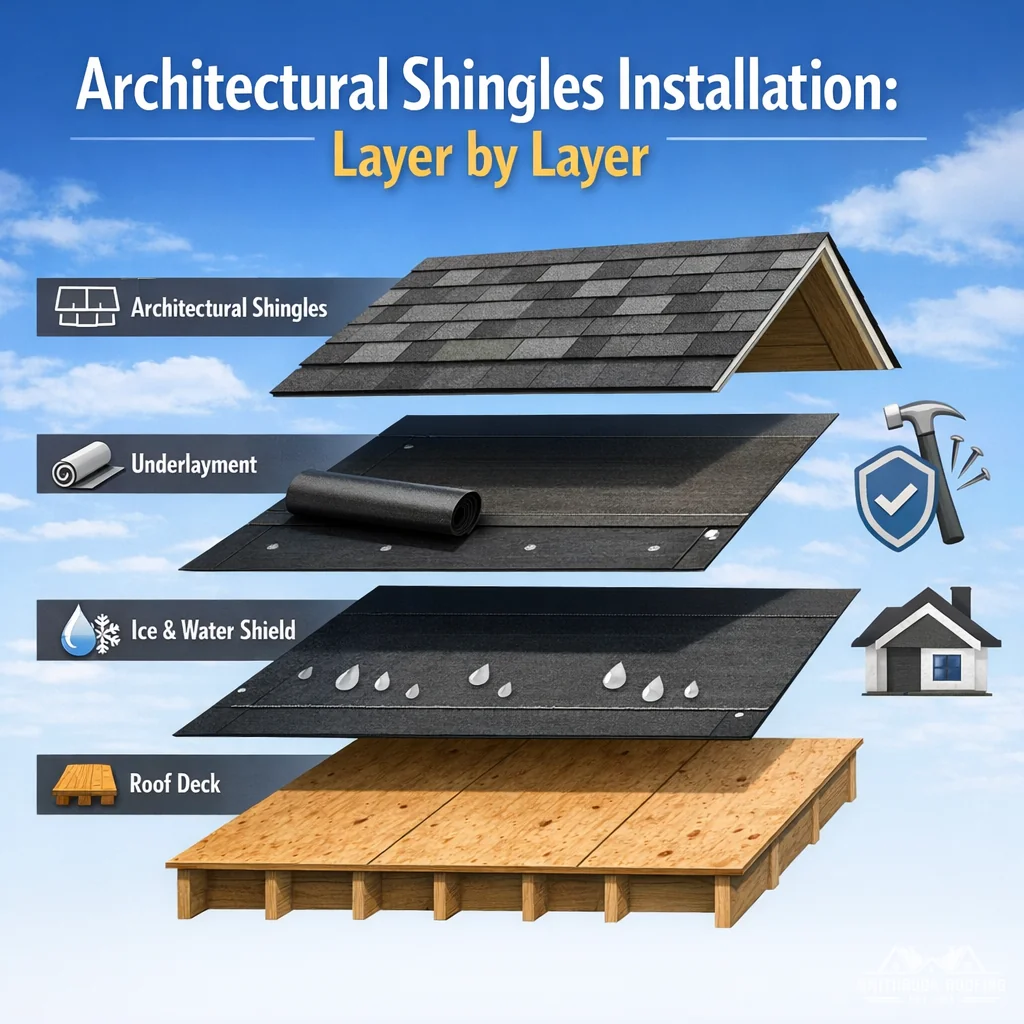
Illustration, not a photograph of a completed client project.
Have a roofing question about your home? Send a message with your town, your current roof material and the repair or material question you want to resolve. Mention this article about architectural shingles installation and ask for a written explanation of possible next steps. You can also review Roofing.
No part of a roof installation matters more than what happens before the first shingle goes down. A new roof placed over a compromised deck is a ticking clock.
The correct approach is a complete tear-off: removing all existing shingles, pulling remaining fasteners, and exposing the full wood deck for inspection. This is the only way to identify soft spots, rot, delamination around penetrations, or areas where previous water intrusion has compromised the wood’s ability to hold a nail. Any section of decking that fails that inspection needs to be replaced with appropriate structural-grade material before the new roofing system begins.
Skipping the tear-off to save time creates compounding problems. Architectural shingles are heavier than 3-tab shingles, and adding a second layer increases load on the framing. More critically, laying new material over old shingles hides deck damage that will only grow, and it removes any honest baseline for the condition of the roof system at the time of installation.
Most municipalities require a building permit before a roof replacement begins. Local building codes govern fire-resistance standards, waterproofing requirements, and structural load limits. Confirming permit requirements before any material is removed protects the homeowner and ensures the finished roof can be inspected for code compliance. (gaf.com)
The dry-in is the layered weather barrier that goes on before any shingles. It is not a formality. It is the system that keeps water out if any part of the finished roof is ever compromised.
Drip edge installation confuses many homeowners and even some installers because the correct position changes depending on where on the roof you are. The logic behind it is simple once you understand it, and understanding it is the difference between a rake edge that stays watertight and one that admits wind-driven rain.
At the eaves, the bottom edge of the roof, water runs downward and off the edge naturally. Here, the drip edge installs directly on the deck first, and then the underlayment lays over it. Water traveling down the slope exits cleanly over the metal flange and into the gutter. The underlayment on top of the drip edge at the eave means any water that gets under the shingles exits off the metal lip rather than working behind it. (achillesroofinghouston.com)
At the rakes, the sloped sides of the roof, the situation reverses. Wind-driven rain moves laterally and can travel upward under an exposed underlayment edge. At the rakes, the underlayment installs first, and then the drip edge goes over it, mechanically capping the underlayment edge and preventing wind from lifting it or driving moisture beneath it. (gaf.com)
The simple decision rule: wherever water can travel toward a seam, the metal cap goes over. Wherever water travels away from a seam naturally, the metal goes under.
In critical zones, a standard underlayment is not sufficient. Self-adhering ice and water shield membrane installs in valleys, around penetrations like chimneys and skylights, and along lower eave sections. This rubberized membrane seals around every nail that passes through it, creating a watertight gasket at the most vulnerable points of the roof. (achillesroofinghouston.com)
Modern synthetic underlayment has replaced traditional felt paper on quality installations. Unlike felt, synthetic underlayment is non-absorbent, meaning it won’t wrinkle or buckle when exposed to moisture during the installation window. Wrinkling in the underlayment telegraphs through the finished shingles, creating surface irregularities that affect both appearance and water-shedding performance.
This is where architectural shingles installation diverges most sharply from older 3-tab practices, and where installation errors have the most direct consequences.
The first course along the eave and rake edges never begins with a full architectural shingle. It begins with a dedicated starter strip. Starter strips have a continuous bead of adhesive along their length. When the first course of field shingles installs over them, that adhesive bonds to the underside of the shingle, creating a wind-resistant seal at the roof’s most exposed edge. (achillesroofinghouston.com)
A standard shingle placed at the eave without a proper starter strip leaves the deck exposed through the shingle cutouts at the very edge where wind uplift is greatest. The starter strip eliminates that gap and provides the adhesive base the warranty system requires.
One installation variable that rarely gets mentioned: the adhesive bead on a starter strip requires heat to activate properly, generally above approximately 40°F ambient temperature. In cooler conditions, the adhesive does not seal on its own. Any installation performed in cold weather requires hand-sealing each shingle edge with roofing cement to compensate. Skipping this step in cold-weather installs leaves the eave edge unsealed regardless of how correctly everything else proceeds.
Nailing is where the most dangerous oversimplifications appear. Two separate decisions govern correct fastening, and collapsing them into a single rule produces installations that look correct but fail structurally.
Variable 1: Where the nail lands (non-negotiable)
Architectural shingles consist of two asphalt layers laminated together. The nail must penetrate through both layers, specifically through the area where they bond together, called the common bond. A nail placed above the common bond, in the single-layer zone, creates a shear point. Under repeated thermal expansion and contraction cycles, the two laminated layers can mechanically separate at that point, independent of wind. This is a structural failure caused purely by incorrect nail placement, not by weather. (achillesroofinghouston.com)
Manufacturers mark the correct zone visibly on the shingle. Following that marked zone is the primary nailing requirement.
Variable 2: How many nails per shingle (wind exposure variable)
Nail count is a secondary variable that depends on wind exposure and local code requirements. The standard minimum is four nails per shingle. Six nails per shingle is appropriate in high-wind applications. The number to use is printed on the shingle packaging and should be confirmed against local building code requirements for the installation location.
The critical point: a six-nail pattern placed in the wrong zone provides less structural integrity than a correctly placed four-nail pattern. Zone compliance comes first. Nail count comes second.
| Nailing Variable | What It Controls | Reference |
|---|---|---|
| Nail placement zone | Structural bond between laminated layers; prevents layer separation under thermal cycling | Manufacturer’s marked zone on shingle |
| Nail count (minimum 4) | Standard wind resistance for normal exposure conditions | Package instructions + local code |
| Nail count (6 per shingle) | Elevated wind resistance for high-wind applications | Package instructions + local code |
| Nail depth (flush to surface) | Prevents over-driving (cuts shingle) or under-driving (creates raised nail that wears shingle above) | Pneumatic nailer pressure calibration |
On pneumatic nailers specifically: an uncalibrated nail gun drives nails inconsistently. Overdriven nails cut through the shingle surface and lose holding power. Underdriven nails sit proud of the surface, creating a raised point that abrades the shingle course above it over time. Pressure calibration before installation begins is not optional.
Every course of shingles must offset its vertical seams from the course below by a minimum of 6 inches. The purpose of this stagger is to prevent water from finding a continuous vertical path through aligned seams down to the deck. (achillesroofinghouston.com)
With 3-tab shingles, the regular tab pattern makes it visually obvious when seams are aligned or close. With architectural shingles, the random dimensional appearance of the finished surface disguises seam position. Two courses that look visually random may still have vertical seams closer together than the 6-inch minimum, and the texture of the material makes that impossible to confirm by sight alone.
The only reliable method is physical measurement. Stagger should be confirmed by tape measure at regular intervals as installation progresses, not by eye. The 6-inch rule is also a floor, not a target. Some manufacturers recommend greater offsets depending on shingle dimensions, and that information is specified in the installation instructions printed on the bundle.
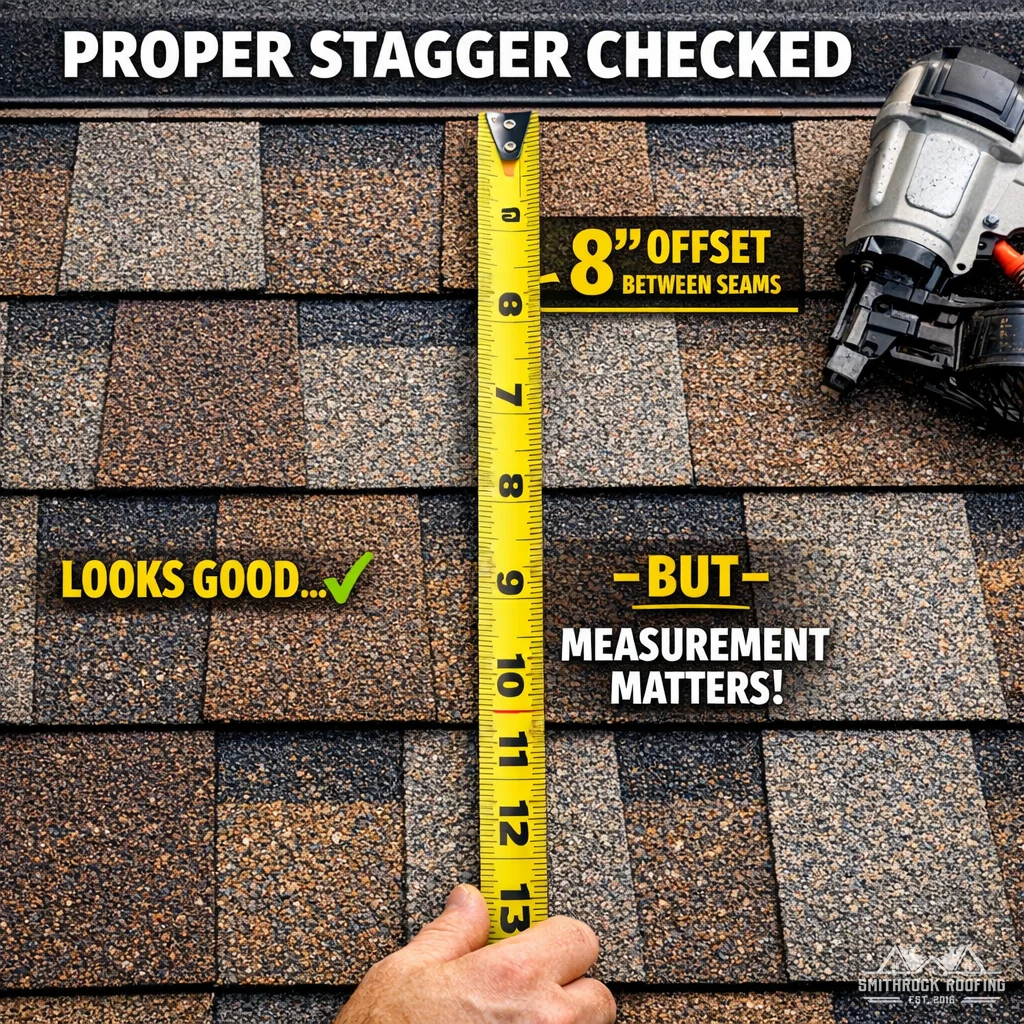
Illustration, not a photograph of a completed client project.
Across all the installation steps described above, one principle applies uniformly: the manufacturer’s installation instructions printed on the shingle bundle are the legal governing document for warranty purposes. They supersede generic installation guides, online tutorials, and conventional trade practices wherever any difference exists. (youtube.com)
This matters practically because different architectural shingle products have different specifications. Reveal measurements, nailing zones, offset requirements, and cold-weather protocols vary by product. Reading the bundle before installation begins is not optional reading. For homeowners evaluating a contractor, asking whether the installation will follow the specific manufacturer’s instructions for the product being used is a reasonable and important question.
The ridge cap is the final weatherproofing step, covering the peak where two roof planes meet. Dedicated ridge cap shingles are designed to bend across the ridge and seal it against wind and rain. They install from one end of the ridge to the other with each piece overlapping the previous, with nails placed to be covered by the next piece. The final piece at the prevailing-wind end receives an additional adhesive seal.
Field shingles cut down for ridge use are not an equivalent substitute for purpose-made ridge cap shingles. Purpose-made ridge cap shingles are pre-bent and carry the adhesive strips positioned for correct ridge application.
A homeowner who understands the installation sequence has the tools to evaluate whether a contractor is doing the job correctly, even from ground level and driveway observation.
A properly run installation will include a complete tear-off with deck inspection before any new material goes down. Drip edge will go on at the eaves before underlayment is rolled, and the crew will run underlayment before installing drip edge at the rakes. A separate starter strip product will appear at all edges before field shingles begin. Chalk lines or consistent measurement will govern course alignment, and the crew will not rely on eyeballing the stagger on architectural shingles.
Smithrock Roofing serves homeowners across Winston-Salem, Greensboro, High Point, Kernersville, Clemmons, Rural Hall, King, and Mount Airy. If you want to talk through what a proper architectural shingles installation involves for your specific home, we’re straightforward with our answers and will tell you exactly what we see. You can learn more about our roofing service or reach out directly with questions about your project.
Yes. Because architectural shingles are laminated from two asphalt layers, nails must penetrate through both layers at the manufacturer’s designated zone. The stagger offset requirements, starter strip requirements, and nailing zone specifications are all specific to laminated shingles and differ from 3-tab installation in ways that directly affect structural performance and warranty validity.
The position follows water direction. At the eaves, water moves downward and off the roof naturally, so underlayment over drip edge allows clean exit. At the rakes, wind-driven rain can move laterally and upward beneath an exposed underlayment edge, so drip edge over underlayment mechanically caps that edge and prevents infiltration. (achillesroofinghouston.com)
Installation is possible in cold temperatures, but the adhesive strips on starter strips and shingles require heat to activate, generally above approximately 40°F. In colder conditions, a hand-seal protocol using roofing cement is required to compensate for adhesive that will not activate on its own. Any contractor installing in cold weather should have an explicit protocol for this.
A minimum of four nails per shingle is the standard. Six nails per shingle is appropriate for high-wind applications. Nail count should be confirmed against the specific product’s installation instructions and local building code requirements. Nail placement zone is a separate and equally important variable: nails must land in the manufacturer’s designated zone through the laminated common bond of the shingle, regardless of nail count.
Most manufacturer warranties require installation over a clean, inspected deck. A complete tear-off is generally required for full warranty coverage, and it is also the only way to identify deck damage that would compromise the new roof system. Confirm warranty requirements in the specific product’s installation instructions before any work begins.
These are two separate variables that control different aspects of shingle performance. The nailing zone determines where each nail lands on the shingle, specifically through the common bond where both laminated layers overlap. A nail placed outside that zone creates a shear point between the two asphalt layers that can cause mechanical separation under thermal cycling, independent of weather conditions. Nail count, by contrast, governs wind resistance and ranges from a minimum of four nails per shingle under standard conditions to six in high-wind applications. Zone compliance is the non-negotiable requirement. Nail count is the wind-exposure variable confirmed against the product’s installation instructions and local building code. An incorrect zone placement with six nails still leaves the shingle structurally vulnerable.
With 3-tab shingles, the evenly spaced tab cutouts create a visible, regular pattern that makes misaligned seams easy to spot. Architectural shingles have a deliberately randomized dimensional appearance that disguises where seams actually fall. Two courses that look visually offset may still have vertical seams closer together than the required 6-inch minimum, and the texture of the material makes that impossible to confirm without measurement. Physical verification by tape measure at regular intervals as installation progresses is the only reliable method. The 6-inch figure is also a floor, not a target: specific product instructions may require greater offsets, which is another reason the shingle bundle’s printed instructions need to be read before work begins.
The adhesive bead on a starter strip requires temperatures above approximately 40°F to activate and bond to the underside of the first field shingle course. Below that threshold, the adhesive does not seal on its own regardless of how correctly the strip is positioned or fastened. The result is an eave edge that remains effectively unsealed, leaving the most wind-exposed section of the roof without the adhesive wind-resistance the starter strip is designed to provide. The compensating step is hand-sealing each shingle edge with roofing cement at the time of installation. Any contractor installing in cold conditions should be able to explain their specific protocol for this, because the problem does not correct itself once temperatures rise.
The clearest approach is to ask directly before work begins. Each shingle bundle carries printed installation instructions that govern reveal measurement, nailing zone location, offset requirements, cold-weather protocols, and other product-specific specifications. These instructions are the legal governing document for warranty validity and supersede generic roofing guides or conventional trade practice wherever any difference exists. A contractor who cannot describe how the installation will follow those specific instructions, or who treats them as optional reference material rather than binding specifications, is a contractor whose work carries measurable warranty risk. Requesting confirmation that the crew has read the bundle instructions for the specific product going on your roof is a reasonable and appropriate question before any material is removed from the deck.
A roof replacement is one of the few home improvements where the quality of the work is almost entirely hidden once the job is complete. The decisions that determine whether architectural shingles perform for thirty years or begin failing in five are made in the first hours of an installation, in the deck inspection, in the drip edge sequence, in nail placement, in measured stagger verification, and in how a crew handles conditions that fall outside the comfortable middle of the installation window.
Understanding the reasoning behind each step is the tool that lets you evaluate a contractor before you have a problem rather than after. The difference between a technically correct installation and one that only looks correct from the street is found in those details, and they are worth asking about directly.
If you have questions about what a correct architectural shingles installation involves for your specific home in Winston-Salem, Greensboro, High Point, or anywhere across the NC Triad, Smithrock Roofing is straightforward with its answers. Reach out in writing and we will tell you exactly what we see.

Smithrock Roofing © Copyright 2026 • All Rights Reserved • Privacy Policy • Maintained by Mongoose Digital Marketing