When most homeowners think about exterior cladding, the conversation tends to start and end with looks. Which material matches the neighborhood? Which color holds up? Those are fair questions — but they’re the last questions you should be asking, not the first.
Here’s what the product brochures and surface-level comparison guides won’t tell you: the durability of your exterior cladding has very little to do with the panel or board you choose in isolation. It depends almost entirely on the system it’s part of — the layers beneath it, the way it’s fastened, the joints between panels, and how well the full assembly handles the specific climate conditions your home faces every single day.
At Smithrock Roofing, we’ve spent decades working on exterior assemblies across Winston-Salem, Greensboro, High Point, Kernersville, Clemmons, Rural Hall, King, and the surrounding NC Triad. We’ve seen premium materials fail prematurely because of poor installation, and we’ve seen modest materials perform beautifully for thirty years because every detail was executed correctly. That experience is what this guide is built on — honest, practical information that helps you make a well-informed decision.
This is the most important thing we can tell you, and it’s the thing almost nobody says out loud.
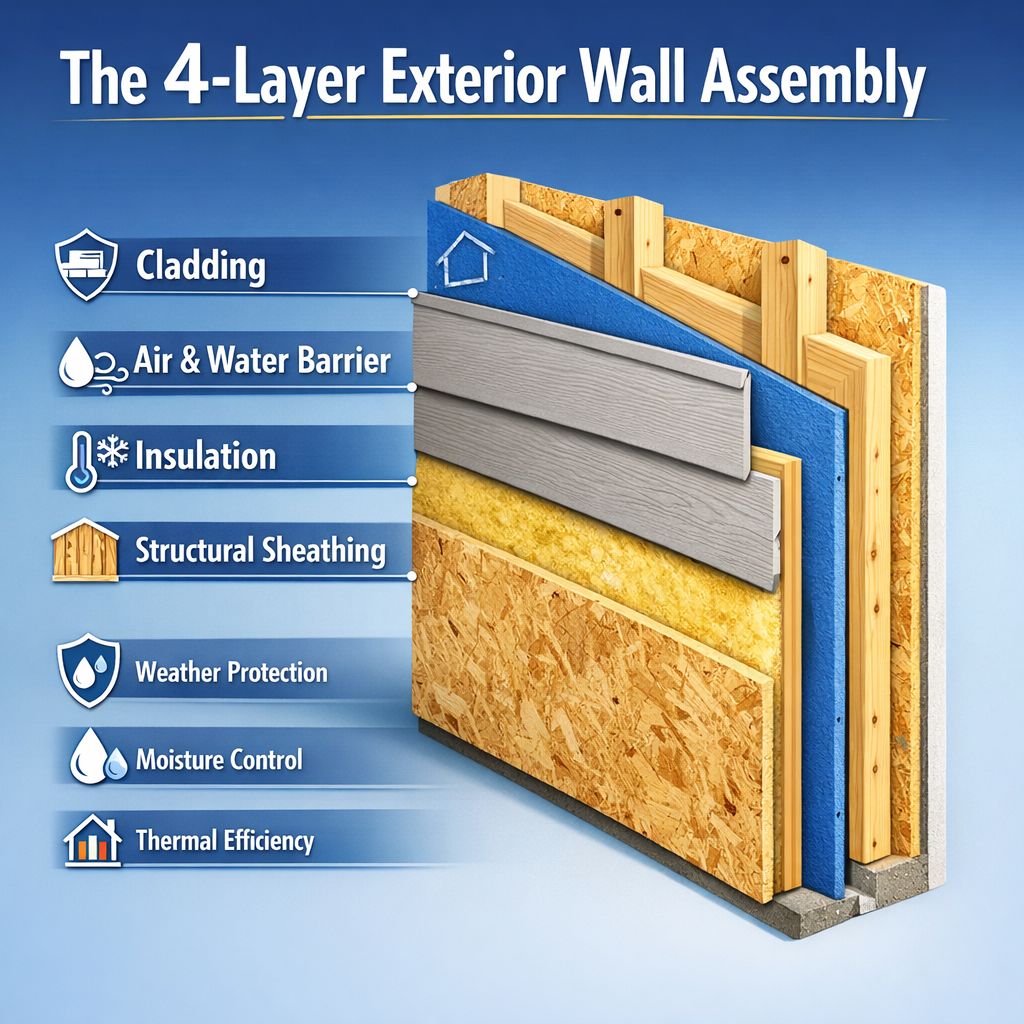
Your exterior cladding — whether that’s fiber cement, engineered wood, vinyl, metal, or brick veneer — is actually the outermost layer of a multi-layer system. It is designed to be the sacrificial layer, the one that takes the weather and absorbs the UV. The real water management happens behind it.
A properly constructed exterior wall assembly works in the following sequence, from the inside out:
This is sometimes called a rainscreen assembly, and it’s the gold standard for durable cladding installation. The drainage cavity works on a basic principle: by equalizing air pressure between the outside environment and the space behind the cladding, you reduce the driving force that pushes water through gaps and joints. Water has nowhere to go and simply drains down and out.
Why does this matter for your material selection? Because a premium fiber cement panel installed without a proper drainage cavity, over a compromised WRB, will fail faster than a basic wood board installed correctly over a well-maintained drainage plane. Durability is a system outcome, not a material specification.
For homeowners wanting to understand the technical standard that governs moisture management in cladding assemblies, ASHRAE 160 provides the benchmark guidance used by building science professionals in the United States.
Material selection doesn’t happen in a vacuum — it happens in a climate zone. And the NC Triad has a climate that genuinely tests exterior assemblies.
Winston-Salem, Greensboro, and High Point sit in IECC Climate Zone 4A — a mixed-humid zone. What that means practically:
This profile means that the NC Triad puts every performance claim on a cladding material to the test. A product that performs well in the mild Pacific Northwest climate may behave very differently here. Your installer needs to understand this context — not just follow the manufacturer’s generic installation guide.
Rather than a surface-level rundown of options, here’s an honest comparison of the most common exterior cladding materials — evaluated against the factors that actually determine long-term performance.
Fiber cement — made from Portland cement, sand, and cellulose fiber — is one of the most popular choices for good reason. It is dimensionally stable, resists moisture well, and holds paint firmly. In the NC Triad climate, it handles freeze-thaw cycling better than raw timber and is not affected by insect activity.
What to watch for: Fiber cement has a coefficient of thermal expansion of approximately 8–10 µm/m·°C — meaning it expands and contracts with temperature, though less dramatically than some other materials. Joints and fastener patterns must accommodate this movement. End cuts — any edge where the factory finish doesn’t exist — must be sealed on site, because raw fiber cement absorbs water readily at cut edges. Installers who skip this step will see premature joint failure and swelling within a few years.
Fiber cement also requires repainting on a cycle. The paint film is what provides UV protection, and once it fails, the substrate becomes vulnerable. In our climate, expect a repainting interval of roughly 10–15 years depending on orientation and sun exposure.
Performance classification note: Fiber cement panels are non-combustible, but fire performance in a full cladding assembly depends on the entire system — including cavity insulation, WRB membrane, and fixing components. A non-combustible panel installed over a combustible insulation layer with a vapor-permeable WRB may produce a very different fire assembly rating than the panel specification alone suggests.
For a closer look at what fiber cement repair and maintenance involves in practice, Siding Savvy: Repairing Fiber Cement Like a Pro is a useful reference for NC Triad homeowners.
Natural and engineered wood products remain popular for their appearance and their relative environmental credentials. In the NC Triad, cedar, pine, and engineered wood composites are all used in residential cladding.
The durability rating gap you need to understand: Timber suppliers often reference “natural durability” as a selling point. Some reference formal ratings like Durability Class 1–5 (per EN 350). The critical detail that rarely gets mentioned: those ratings are laboratory-derived under standardized exposure conditions. They assume adequate ventilation, appropriate end-grain protection, and correct joint detailing.
In real-world installation, the same timber that achieves a favorable durability class rating can fail within a decade if:
– End grain is left unsealed — the cut ends of any board absorb moisture at many times the rate of the face grain. Every cut made on site must be sealed with an appropriate end-grain sealer.
– Joint geometry traps water — horizontal surfaces or recessed joints that allow water to pond rather than drain dramatically accelerate decay and splitting.
– The board is installed in the lowest 300mm of the facade — the zone closest to ground level is the highest-moisture environment on any exterior wall, subject to splash-back, soil moisture, and reduced airflow. Special attention to drainage and stand-off from grade is essential here.
– Ventilation behind the board is restricted — wood manages moisture through drying. If the back face cannot dry, even a naturally durable species will degrade ahead of schedule.
Engineered wood products (such as oriented strand board siding or composite fiber-wood panels) are generally more dimensionally stable than solid timber but are not immune to these concerns. Proper sealing and installation details remain essential.
Vinyl is the most widely installed residential siding in the United States, and for straightforward reasons: it requires minimal maintenance, doesn’t need painting, and holds its color reasonably well in moderate climates.
Where vinyl faces pressure in NC Triad conditions: Vinyl has a high coefficient of thermal expansion — it moves substantially with temperature change. This is why every vinyl installation uses a nail slot rather than a fixed fastener: the siding panel must be able to slide. Installers who over-drive fasteners, restrict panel movement at corners, or install panels in cold weather without accounting for contraction will see buckling, warping, or joint separation within a few years.
In high-UV environments, lower-grade vinyl formulations can become brittle over time, making them vulnerable to impact damage. Specify products with UV-stabilized formulations and heavier wall thickness for better long-term performance. Homeowners comparing specific product lines and profiles will find How to Compare Vinyl Siding Options a practical starting point before meeting with a contractor.
Metal panels — aluminum, zinc, Corten steel, and aluminum composite materials — offer excellent longevity when correctly specified and installed. They are increasingly used in residential applications in the NC Triad for both aesthetic and performance reasons.
Surface finish is where long-term performance is decided: Not all metal coatings are equivalent. The coating chemistry determines how long the finish performs:
Galvanic corrosion is a real fastener risk. When dissimilar metals are in contact in the presence of moisture — such as a steel fastener through an aluminum panel — electrochemical corrosion occurs at the interface. Over 20–30 years, this can compromise fastener pull-out resistance and create visible rust staining on the face of the panel. Specify compatible fastener materials as part of any metal cladding system.
Here’s a technical point that separates experienced cladding installers from those who are simply following directions: every cladding material moves with temperature, and if the installation system doesn’t accommodate that movement, the joints pay the price.
The measurement used is the coefficient of thermal expansion (CTE) — how much a material expands per degree of temperature change per unit of length. In the NC Triad, where the temperature swing between a cold January night and a July afternoon can exceed 90°F (50°C), the cumulative movement across a full wall of cladding is significant.
| Cladding Material | Approx. CTE (µm/m·°C) | Movement Risk Level | Key Design Consideration |
|---|---|---|---|
| Aluminum composite panel | ~23 | Medium-High | Requires movement joints at regular intervals; fixed points must be engineered |
| Vinyl siding | ~50–80 | High | Nail slots are mandatory; never fix rigidly at mid-panel |
| High-pressure laminate (HPL) | ~35 (longitudinal) | Medium-High | Panel sizing and joint width must be calculated per span |
| Fiber cement | ~8–10 | Low-Medium | More stable than most; still requires gap at butt joints |
| Timber (across grain) | ~30–60 (variable) | High | Highly dependent on moisture content; end-grain sealing critical |
| Zinc / pre-patinated metal | ~22 | Medium-High | Requires standing seam or clip systems to allow linear movement |
When these values are not factored into joint width, fastener pattern, and panel sizing, the result is predictable: sealant joints that split open, panels that buckle in summer heat, and fasteners that work loose over repeated expansion cycles. Most cladding failures that appear within 5–10 years of installation trace back to movement accommodation that was either ignored or underestimated.
Visible fasteners — face-screwed panels — are the simplest installation method, and the most problematic over the long term. Each fastener penetration is a potential water ingress point, and the washer and sealant that protect it are on a shorter service life than the cladding itself.
Hidden fastener and clip systems eliminate exposed penetrations and allow panels to move independently of the fixing point. They are worth specifying for any premium installation, but they introduce their own engineering requirements:
This is the topic that almost never appears in residential cladding guides, and it’s one of the more consequential oversights.
In the NC Triad’s Zone 4A climate, moisture vapor moves in two directions depending on the season:
– In winter, warm interior air drives vapor outward through the wall. If that vapor reaches a cold surface within the wall assembly at the right conditions, it will condense — a phenomenon called interstitial condensation.
– In summer, the situation partially reverses. Hot, humid outdoor air can drive vapor inward, particularly in air-conditioned homes where the interior surface is cold.
This is why the WRB specification — and specifically whether it is vapor-open or vapor-closed — matters for the long-term hygrothermal performance of the full assembly. A vapor-open WRB allows the wall to dry outward; a vapor-closed WRB does not. In a mixed-humid climate, a vapor-open WRB is generally the appropriate choice for above-grade walls, because outward drying is the primary moisture management mechanism.
If you’re evaluating a contractor who cannot explain this distinction, that’s useful information about how they think about exterior assemblies.
The Building Science Corporation’s resource library provides accessible, peer-reviewed guidance on hygrothermal wall assembly design that is directly applicable to NC climate conditions.
We want to offer a realistic framework for thinking about service life — because the marketing claims attached to cladding products are often optimistic under ideal conditions, and field conditions are rarely ideal.
Factors that extend real-world service life:
– Correct drainage cavity installation (rainscreen principle)
– Compatible, corrosion-resistant fasteners specified for local wind loads
– Factory finishes with PVDF coating chemistry (for metal) or quality paint systems (for fiber cement and wood)
– Sealed end grain on all site-cut timber and fiber cement
– Proper joint geometry that sheds rather than traps water
– Ground clearance of at least 150–200mm above finished grade at the base of cladding
Factors that reduce real-world service life:
– Cladding installed directly over sheathing with no drainage gap
– Face fasteners without appropriate sealant maintenance
– Horizontal surfaces or deep-recessed joints that allow water to pond
– Cutting factory-finished edges without sealing the exposed substrate
– Ignoring the lowest 300mm of facade (the highest-moisture zone on any wall)
A reasonable performance expectation for a correctly installed, well-specified cladding system in NC Triad conditions, without major maintenance failures, is 30–50 years for quality fiber cement or metal systems. Timber systems can achieve similar lifespans when installed and maintained correctly, though they typically require more active maintenance involvement.
We’ve covered a lot of technical ground in this guide deliberately, because we believe homeowners deserve to understand why these details matter. But here’s the plain truth: the gap between a cladding system that lasts 15 years and one that lasts 45 years is almost always the installation, not the material.
Specifying a premium product and handing it to an installer who doesn’t understand drainage cavities, movement accommodation, or fastener compatibility is a combination that produces beautiful results for the first two years and expensive problems in year seven.
When evaluating contractors for an exterior cladding project in the NC Triad, it’s worth asking directly: How do you detail the drainage plane? What fastener specification do you use for this cladding system? How do you handle end-grain sealing on site-cut fiber cement or timber? The quality of those answers will tell you a great deal about what you’re actually purchasing.
At Smithrock Roofing, our 60-plus combined years of exterior experience means we’ve worked through these questions on real projects, in real NC conditions — not in a manufacturer’s training video. We’re fully licensed, insured, and CertainTeed PREMIER ShingleMaster certified, and we approach every exterior project the same way: with the same attention to the details that determine whether a system performs as it should over the long term.
If you’re planning an exterior cladding project and want a straightforward conversation about what the right system looks like for your specific home and situation, we’re happy to take a look and give you an honest assessment.
If you’re approaching an exterior cladding project in the coming year, three steps will put you in the strongest possible position before a single panel goes up.
1. Commission a Moisture Audit Before Specifying Materials
Before selecting a cladding system, have a qualified contractor assess your existing wall assembly — particularly around windows, penetrations, and any areas where previous cladding has shown movement or staining. In NC Triad conditions, the moisture history of a wall often determines which system makes the most sense going forward. Starting with that information prevents costly mid-project corrections.
2. Request Manufacturer Technical Documentation for Any System You’re Considering
In 2026, every major cladding manufacturer publishes detailed installation requirements that go far beyond what appears in a sales brochure. Ask your contractor to walk you through the relevant sections before signing a contract. If they can’t locate or discuss those documents comfortably, that tells you something important about the level of installation you’re likely to receive.
3. Plan the Full Envelope, Not Just the Cladding Layer
Coordinate your cladding project with any window, trim, soffit, or flashing work that’s due within the next several years. Systems that are detailed as a complete envelope assembly perform significantly better than cladding that’s added around aging or incompatible adjacent components. Bundling that scope now also reduces the number of times the wall assembly is opened over time — each of which introduces risk.
There’s no single answer that applies to every home, but fiber cement and engineered wood products consistently perform well in the NC Triad because they’re designed to handle the region’s combination of high humidity, significant rainfall, and temperature swings. Metal panel systems are also strong performers in these conditions. The right choice depends on your specific wall assembly, the home’s exposure, and your maintenance preferences — which is why an on-site assessment matters more than a general recommendation.
Early-stage issues like isolated paint failure, minor caulk separation at joints, or a few damaged panels can often be addressed with targeted repairs if the underlying water-resistive barrier is intact. Signs that replacement is likely the better path include widespread cracking or warping, any evidence of moisture intrusion into the wall cavity, fastener corrosion or pull-through, or cladding that’s approaching the end of its expected service life. A qualified contractor can help you make that determination with a proper inspection rather than a visual estimate from the ground.
Project duration varies considerably depending on the size of the home, the complexity of the wall geometry, how much trim and detail work is involved, and whether there are any substrate issues that need to be addressed before the new system goes on. A straightforward re-clad on a modest single-story home moves faster than a multi-story home with significant window and architectural detail. Your contractor should be able to give you a realistic schedule estimate after reviewing the scope in person.
It can, depending on what’s happening behind the cladding layer. A cladding replacement project is an opportunity to improve air sealing, upgrade the water-resistive barrier, and in some cases add continuous insulation to the wall assembly — all of which contribute to better thermal performance. However, cladding alone, installed over an existing assembly without those upgrades, won’t produce dramatic energy improvements on its own. If energy performance is a priority, it’s worth discussing those options as part of the overall project scope.
Exterior cladding is a long-term investment in your home’s protection, and the NC Triad’s climate doesn’t forgive shortcuts in the wall assembly. Smithrock Roofing brings more than 60 combined years of real-world exterior experience to homeowners across Winston-Salem and Greensboro — with the technical knowledge and installation discipline to back it up. If you’re ready to talk through your project honestly and without pressure, Contact Smithrock Roofing and let’s start with a straightforward conversation about what your home actually needs.
Smithrock Roofing © Copyright 2026 • All Rights Reserved • Privacy Policy • Maintained by Mongoose Digital Marketing