
If you’ve noticed water stains on the ceiling near your fireplace, or dark streaking on the masonry inside your home after a heavy rain, you already know the sinking feeling that comes with a chimney leak. Our area gets its fair share of weather, with spring storms, heavy summer downpours, and freeze-thaw cycles that can work against any weak point in your roof. A chimney sits right in the middle of all that exposure, and the intersection where it meets your roof is one of the most technically demanding details in residential construction.
The frustrating reality for most homeowners is that chimney leaks are frequently misdiagnosed, repeatedly patched with the wrong materials, and declared “fixed” until the same stain reappears six months later. That cycle is expensive in both time and long-term structural damage, and it’s almost always avoidable with the right approach from the start.
This guide breaks down roof repair around a chimney at a level of detail most contractors won’t take the time to explain. We’ll cover why flashing actually fails (the real reason, not the oversimplified version), how to think about the five distinct failure zones around a chimney, what separates a durable repair from a temporary patch, and what questions to ask before any work begins.
A chimney isn’t just a structure sitting on your roof, it’s a separate, independent mass of masonry that moves on its own thermal schedule. Your wood-framed roof expands and contracts with temperature swings too, but at a completely different rate. When outdoor temperatures shift dramatically, which they absolutely do across the Piedmont Triad through the seasons, a masonry chimney and a wood roof deck are pulling apart from and pressing against each other in a slow, relentless cycle.
This is called differential thermal movementand it is the primary mechanical reason chimney flashing fails. Not age. Not UV exposure. Not inferior caulk. The materials themselves are engineered to move, and any connection that can’t accommodate that movement will eventually crack, gap, or tear loose.
This is exactly why the standard professional flashing system uses two independent components, step flashing that moves with the roof, and counter flashing that moves with the chimneyrather than one continuous piece bridging both. When a contractor installs a single rigid piece of flashing and calls the job done, they’ve ignored the physics of the problem. When a homeowner fills a gap with caulk from the hardware store, they’ve applied a band-aid to a structural engineering issue.
Understanding this from the start changes how you evaluate any repair proposal you receive.
Need a hand with this in Winston-Salem, Greensboro and the NC Triad? Call (336) 971-0464 or request a free estimate. Honest answers, no pressure.
Most articles talk about chimney flashing as if it’s one single component that either works or doesn’t. In reality, there are five distinct zones where flashing can fail, and each one fails for different reasons and demands a different fix.
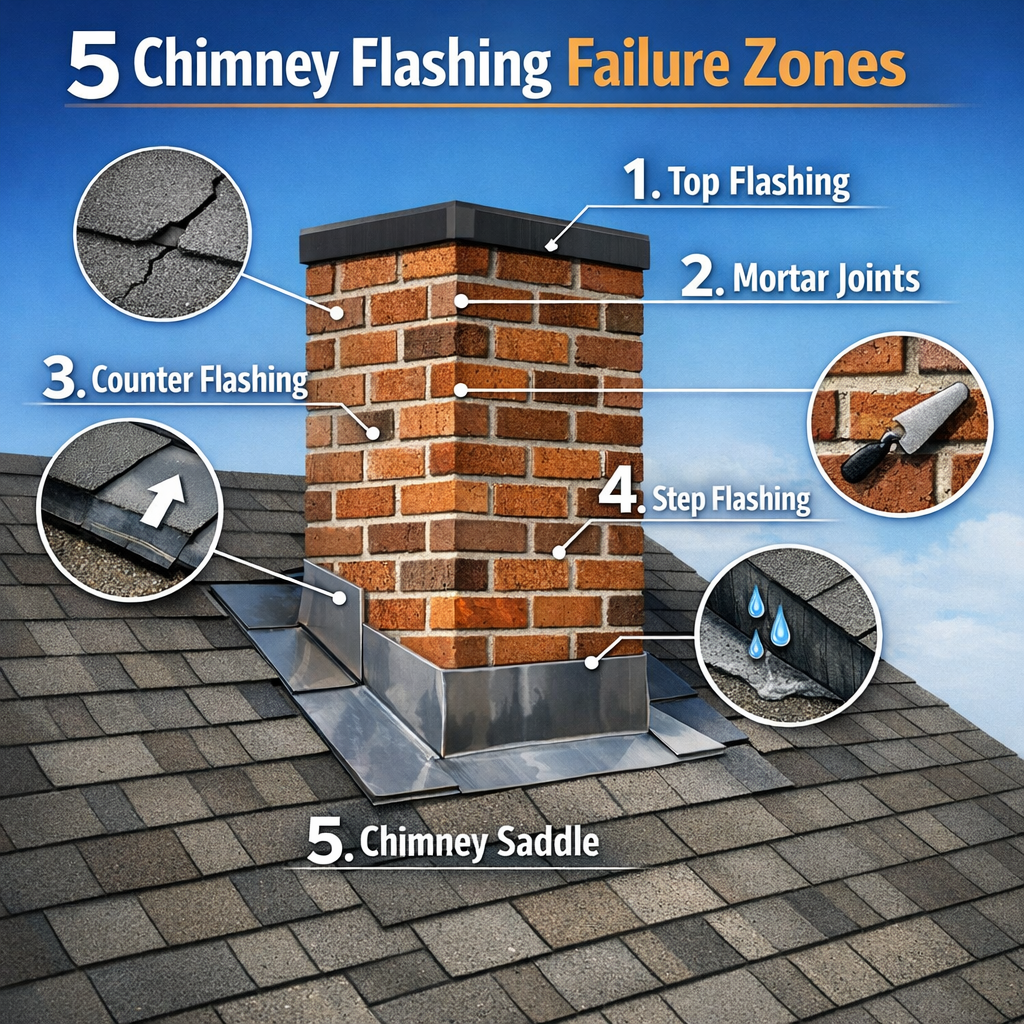
The back pan sits directly behind the chimney on the upslope side, it’s the first line of defense against water that runs down the roof and hits the back face of the chimney. This is also the zone most homeowners never see, which means problems here often go unnoticed until they’re serious.
One detail almost never mentioned in general roofing content: the back pan must be fabricated with a built-in slope. It is not simply a flat pan of metal sitting behind the chimney. On a low-pitch roof, a flat back pan creates a standing water situation that will fail regardless of how good the metal is or how well it’s sealed at the edges. A properly fabricated back pan channels water away from the chimney face rather than holding it there.
The apron covers the front face of the chimney where it meets the lower slope of the roof. Water doesn’t typically accumulate here the way it does at the back pan, so the apron is often the last zone to develop an active leak. However, if you’re seeing visible damage to the apron, that’s usually a signal that more serious hidden damage exists higher up on the chimney.
Step flashing is a series of individual L-shaped metal pieces, each interwoven with a course of shingles along the side walls of the chimney. This is where the independent movement principle matters most. Each step flashing piece should be fastened only to the roof deck, not to the chimney, so it can move freely as the roof shifts. When a roofer nails through both the step flashing and the counter flashing in the same location, they’ve mechanically locked the two systems together and defeated the entire purpose of the two-part design.
Nail placement also matters in a less obvious way: fasteners placed too close to shingle keyways can create water entry points that look like flashing leaks but are actually shingle installation errors.
Counter flashing overlaps the top edge of the step flashing and is anchored into the chimney itself, not the roof. This is the component that moves with the masonry and allows the step flashing below it to move independently with the roof deck.
The method used to anchor counter flashing depends on the chimney’s brick age, mortar condition, and expected thermal movement, not just personal preference or what’s easiest on the day of the repair. There are three primary approaches:
Inside corners (where the side wall of the chimney meets the roof slope) and outside corners (the leading edge of the apron) require custom-formed pieces that change flashing direction. These are the most skill-dependent fabrications in the entire system. Field-bent corners made on the job site from flat stock are more prone to cracking at the bend, especially with aluminum. Factory-fabricated corner pieces made from copper or heavier-gauge material perform significantly better over time.
A chimney cricket (also called a saddle) is a peaked, tent-shaped structure built on the upslope side of the chimney to divert water and debris around the chimney rather than letting it accumulate behind it.
Most building codes, including those applicable across our area, require a cricket for any chimney wider than 30 inches measured perpendicular to the roof slope. This isn’t a suggestion or an upgrade. It’s a structural requirement that changes the entire repair calculus for larger chimneys.
Here’s why it matters even if your local inspector didn’t flag it: without a cricket, the dead zone behind a wide chimney becomes a debris trap. Leaves, pine needles, and granules from aging shingles accumulate in this pocket, hold moisture against the back pan and chimney base, and accelerate deterioration at a rate that a correctly installed flashing system simply cannot overcome. You can install the best copper flashing money can buy, and a wide chimney without a cricket will still develop problems faster than it should.
The presence or absence of a cricket should be one of the first things evaluated in any chimney repair assessment. If your chimney is wider than 30 inches and doesn’t have one, any repair proposal that doesn’t address the cricket is an incomplete proposal.
Walk into any hardware store and you’ll find tubes of roofing cement and elastomeric sealant marketed directly at the homeowner chimney leak problem. Spread this over the gap, the packaging implies, and you’re done.
Here’s the honest explanation of why that approach fails: surface-applied sealant on chimney flashing has a functional lifespan measured in months under real outdoor conditions, not years. The thermal movement described earlier means the joint between chimney masonry and roof flashing is constantly working. A sealant joint that can’t accommodate that movement cracks, loses adhesion, or peels at the edge. When it does, it often creates a worse situation than the original gap because water can get under the sealant layer and become trapped, accelerating rot and corrosion beneath a surface that looks sealed from the outside.
The deeper problem is diagnostic: sealant applied over existing flashing makes it nearly impossible to properly assess what’s happening underneath. A roofer who applies sealant as a primary repair is effectively closing the chart on the patient without running the tests.
A durable chimney flashing repair requires removing the existing flashing system, inspecting the underlying roof deck and sheathing for rot or water damage, and installing a properly engineered two-part system with the correct termination method for that chimney’s specific masonry characteristics. Sealant has a role in that system, specifically at the counter flashing termination joint, applied correctly over a backer rod, but it is a component, not the solution.
Not all flashing metals are equal, and the wrong material choice can undermine an otherwise correct installation.
| Material | Expected Lifespan | Key Advantages | Key Limitations |
|---|---|---|---|
| Copper | 50–70+ years | Exceptionally durable; self-sealing patina; ideal for masonry contact | Higher material cost; incompatible with pressure-treated lumber without isolation |
| Galvanized Steel | 15–25 years | Cost-effective; widely available; easy to form | Zinc coating eventually fails; susceptible to corrosion at cut edges |
| Aluminum | 20–35 years | Lightweight; corrosion-resistant; good formability | Reacts with wet concrete and mortar (galvanic corrosion); not suitable for direct masonry contact without isolation layer |
| Lead-Coated Copper | 50+ years | Excellent durability; traditional aesthetic; solderable | Specialized application; less commonly stocked |
| EPDM Rubber | 20–30 years | Highly flexible; ideal for low-slope applications; accommodates movement well | Incompatible with certain petroleum-based sealants; requires compatible adhesives |
A detail that rarely gets mentioned in general content: aluminum flashing in direct contact with wet mortar undergoes galvanic corrosion. The mortar’s alkaline chemistry reacts with the aluminum and accelerates deterioration from the embedded edge, the exact point you can’t see or inspect easily. If aluminum flashing is used on a masonry chimney, it needs a separation layer or isolation compound at every point of masonry contact. Skipping that step shortens the flashing’s effective life significantly.
Copper, by contrast, is chemically stable in contact with masonry and develops a patina that actually improves its sealing characteristics over time. It’s the premium choice for chimney flashing specifically because of this compatibility advantage, and for chimneys with significant thermal movement or complex geometry, the material cost is a sound long-term investment.
One factor that almost no general content addresses: the right repair method depends significantly on how much water your chimney is managing.
On a steep-pitch roof with a narrow chimney, water sheds quickly and the flashing system handles a relatively modest hydraulic load. On a low-pitch roof with a wide chimney, that same storm produces dramatically more water pressing against the back pan and sides, with less gravitational force helping it drain away.
This directly affects:
A minimum two-foot removal zone around the chimney is standard practice before any flashing repair is performed. This allows the roofer to inspect the deck, address any shingle layout problems in the approach zone, and ensure the new flashing integrates correctly with properly positioned shingles rather than conforming to the compromised geometry of whatever was there before.
One of the most common complaints homeowners have about the repair process is that different contractors give them wildly different assessments, one says it can be patched, another says the entire system needs to come out. Without a clear framework, that feels like a coin flip.
Here’s how an experienced roofer actually evaluates this decision:
Indicators that a targeted repair may be appropriate:
– Flashing metal is intact with measurable thickness (no pin holes, no significant corrosion through the material)
– Counter flashing mortar joint is reachable, at least ¾ inch deep, and mortar is in sound condition
– Underlying deck shows no soft spots, no rot, and no evidence of long-standing water infiltration
– The flashing system is two-part (step + counter) rather than a single caulked sheet
– Adjacent shingles are within their service life and can integrate cleanly with re-seated flashing
Indicators that full replacement is the correct call:
– Metal has thinned through corrosion or has visible perforations
– Mortar joint depth is insufficient to re-anchor counter flashing properly
– Underlying sheathing or deck boards show rot or water damage
– Existing system is a single-piece surface-mounted installation rather than a proper step/counter configuration
– Shingles adjacent to the chimney are at or past their service life (replacement prevents the geometry mismatch problem described above)
– Chimney wider than 30 inches without a cricket (repair without cricket installation is an incomplete solution)
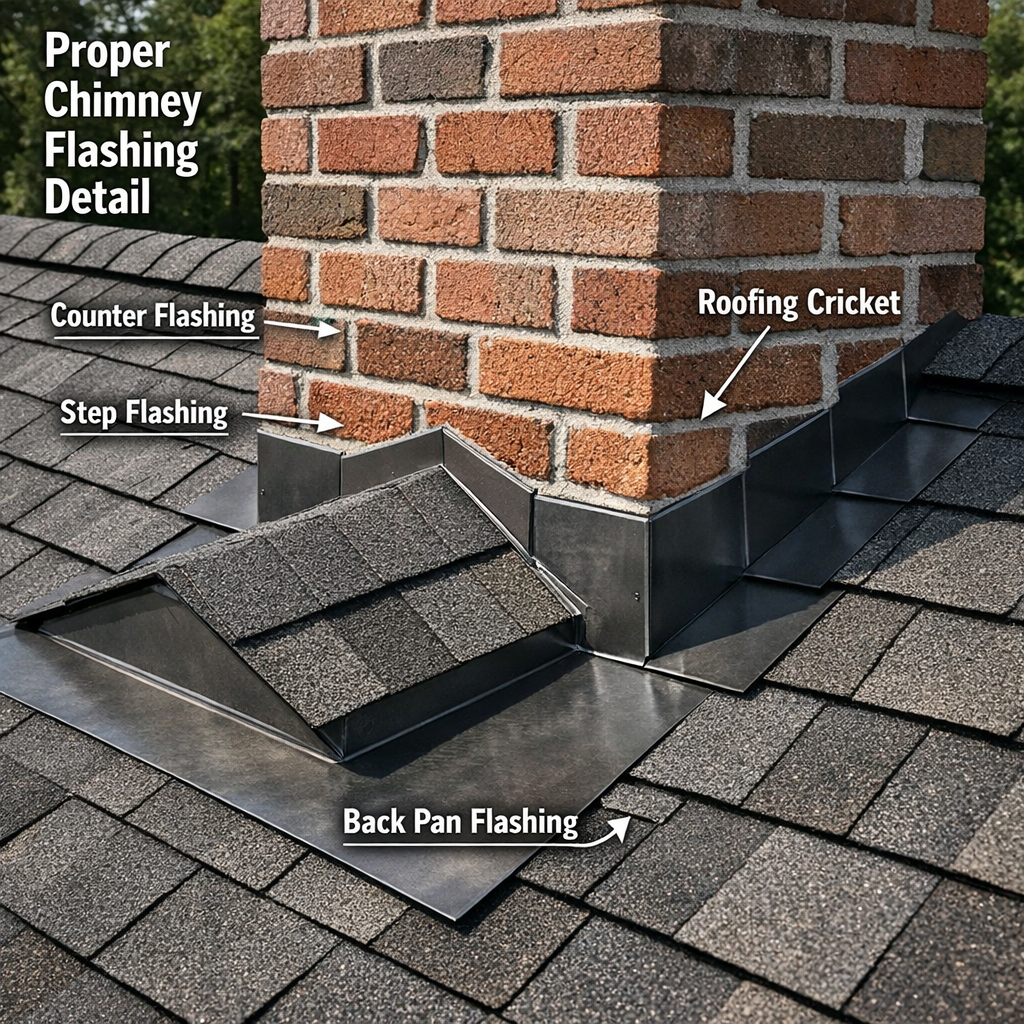
Understanding the correct process helps homeowners evaluate the proposals they receive, and recognize when a contractor is taking shortcuts.
A roofer who provides a final scope of work without removing the existing flashing first is guessing. The condition of the deck, the mortar joint, and the existing step flashing is often only visible after removal. At minimum, a thorough inspection of accessible areas should precede any binding repair commitment.
Any soft, rotted, or water-damaged sheathing must be replaced before new flashing goes in. Installing new flashing over compromised decking is a guaranteed callback, the fasteners won’t hold properly, and the structural support for the repair is already compromised.
Each L-shaped piece of step flashing goes in with each course of shingles, fastened to the roof deck only, never to the chimney, and never through both components simultaneously. Fasteners should be placed according to manufacturer specifications, away from shingle keyways.
On most chimney configurations, this means a back pan with a minimum slope of at least 1/8 inch per foot built into the metal itself, not relying on the roof pitch alone. On a very low-pitch roof, this may require a more aggressively formed pan or a modified drainage channel.
Based on mortar condition and brick type, reglet in mortar, reglet in face, or surface-mounted bar, counter flashing is anchored into the chimney with appropriate fasteners. The joint is sealed with a UV-stable, flexible sealant applied over a correctly sized foam backer rod. The backer rod controls sealant depth to the 2:1 width-to-depth ratio that allows the joint to perform properly across thermal movement cycles.
Shingles near the chimney are laid so keyways don’t align with the chimney face, and a minimum gap is maintained between shingle edges and masonry to prevent capillary water draw. This is a detail that requires attention to layout, not just material installation.
For chimneys over 30 inches wide, this step isn’t optional. A properly framed and flashed cricket is its own mini-roofing project, it requires sheathing, step flashing along its ridgeline, and integration with the back pan below it.
The difference between a repair that holds for 20 years and one that needs to be redone in 18 months often comes down to the answers you get before the contract is signed.
At Smithrock Roofing, these aren’t trick questions, they’re the baseline of how we approach every chimney repair assessment across Winston-Salem, Greensboro, High Point, Kernersville, and the surrounding Triad communities. With 60+ combined years of experience, CertainTeed PREMIER ShingleMaster certification, and over 312 five-star reviews from neighbors just like you, we don’t believe in patch-and-hope work. We believe in getting it right the first time, and backing that with a 5-year labor warranty alongside the manufacturer’s limited lifetime coverage on materials.
If you’ve got a chimney concern, reach out for an honest assessment. No pressure, no upsell, just straight answers about what your roof actually needs.
The most common indicator is water staining that appears on interior ceilings or walls directly below or near the chimney, particularly after heavy rain or snowmelt. However, because water travels before it drops, the stain may appear several feet from the actual entry point. For a more thorough diagnosis, the article Ceiling Leak? Find the Real Source Before You Call Anyone walks through how to trace the path from interior stain back to the actual entry point, which is a useful companion to any chimney assessment. A roofing professional can also confirm the source by inspecting the flashing system directly, checking for separated counter flashing, failed sealant at termination points, or base flashing that has lifted away from the roof deck.
Base flashing is the lower component, embedded into the roofing material and designed to move with the roof as it expands and contracts with temperature changes. Counter flashing is the upper component, set into the mortar joints of the chimney masonry and overlapping the base flashing. The two pieces work together but remain independent of each other, that overlap without rigid connection is intentional, and it’s what allows the system to flex without cracking or pulling apart over time.
Not every chimney requires a cricket, but any chimney wider than 30 inches on its upslope face does, and many roofing codes require it regardless of preference. A cricket is a peaked structure built behind the chimney to deflect water and debris around the sides rather than allowing it to pool against the back wall. Without one on a wide chimney, that back wall becomes a point of continuous water pressure during every rain event, which dramatically accelerates flashing failure and masonry deterioration.
A properly scoped and installed chimney flashing repair using quality materials, correctly lapped, correctly terminated into mortar joints, and integrated with sound shingle courses, should perform reliably for 20 years or more under normal conditions. The variables that shorten that lifespan are almost always related to installation quality: insufficient lap, sealant used as a primary seal instead of a secondary one, or counter flashing that was surface-mounted rather than embedded. Material choice matters, but execution matters more.
Chimney flashing repair is one of the more exacting jobs in residential roofing, and it rewards contractors who understand both the masonry and the roofing system well enough to make them work together correctly. Smithrock Roofing has been doing exactly that across Winston-Salem and Greensboro for decades, with the certifications, the track record, and the straight-talking approach that homeowners in the Triad deserve. If your chimney has you concerned, Get a Free Estimate and let’s take an honest look at what it actually needs.
Need a local pro? Learn more about our chimney services in King.
See also: Roof Repair Company | Fix Leaks Right the First Time

Smithrock Roofing © Copyright 2026 • All Rights Reserved • Privacy Policy • Maintained by Mongoose Digital Marketing
