
Steel siding has earned a strong reputation among homeowners who want a low-maintenance, long-lasting exterior, and for good reason. It holds up against impact, resists rot, and when properly installed, can outlast many other siding materials by decades. But “properly installed” is doing a lot of work in that sentence.
Here at Smithrock Roofing, we’ve seen firsthand what separates a steel siding installation that performs beautifully for 40 years from one that starts showing problems in under five. The difference almost never comes down to the panels themselves. It comes down to the wall assembly underneath them, the fasteners holding them in place, and whether the installer understood the engineering behind the material, not just the technique.
This guide covers what you actually need to know: the building science, the common mistakes, and the details that most installation guides skip entirely. Whether you’re evaluating a contractor’s proposal or simply want to be a more informed homeowner, this is the deeper look the topic deserves.
Most installation guides jump straight to starter strips and panel overlaps. That’s a problem, because the most consequential decisions in a steel siding project happen before a single panel goes up.
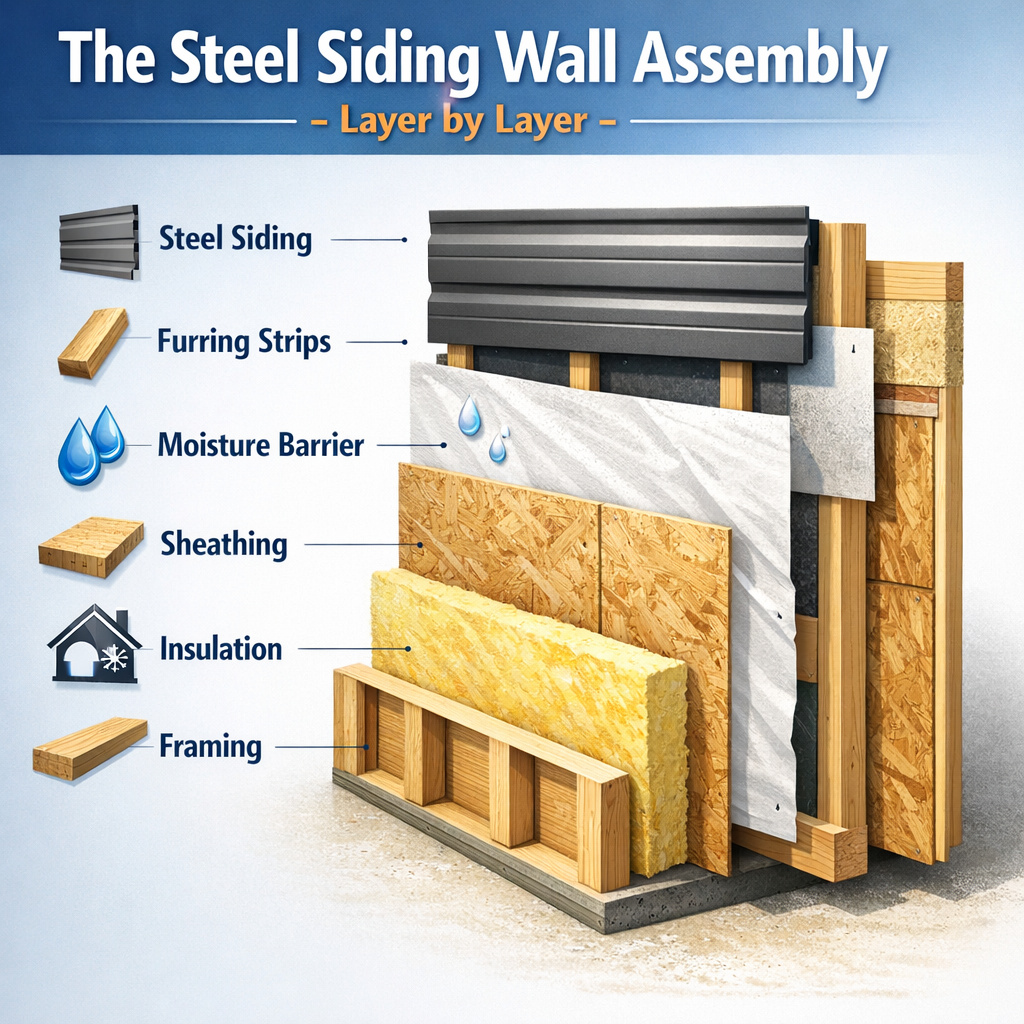
Think of your wall as a system, not just a surface. Steel siding is the outermost layer of that system, but it’s the layers beneath that determine whether your home stays dry, energy-efficient, and structurally sound over time.
The foundation of any exterior wall assembly is the structural sheathing, typically OSB or plywood. For steel siding applications, the sheathing needs to be properly fastened to the framing with an appropriate fastener schedule to resist racking forces. Any gaps at panel edges should be tight enough to maintain shear performance without compromising the drainage plane you’ll build above it.
Sheathing condition matters enormously on re-siding projects. When old siding comes off, it’s not unusual to find soft spots, delamination, or areas where moisture has been quietly working for years. Any compromised sheathing should be replaced before new panels go on, full stop.
Steel siding is not airtight. Wind-driven rain, particularly in storms common to the NC Triad area, will find its way behind panels at laps, penetrations, and trim intersections. The air and water-resistive barrierhouse wrap or building paper, is your primary defense against bulk water infiltration and air movement through the wall.
The WRB needs to be installed with overlapping courses (upper layers lapping over lower ones, like shingles), sealed at all penetrations, and integrated correctly with window and door flashing. Skipping this step or doing it carelessly is the single fastest way to create a moisture problem that won’t show up until significant damage has already occurred.
One of the most overlooked details in steel siding installation is the ventilated air gap between the WRB and the back of the panels. A 3/4-inch to 1-inch gap, created using hat channel or horizontal furring strips over the WRB, does two things that dramatically extend the life of your siding:
Panel manufacturers know this. Many of their warranty documents reference the importance of a drainage plane, though this detail rarely makes it into contractor conversations with homeowners.
Here’s a detail that surprises many homeowners: if your wall framing is steel (light-gauge metal studs), that framing conducts heat at roughly 400 times the rate of wood. Even in wood-framed homes, steel fasteners and connectors create thermal bridges that quietly undermine energy performance.
The solution is continuous exterior insulationrigid foam or mineral wool board installed over the sheathing, beneath the furring strips, before the steel siding goes on. This layer breaks the thermal bridge, dramatically improves wall R-value in practice (not just on paper), and keeps the sheathing warmer in winter, which reduces the risk of condensation within the wall cavity.
In the NC Triad’s mixed-humid climatethis isn’t an exotic upgrade, it’s a smart building practice that pays off in lower energy bills and better long-term durability.
Need a hand with this in Winston-Salem, Greensboro and the NC Triad? Call (336) 971-0464 or request a free estimate. Honest answers, no pressure.
Every installer knows that steel expands and contracts with temperature. What most of them can’t tell you is how much, and that gap in knowledge leads to real installation errors.
Steel has a coefficient of thermal expansion of approximately 6.5 × 10⁻⁶ inches per inch per °F. That sounds abstract, so here’s what it means in practice:
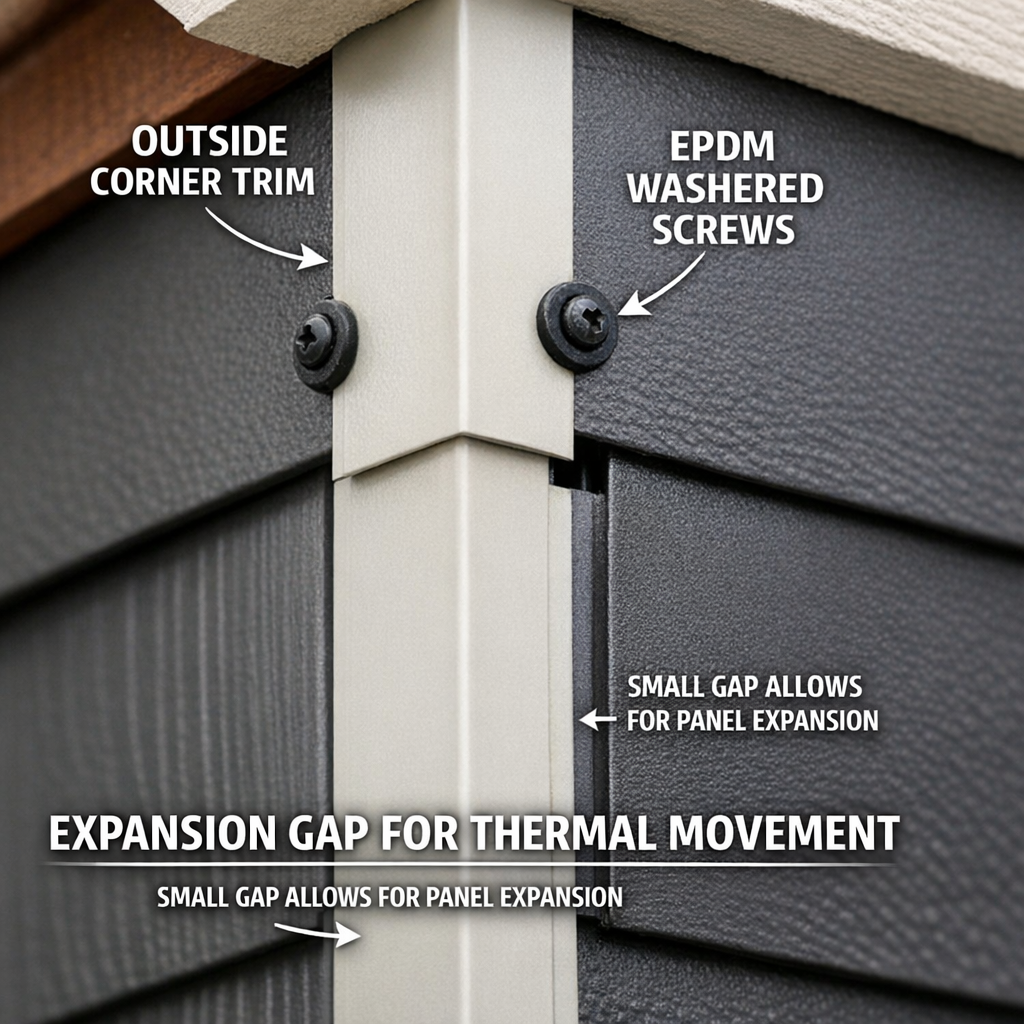
A 20-foot steel panel in a climate with a 100°F temperature swing, which is realistic in the NC Triad, where summer surface temperatures on dark-colored panels regularly exceed ambient air temperature by 40–60°F, will move approximately 0.156 inches (nearly 5/32 of an inch) along its length through a seasonal cycle.
That movement has to go somewhere. If the fasteners are overtightened and the panel is fully constrained, the steel has no option except to buckle, creating the visible waviness known as oil-canning, or to pull away from the fasteners entirely over repeated cycles.
The standard solution is slotted fastener holes in the panel. But the slot only works correctly if the screw is positioned at the center of the slot at installation, not driven tight to one end. Centering the screw in the slot allows the panel to move in both directions as temperatures change.
Key factors that affect how much movement to expect:
| Factor | Effect on Thermal Movement |
|---|---|
| Panel length | Longer panels move more, movement is proportional to length |
| Panel color | Dark colors absorb more solar radiation; surface temps can be 40–60°F above air temp |
| Climate zone | Greater seasonal temperature swings = greater total movement |
| Panel orientation | Horizontal panels experience most movement across their width; vertical panels along their length |
| Substrate | Panels over rigid foam have slightly different restraint characteristics than direct-to-sheathing installs |
Understanding this table helps explain why a fastening pattern that’s perfectly adequate in one climate zone or application can cause visible panel distortion in another. The NC Triad’s warm, humid summers and periodic cold snaps mean thermal movement is a real design consideration, not a footnote.
Walk into a home center and you’ll find dozens of screw options. The wrong choice here isn’t just a performance issue, it can become a visible, structural problem within a few years.
When two dissimilar metals make contact in the presence of moisture, a small electrical current flows between them. The less noble metal corrodes faster than it would in isolation. This is galvanic corrosion, and it’s one of the leading causes of premature steel siding failure that most installation guides don’t mention at all.
The practical implications for steel siding:
The professional standard for steel siding fasteners is stainless steel or coated carbon steel screws with EPDM washers. The EPDM washer creates a weathertight seal at the fastener penetration and provides a slight isolation buffer that reduces galvanic interaction.
Generic zinc-coated drywall screws are not an acceptable substitute, regardless of what’s available at the hardware store. They will corrode, and they will create rust staining on your siding within a few years.
Additionally, understand the difference between self-drilling and self-tapping screws:
Using the wrong screw type for your substrate doesn’t just make installation harder, it can strip fastener holes, reduce holding strength, and create entry points for water infiltration.
How panels are oriented on the wall, horizontal or vertical, affects more than aesthetics. It directly affects how wind-driven rain interacts with the laps and whether water has a path to drain away or a tendency to be forced inward.
Horizontal panels lap upper over lower, mimicking the logic of lap siding or fish-scale shingles. Gravity works in your favor: water that enters a lap has a natural path downward and outward. This orientation is generally more forgiving in high-rain environments when installation details at the laps are consistent.
The trade-off is that horizontal laps create more opportunities for wind-driven rain infiltration on walls with heavy lateral wind exposure, particularly at gable ends facing prevailing storm tracks.
Vertical panel orientation, common with corrugated and board-and-batten profiles, eliminates horizontal laps entirely. Water runs straight down the panel face and off. This is often preferred for agricultural and commercial applications, and it performs well on walls with significant wind exposure because there are no horizontal seams for wind pressure to push against.
The consideration with vertical installation is that water management at the top and bottom of the panel run becomes more critical. Head flashing at the top and proper base trim with drainage relief at the bottom need to be executed correctly.
In the Winston-Salem, Greensboro, and High Point area, prevailing weather tends to track from the southwest and west. For walls with heavy southwest exposure, the installation direction and trim detailing should account for the wind angle, particularly during the convective storm season. A knowledgeable installer will consider site-specific exposure, not just default to whatever orientation is easiest to work with.
Foam closure strips are the unsung component of a quality steel siding installation. They fill the corrugated voids at the top and bottom of panel runs, and at ridge and eave conditions on wall-to-roof transitions, sealing out insects, birds, and driven moisture.
There are two profiles:
Skipping closure strips, or using the wrong profile, creates open channels directly into the wall cavity. In warm, humid summers, that’s an open invitation for wasps, yellow jackets, and carpenter bees, as well as a direct moisture infiltration path during wind-driven rain.
Closure strips should be cut precisely to panel width, compressed slightly at installation for a snug fit, and coordinated with any sealant applied at the adjacent trim interface.
Most installation guides show a fastening pattern, typically screws at 12 inches on center, and present it as universal. It isn’t.
Fastener spacing for steel siding is actually a function of several variables:
When a contractor specifies a fastening pattern, that pattern should be traceable to the panel manufacturer’s installation guide and, where applicable, to the local building code. If your contractor can’t explain the reasoning behind their fastening pattern, that’s worth asking about.
Steel siding installation often triggers a building permit requirement, though this varies by jurisdiction. In our area, permit requirements for re-siding projects can depend on the scope of work, whether structural sheathing is being replaced, and whether the project involves changes to wall assembly that affect energy code compliance.
Beyond the permit question, steel siding carries several code-relevant performance characteristics worth understanding:
Working with a licensed, insured contractor who pulls permits and works within the code framework protects you as a homeowner. It keeps your warranty valid, ensures your home inspection goes smoothly if you sell, and provides a documented record of the work.
Steel siding done right is a building science project as much as a craftsmanship project. The panels themselves are only as good as the wall assembly supporting them, the fasteners securing them, and the trim and closure details sealing them.
At Smithrock Roofing, we bring more than 60 combined years of exterior expertise to every project, roofing, sidinggutters, and windows, which means we look at your home’s exterior as an integrated system. When we evaluate a siding project, we’re thinking about what’s happening behind the wall, how the new siding connects to your roofline and window trim, and what details are going to matter ten or fifteen years from now.
If you’re considering steel siding for your home in Winston-Salem, Greensboro, High Point, Kernersville, Clemmons, Rural Hall, King, or anywhere across the NC Triad, we’re happy to take a look and give you a straight, honest assessment of what your project actually involves.
For more on wall assembly best practices and moisture management, the Building Science Corporation publishes extensive free resources for homeowners and contractors. The North Carolina Department of Insurance, Engineering Division maintains current state building code information including residential exterior requirements.
Steel siding is among the most durable siding options available, with a well-installed system commonly lasting several decades when properly maintained. Its longevity advantage over vinyl comes primarily from dimensional stability, steel doesn’t expand, contract, or become brittle the way vinyl can over time. Longevity depends heavily on the quality of the coating system, the gauge of the steel, and the integrity of the installation, particularly at trim transitions and penetrations where moisture can work its way into the wall assembly.
Steel siding is relatively low-maintenance compared to wood, but it isn’t maintenance-free. An annual inspection of trim pieces, sealants, and any areas where the finish coating may have been scratched or damaged is a good practice. Scratches that expose bare metal should be addressed promptly with touch-up paint to prevent rust from developing. Periodic cleaning with a mild detergent and low-pressure water keeps the surface looking its best and removes debris that can trap moisture against the panel surface.
In some cases, yes, but this decision requires careful evaluation of the existing wall assembly. The existing surface must be stable, flat, and free of significant moisture damage. Adding siding over existing material also changes the depth of window and door reveals, which requires new trim work. More importantly, installing over existing siding without understanding what’s beneath it can trap existing moisture problems rather than solving them. A thorough assessment of the current wall condition should always precede this decision.
Many homeowners find that steel siding is viewed favorably by insurers due to its fire resistance and impact resistance ratings, though any specific policy impact depends on your individual carrier and coverage. From a resale standpoint, steel siding is generally well-regarded by buyers and home inspectors for its durability and low maintenance profile. As with any major exterior improvement, documentation of professional installation, permits pulled, and inspections passed adds credibility to the upgrade when it comes time to sell.
Steel siding is a long-term investment in your home’s durability and resilience, and getting the installation right from the start, wall assembly, fasteners, trim details, and all, is what separates a project that holds up for decades from one that causes problems in year three. If you’re weighing steel against other options, the article Vinyl vs. Hardie Board vs. Everlast Siding in Winston-Salem: Which Is Best? offers a useful side-by-side look at how common exterior cladding choices compare. At Smithrock Roofing, our team brings deep exterior systems experience to homeowners across Winston-Salem, Greensboro, and the surrounding Triad communities, and we’re committed to doing the job the right way, not just the fast way. If you’re ready to explore whether steel siding is the right fit for your home, we’d be glad to take a look, Get a Free Estimate and let’s start the conversation.
Need a local pro? Learn more about our siding installation and repair in King.
See also: Steel Roof Over Shingles: What You Must Know First

Smithrock Roofing © Copyright 2026 • All Rights Reserved • Privacy Policy • Maintained by Mongoose Digital Marketing
