
Rolled asphalt roofing is installed by applying overlapping horizontal courses of 36-inch-wide asphalt material across a prepared roof deck, starting at the eave and working toward the ridge, with all seams sealed using roofing cement. This article walks through the full installation sequence, explains how to choose the right application method for your slope, and covers the details that determine whether a roll roofing job holds up or develops early leaks.
Roll roofing is a single-ply asphalt product that comes in rolls approximately 36 inches wide and covers roughly 100 square feet per roll. It is surfaced with mineral granules on the weathering side, and like asphalt shingles, its core is a fiberglass or organic felt mat saturated with asphalt.
The critical factor that makes roll roofing appropriate for some structures and not others is slope. Roll roofing is engineered for low-slope applications, generally roofs with a pitch between 1:12 and 4:12. Below 1:12, water moves too slowly to rely on any lapped roofing system. Above 4:12, asphalt shingles outperform roll roofing in durability, appearance, and long-term value.
Where roll roofing genuinely earns its place is on detached garages, storage sheds, porches, workshops, and other outbuildings where a functional, weather-resistant cover is the priority. It installs faster than shingles and requires less complexity. For the main roof of a home, however, the tradeoff in service life makes other options worth the investment.
No roofing material performs better than the surface beneath it. Before any roll roofing goes down, the deck needs to meet three conditions.
First, the deck must be structurally sound with no soft spots, rotted sheathing, or loose panels. Walk the surface and press at the edges between decking joints. Any give means the sheathing needs to be replaced before installation begins.
Second, the surface must be clean and dry. Dirt, debris, standing moisture, and old roofing material left underneath new roll roofing will trap water against the deck and accelerate decay. Strip the old material if it is present, sweep the deck, and allow any moisture to dry completely.
Third, all fasteners must be flush or slightly countersunk. Nails or screws proud of the deck surface will telegraph through the roll roofing, create high points that resist adhesion, and can eventually puncture the material from below as it expands and contracts with temperature changes.
Need a hand with this in Winston-Salem, Greensboro and the Triad? Call (336) 971-0464 or request a free estimate. Honest answers, no pressure.
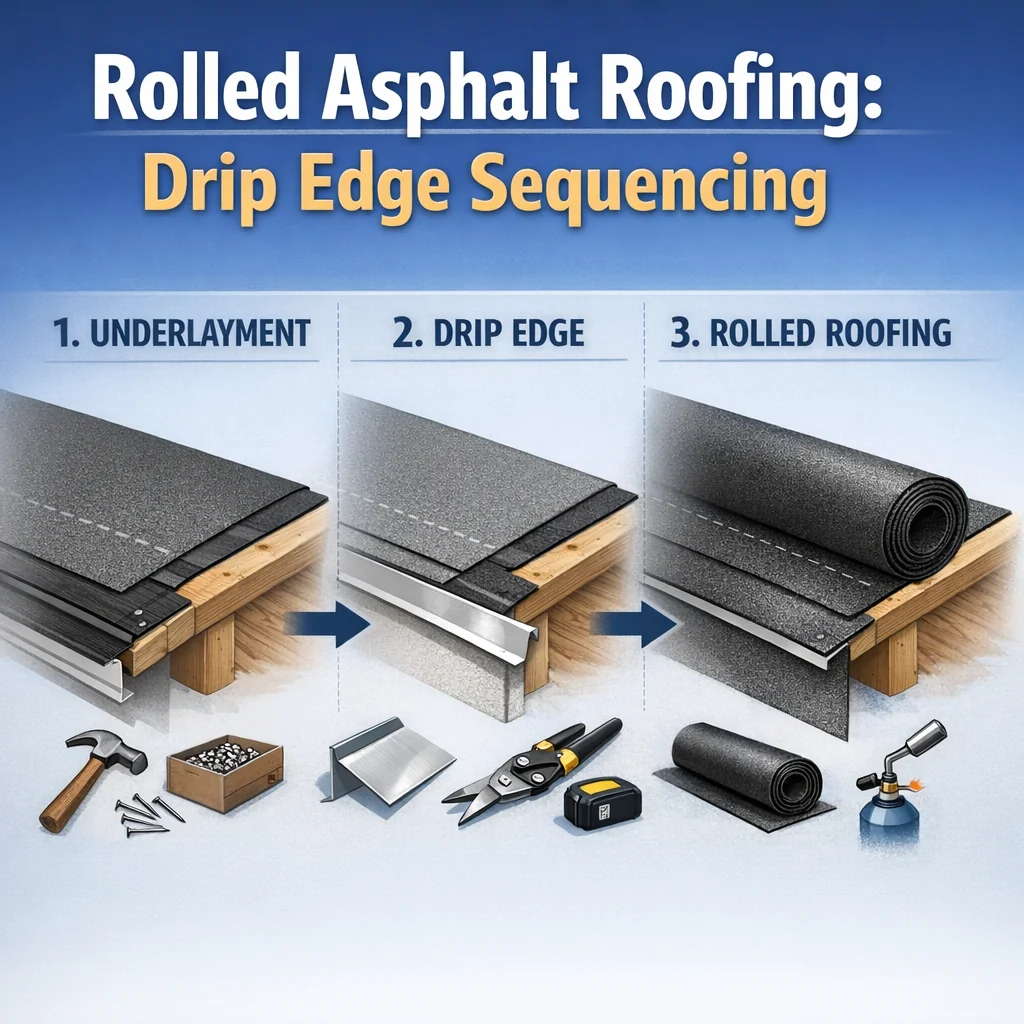
Drip edge is the metal flashing that runs along the roof perimeter. Its job is to direct water off the roof edge and past the fascia board rather than letting it wick behind the roofing material.
The sequencing rule is one of the most consistently misunderstood steps in roll roofing installation, and getting it wrong leads to fascia rot that is often diagnosed as a gutter problem rather than a roofing problem. If you want to learn more about how gutters and roofing work together to protect your home’s exterior, our gutter installation services article covers the relationship in detail.
At the eave, drip edge installs first, directly on the deck, and the roll roofing laps over the top of it. Water running down the slope reaches the drip edge and is carried outward over the gutter or away from the fascia.
At the rake, the sequence reverses. The roll roofing goes down first, and the drip edge is fastened over the top of it. Water that runs laterally off the edge of each course hits the drip edge and is directed away from the fascia rather than behind it.
The reason the rake sequence is different comes down to water direction. At the eave, gravity moves water straight down off the roof. At the rake, water runs diagonally across the slope and off the angled edge. Drip edge positioned over the roofing at the rake intercepts that lateral flow. Drip edge positioned under the roofing at the rake does the opposite: it lets water slide between the roofing material and the flashing and pool directly against the fascia.
This is the decision point that most installation guides leave unresolved. Both methods are valid, but they are not interchangeable, and the slope of your roof determines which one applies.
In the concealed nail method, nails are driven along the top edge of each course. The next course overlaps that nail line, hiding the fasteners completely under the roofing material. No nail head is exposed to weather.
The advantage is straightforward: no exposed nail holes means no exposed leak points. Every fastener is protected by the course above it. This method is appropriate for any slope within the roll roofing range and is the recommended approach when longevity is the priority.
The overlap for this method is typically 3 inches, with roofing cement applied to the full width of the overlap zone before the upper course is pressed down.
In the exposed nail method, nails are driven through both the upper and lower courses in the lap zone, and each nail head is then sealed with a spot of roofing cement. The nails are visible in the finished installation.
This method has a minimum slope requirement. It should not be used on roofs with less than a 2:12 pitch. On very low slopes, water moves slowly enough that even a well-sealed nail hole becomes a risk. Cement degrades over time, and on a near-flat surface where water can pool briefly after heavy rain, a degraded seal around a nail head is a reliable entry point for moisture.
| Feature | Concealed Nail Method | Exposed Nail Method |
|---|---|---|
| Fastener visibility | None, covered by next course | Visible, sealed with cement |
| Minimum slope required | 1:12 | 2:12 |
| Nail hole leak risk | Low | Moderate, depends on cement condition |
| Overlap depth | 3 inches | 2 inches |
| Recommended use case | Any low-slope application | Moderate low-slope, simpler installs |
| Service life | Longer | Shorter on very low slopes |
Roofing cement is required at every lap in a roll roofing installation. It bonds the courses together and creates the waterproof seal that keeps water from working under the overlaps. The directive to use it generously, however, is the instruction that causes the most preventable damage.
Asphalt plastic cement contains solvents. When you apply cement in a thin, continuous layer and then press the overlying sheet down, the solvents have enough surface exposure to evaporate before the lap is sealed. The bond forms cleanly.
When cement is applied too thickly, or allowed to pool in low spots before the next course goes down, those solvents cannot escape. The overlying sheet seals them in. When temperatures rise, the trapped solvents expand. The surface of the roll roofing separates from the material beneath it, forming a blister. Over time, that blister shifts and cracks under foot traffic, wind movement, and repeated temperature cycling. The crack becomes a water entry point.
The correct application is a thin, even coat across the full overlap width. If the cement is spreading easily and laying flat, the thickness is right. If it is thick enough to have texture or ridges, it is too heavy.
Allow adequate time for volatiles to flash off from the cement surface before pressing the next course down. In cool or humid conditions, this takes longer. There is no fixed number of minutes, but the surface of the cement should lose its wet sheen before the lap is closed.
Overlap measurements vary between methods, as noted above, but the underlying logic applies universally. The overlap zone is the waterproofing zone. A full-width cement layer in the overlap creates a continuous bonded seal. The deeper the overlap, the longer the water infiltration path an intruding drop would have to travel before reaching the deck.
Undersized overlaps compress that path. A 1-inch overlap in a zone that calls for 3 inches means water only has to work 1 inch laterally before it reaches open deck. In a driving rain with wind forcing water horizontally under the lap, that distance disappears quickly.
Each roll covers the width of one course. When a course runs longer than one roll, the ends of two rolls are joined in what is called an end lap. That end lap must be offset from the end lap in the course below it, typically by at least 18 inches.
The reason is direct. An end lap is a vertical seam. Two vertical seams stacked directly above each other create a single continuous channel running straight down through the roofing system. Water entering the top seam exits through the bottom seam directly onto the deck. Staggering the end laps breaks that channel so water that enters one seam encounters solid material below it rather than another gap.
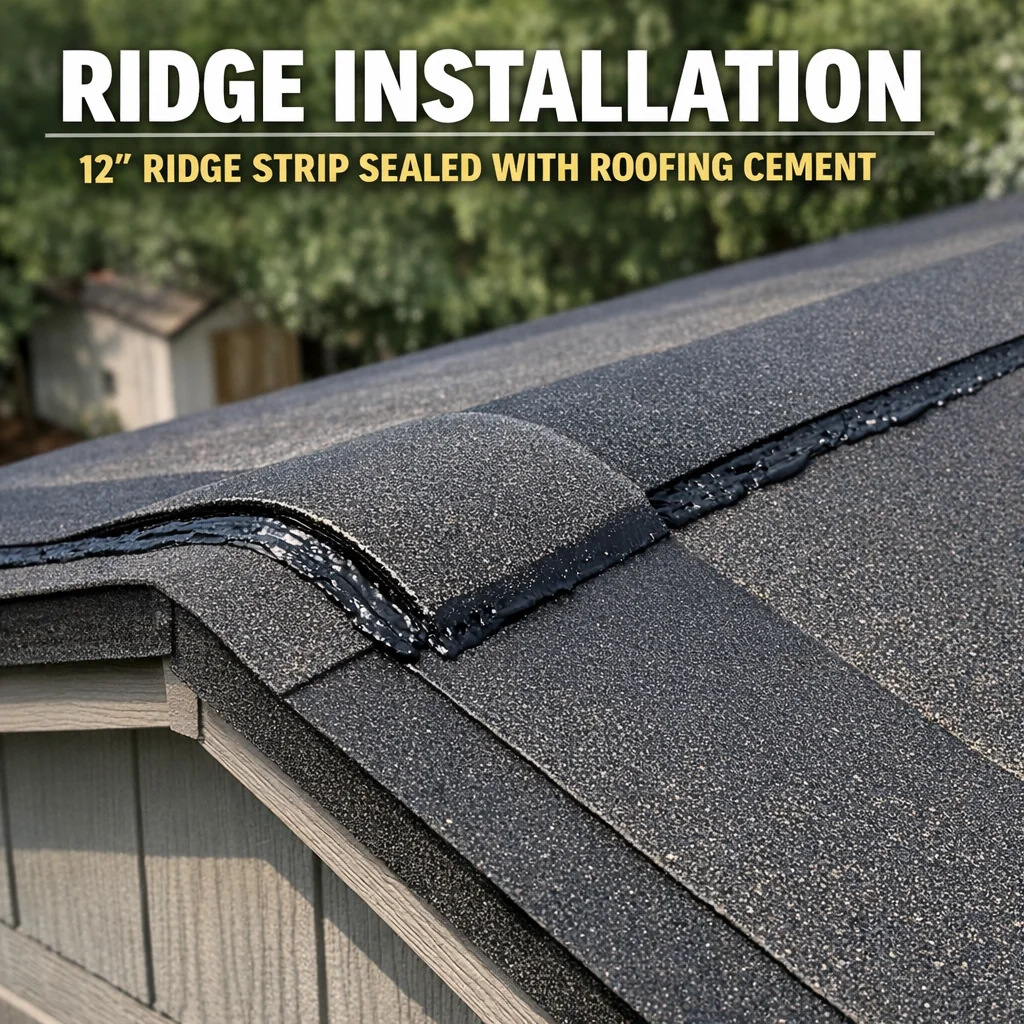
The ridge is the highest point of the roof and one of the most exposed seam locations in any installation. It requires its own treatment rather than simply bending the last course over the peak.
The standard approach is to cut a 12-by-36-inch strip of roll roofing, bend it lengthwise down the center, and position it centered over the ridge so it covers approximately 6 inches on each side. Snap a chalk line 5.5 inches back from the ridge on each slope to give yourself a straight placement guide. Cement is applied on both sides of the ridge beneath the strip, and the strip is pressed firmly into place before nailing along each edge.
When installing multiple ridge strips, each strip overlaps the previous one by at least 6 inches, with the overlap running in the direction away from the prevailing wind exposure. Cement seals every end lap on the ridge.
Hips follow the same logic as ridges: a separate strip bent to conform to the angle, cemented and nailed on both faces, with each successive strip overlapping the previous one toward the ridge.
Roll roofing on a simple shed or outbuilding is a manageable project for a prepared homeowner. Roll roofing on a structure where a failed installation creates real consequences, like a detached garage with finished interior walls, a screened porch attached to the house, or any structure tied into the main home’s drainage system, is a different conversation.
At Smithrock Roofing, we bring more than 60 combined years of experience to exterior work across the NC Triad, serving homeowners in Winston-Salem, Greensboro, roofing in High Point, Kernersville, Clemmons, Rural Hall, King, and surrounding communities. We carry full licensing and insurance, back our labor with a 5-year warranty, and approach every project with the same attention to detail whether it is a complete roof replacement or a targeted repair. If your low-slope roof is showing signs of wear, blistering, or seam separation, explore our roofing services to see how we can help, and give us a call for an honest assessment of what it needs.
Rolled asphalt roofing generally lasts between 5 and 15 years depending on the quality of the material, the slope of the roof, the local climate, and how well the installation was executed. Properly sealed seams and correct nailing patterns make a meaningful difference in how long any roll roofing installation holds up. Structures in areas with significant sun exposure and temperature swings, like the NC Triad, tend to see shorter lifespans without periodic inspection and maintenance.
Roll roofing is designed for low-slope applications, generally roofs with a pitch between 1:12 and 4:12. On slopes steeper than that, standard asphalt shingles are the more appropriate choice because they shed water more effectively and hold up better to the mechanical stresses of a steep pitch. On completely flat roofs, a dedicated flat roofing system is usually the better long-term solution.
In some cases, yes. If the existing surface is sound, flat, and free of significant damage, a new layer of roll roofing can be applied over it. However, any buckled, rotted, or structurally compromised decking needs to be addressed first. Adding a second layer without correcting underlying problems only delays and worsens the eventual failure, so a thorough inspection of the deck before installation is always worth the time.
Seam failure is most often traced back to insufficient roofing cement, nails placed too close to the seam edge, or installation during temperatures that are too cold for the materials to bond properly. Cold asphalt does not compress and seal the way warm asphalt does, which is why manufacturers specify a minimum ambient temperature for installation. Exposure to standing water over time can also degrade seams that were not fully embedded in cement at the time of installation.
Whether you are finishing a detached garage in Kernersville or addressing wear on a low-slope addition in Winston-Salem, getting the installation right from the start is what separates a roof that performs for years from one that needs attention every season. At Smithrock Roofing, our team brings decades of hands-on experience to every project across the NC Triad, and we are always glad to offer an honest, straightforward assessment of what your roof actually needs. Give us a call at (336) 971-0464 or Contact Smithrock Roofing to schedule your free estimate.

Smithrock Roofing © Copyright 2026 • All Rights Reserved • Privacy Policy • Maintained by Mongoose Digital Marketing
