
A shingle repair goes wrong most often in the first five minutes. Someone pries up a damaged shingle, hears a crack, and realizes they have broken the shingles above it. Or they replace the damaged piece correctly, only to watch a repaired tab lift in the next windstorm because the re-sealing step was rushed. Neither problem is hard to avoid when you understand what is actually happening at each stage of the repair, and that is what this guide covers. Whether you are a confident DIYer or a homeowner trying to understand what a roofer is doing on your roof, the information below will help you make smart decisions and protect your home.
Most repair guides jump straight to removal. An experienced roofer’s first move is assessment, because not every damaged shingle needs to come off the roof.
Getting this assessment right before you pick up a pry bar saves time, prevents new damage, and sometimes reveals that the real problem is not the shingle at all but a failed flashing or a failing roof section that a surface repair cannot fix. Understanding wind damage to roof shingles can help you recognize when you are dealing with a pattern problem rather than a single isolated incident.
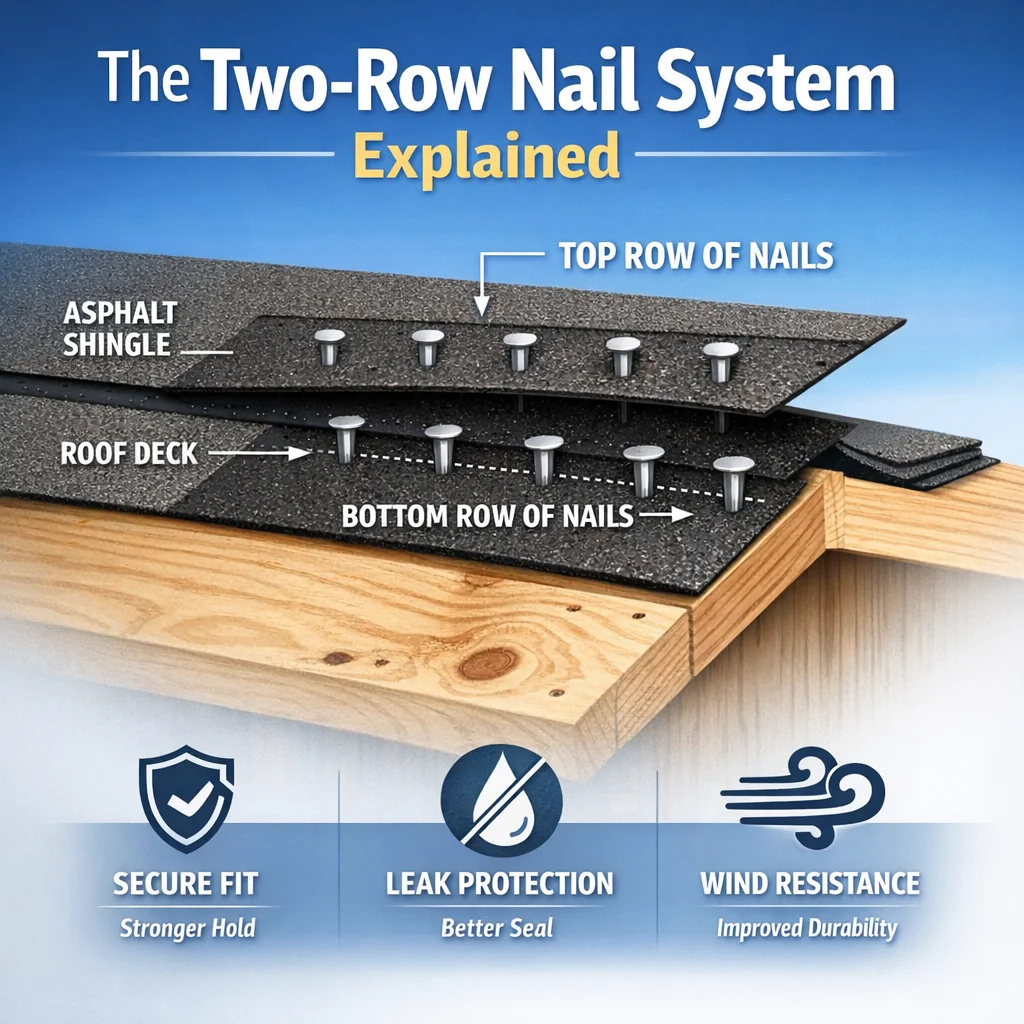
Every standard three-tab or architectural shingle on a properly installed roof is held by two separate rows of fasteners.
Row 1, the common bond nails: These four nails sit in the nail strip of the shingle you are removing, just above the adhesive sealant strip. They are the nails that belong to your damaged shingle.
Row 2, the headlap nails: These four nails are positioned near the upper edge of your damaged shingle but they belong to the course above it. They pass through the lower portion of the overlying shingles and into your target shingle’s top edge.
This is the step that trips people up. When you pry up the shingle you are trying to remove, the headlap nails are holding it from above through the shingle you cannot see easily. Forcing the pry bar without releasing those nails first is what causes cracking in the course above.
Need a hand with this in Winston-Salem, Greensboro and the Triad? Call (336) 971-0464 or request a free estimate. Honest answers, no pressure.
Here is something most repair guides mention but never resolve. Cool temperatures make sealant bonds easier to shear, which is helpful. But those same cool temperatures make shingles stiffer and more prone to cracking, which is dangerous. Warm temperatures make shingles flexible and forgiving but make sealant bonds gooey and hard to break cleanly.
The practical decision framework looks like this:
| Temperature Range | Shingle Behavior | Sealant Behavior | Technique Adjustment |
|---|---|---|---|
| Below 40°F | Very brittle, cracks easily | Brittle, breaks cleanly | Avoid repair if possible; warm shingles gently with low heat before flexing; use sliding lateral bar motion only, no upward prying |
| 40°F to 55°F | Stiff but workable | Shears with controlled pressure | Break sealant with slow lateral passes; allow extra time between each prying step |
| 55°F to 75°F | Flexible, forgiving | Bonds release with moderate pressure | Optimal range; standard removal sequence works well |
| Above 85°F | Soft, can distort under pressure | Sticky and stringy, hard to shear cleanly | Avoid heavy prying pressure on surrounding shingles; use a wide flat bar to distribute load |
The takeaway is that your prying technique should change with the weather, not just your pace. In cold conditions, the priority is protecting the surrounding shingles from cracking, which means more time breaking sealant bonds before any lifting motion. In hot conditions, the priority shifts to avoiding surface distortion on softened shingles, which means wider tool contact and lighter pressure.
The right nail for shingle replacement is a roofing nail with a wide flat head, at minimum 1-1/4 inches long for standard roof decking, and long enough to penetrate at least 3/4 inch into the deck below. Ring-shank nails hold significantly better than smooth-shank nails because the rings create mechanical resistance against pull-out. Galvanized nails are the standard; stainless steel ring-shank nails cost more but are worth considering in any repair that is meant to last the life of the surrounding roof.
Never reuse the old nails. Drive new fasteners into undamaged wood, slightly offset from the original nail holes if those holes have widened.
On a roof that is eight to fifteen years old, finding an identical match from the same manufacturer’s current production run is often not possible. Shingle colors shift between production batches, and discontinued lines cannot be replicated. Our roofing service includes material matching expertise that can help homeowners navigate these situations when the options run out.
Practical options in that situation:
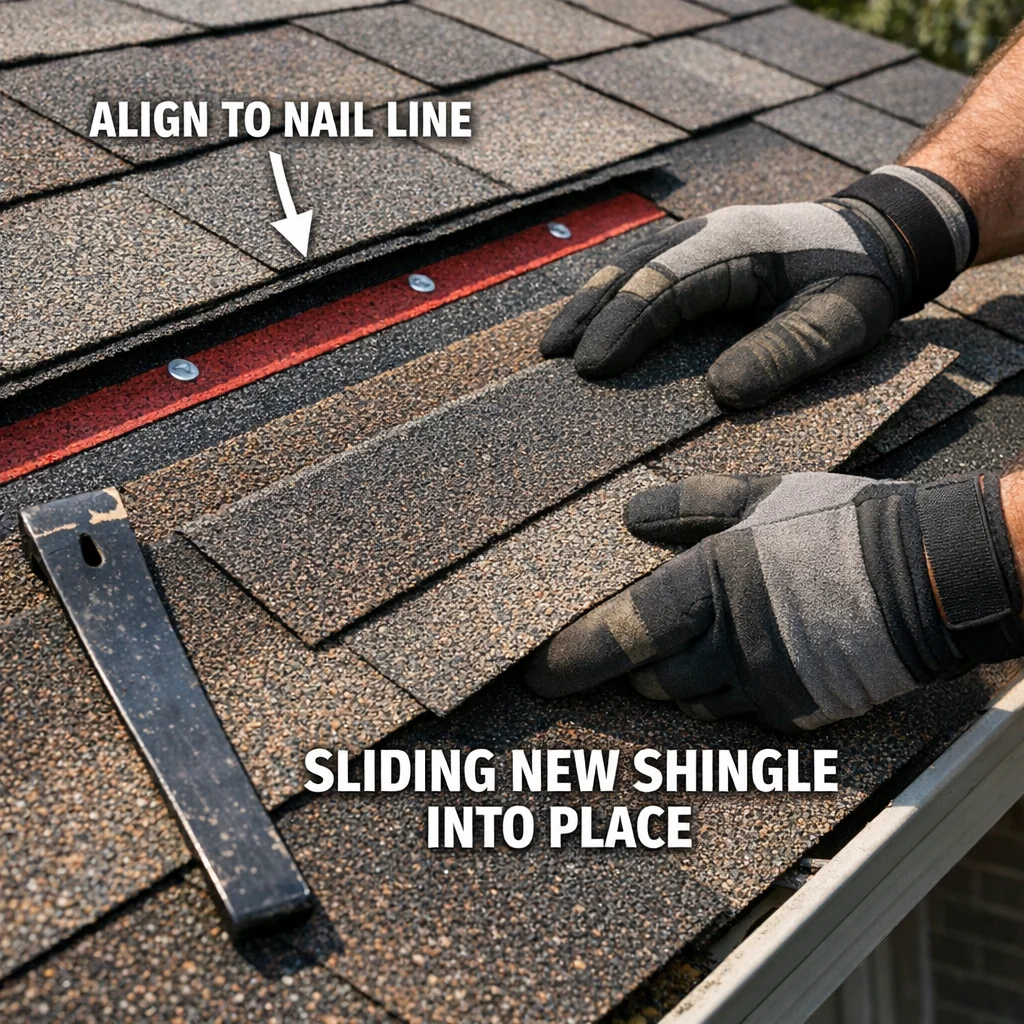
This is the part of a shingle repair that most homeowners underestimate. When you lift surrounding shingles to remove the damaged piece, you break the factory sealant bonds on every shingle you touched, not just the one you replaced. Each broken bond is a point where wind can lift a tab and begin working water underneath.
The rule is straightforward: every shingle whose sealant bond was disturbed during the repair needs to be manually re-sealed, not just the new shingle.
Apply roofing cement or a compatible sealant in three evenly spaced spots under each tab, approximately one inch from the lower edge. Press the tab firmly and hold it for a few seconds to seat the bond. On installations that will not see enough summer heat to activate a new factory sealant strip naturally, this manual re-sealing step is the only thing standing between your repair and the next wind event.
A repair that skips this step on the surrounding shingles is not finished. It looks complete from the ground and may hold fine in calm weather, but it has left the roof system with multiple unresolved vulnerabilities that a windstorm will find.
A single damaged shingle in an accessible location on a low-slope roof is a reasonable DIY project for a careful homeowner. The line moves quickly in a few situations:
At Smithrock Roofing, we have more than 60 combined years of experience helping homeowners across Winston-Salem, roofing in Greensboro, High Point, Kernersville, Clemmons, Rural Hall, King, and the surrounding NC Triad make the right call on repairs like these. We are CertainTeed PREMIER ShingleMaster Certified and carry full licensing and insurance. When you are not sure whether a repair is a DIY fix or something that needs a professional eye, we are glad to take a look and give you an honest answer. That is how we have built more than 350 five-star reviews across the Triad, one straightforward conversation at a time.
A shingle that is cracked, curling, or missing a small section can often be repaired with roofing cement and re-sealing. If the shingle is broken in multiple places, missing entirely, or shows soft or spongy material underneath it, replacement is the better path. When several shingles in the same area are failing at once, that pattern usually points to an underlying issue that a repair alone will not fix. The article on roof repair vs. replacement in Winston-Salem walks through the decision in more detail if you are weighing the two options.
On a low-slope roof with good footing and dry conditions, a careful homeowner can often move around safely. Steeper pitches, wet or mossy surfaces, and roofs with brittle older shingles all raise the risk significantly. If you have any doubt about your footing or the roof’s condition underfoot, stay off it and call a professional who has the right fall protection equipment.
A repair done correctly, with the damaged shingle properly seated, nailed at the right points, and all surrounding tabs re-sealed, can last for many years. The lifespan depends on the age of the surrounding shingles, the quality of the materials used, and how well the repair addressed any underlying moisture or decking issues. A repair made to a roof where the shingles are already near the end of their life expectancy is a temporary fix, not a long-term solution.
Mild temperatures are ideal. Asphalt shingles become brittle and crack more easily in cold weather, and roofing cement bonds and cures best when temperatures are above freezing. Late spring through early fall is generally the most favorable window. That said, a damaged shingle should not be left unaddressed through a rain season just to wait for perfect conditions, a temporary patch is better than an open leak.
When a shingle repair is straightforward, this guide gives you what you need to handle it confidently. When it is not, Smithrock Roofing is here for homeowners across Winston-Salem and Greensboro, bringing more than 60 combined years of experience, CertainTeed PREMIER ShingleMaster Certification, and the kind of honest advice that has earned more than 350 five-star reviews across the Triad. Give us a call at (336) 971-0464 or Contact Smithrock Roofing to get a free estimate and a straight answer about what your roof actually needs.

Smithrock Roofing © Copyright 2026 • All Rights Reserved • Privacy Policy • Maintained by Mongoose Digital Marketing
