
Adding windows to a house is one of those projects that sounds straightforward until you’re standing in front of an exterior wall trying to figure out what’s actually inside it. Natural light, better ventilation, improved curb appeal — the reasons to add a window are real and worth pursuing. But this is not a project where the details are interchangeable. The wall assembly, the framing system, the flashing sequence, the glazing specification, and the permit requirements all interact in ways that determine whether your new window performs beautifully for thirty years or quietly rots the framing behind it in eight.
We’ve seen both outcomes firsthand serving homeowners across Winston-Salem, Greensboro, High Point, Kernersville, and the surrounding NC Triad communities. This guide is written to give you the honest, technically grounded picture — the kind of information that helps you ask the right questions, make confident decisions, and avoid the mistakes that don’t show up until serious damage has already been done.
The short answer is yes — in most cases, it is entirely possible to add a new window to an existing exterior wall. The longer answer is that “possible” covers a wide range of scope and complexity depending on what’s inside that wall.
Every exterior wall in your home is doing at least one of two things: carrying structural load from above, or simply enclosing space. Load-bearing walls support the weight of the floor, roof, or framing above them and transfer that load down to the foundation. Non-load-bearing walls, sometimes called partition walls, are essentially dividers — they hold themselves up and not much else.
Adding a window to a non-load-bearing exterior wall is a more contained project. Adding one to a load-bearing wall requires temporary shoring of the structure above while the permanent support system is installed. Both are achievable. Neither should be approached without understanding which one you’re dealing with.
A few indicators point toward load-bearing status, though confirmation should always come from a qualified contractor or structural engineer:
If there’s any uncertainty, the right move is professional evaluation — not an exploratory cut.
Need a hand with this in Winston-Salem, Greensboro and the NC Triad? Call (336) 971-0464 or request a free estimate. Honest answers, no pressure.
This is where a lot of generic advice starts to fail homeowners. Most guides discuss “cutting into the wall” as if every exterior wall is built the same way. They’re not.
The vast majority of homes built after World War II use platform framing — each floor is framed as its own platform, with wall studs running from one floor level to the next. The top plate of each wall level acts as a bearing point for the floor or roof above. This is the construction type that most modern window installation guidance assumes.
Homes built before approximately 1940–1950, however — and there are many of them throughout the Winston-Salem and Greensboro area — are frequently balloon-framed. In balloon framing, the wall studs run continuously from the foundation sill all the way up to the roof rafters, passing uninterrupted past the floor joist level. There is no platform break.
This distinction matters enormously when you’re opening a wall for a new window. In a balloon-frame wall:
The visual diagnostic: If you open a small exploratory section of wall and the studs appear to run uninterrupted past the floor joist level without any top plate break, treat this as balloon frame construction and expand your scope of professional review accordingly. This is not a situation to proceed through by assumption.
The exterior sheathing — the panel material nailed to the outside face of the studs before siding is applied — also varies by era and region:
This matters because the sheathing type affects how the rough opening edges are supported, how susceptible the exposed cut edges are to moisture absorption, and how the existing weather-resistant barrier (WRB) integrates with the new window flashing. Structural fiberboard, in particular, absorbs water aggressively at cut edges and requires more deliberate edge treatment and flashing detail than OSB or plywood.

Once you’ve confirmed what kind of wall you’re working with, the structural phase begins. This is the step that separates a correctly executed window addition from one that slowly shifts, sags, or fails.
When you remove studs to create a rough opening in a load-bearing wall, the structure above that section of wall is temporarily unsupported. Temporary shoring — a temporary stud wall or adjustable support columns — carries that load while the permanent header is installed.
What the general guides omit:
Rushing past this step — or skipping it because “the opening won’t be open long” — is how rafters shift and walls rack.
Most guides present header sizing as a simple lookup: span this distance, use this lumber size. That framing is incomplete. Header sizing is actually a function of several interacting variables:
| Variable | Why It Matters |
|---|---|
| Clear span of the opening | Longer spans require deeper lumber or engineered members to limit deflection |
| Tributary load width | The wider the roof or floor area bearing on this wall section, the greater the load the header must carry |
| Lumber species and grade | Structural values vary significantly — a #2 Southern Yellow Pine header performs differently than the same dimension in SPF |
| Single vs. double top plate | A double top plate distributes load differently and affects how closely trimmer studs must be spaced |
| Story count above | A single-story wall opening carries far less load than a first-floor opening in a two-story home |
| Engineered vs. dimensional lumber | LVL (laminated veneer lumber) headers allow slimmer profiles at the same span, preserving insulation depth |
When a contractor or guide says “size your header appropriately,” what they’re really describing is a calculation that should be verified against the applicable building code span tables — and, for larger openings or unusual load conditions, reviewed by a structural engineer.
This is the section most guides gloss over in a single sentence — “flash and seal” — without explaining what flashing actually does or why the sequence in which it’s applied is non-negotiable.
Your home’s exterior wall is designed with a drainage plane: a layer behind the siding where any water that gets past the outer finish material is directed downward and out. The weather-resistant barrier (WRB) — whether that’s housewrap, felt paper, or a fluid-applied membrane — is the primary component of that drainage plane.
When you cut into the wall for a new window, you interrupt that plane. The goal of correct flashing is not simply to seal the window in place — it’s to reconnect the window’s own water management system to the existing drainage plane so that the wall continues to function as designed.
The flashing sequence around a new window opening follows a specific order. Reversing or skipping any step creates a water trap rather than a drainage path:
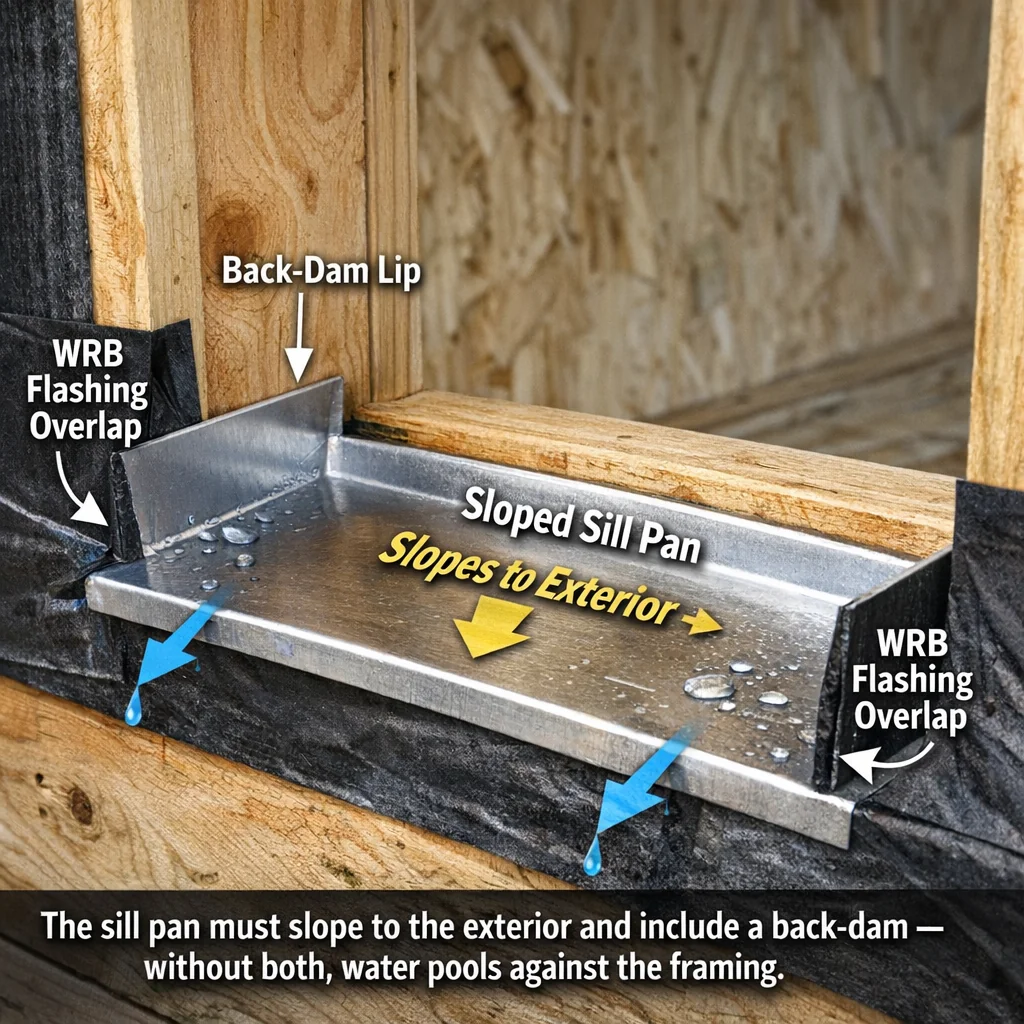
Sill pan first. The horizontal surface at the bottom of the rough opening — where water will inevitably collect — is addressed before anything else. A proper sill pan is sloped toward the exterior, integrated with the WRB at the sides, and includes a back-dam: an upturned rear lip that prevents water from running toward the interior even if the window isn’t perfectly plumb.
Jamb flashing second. The vertical sides of the opening are flashed next, lapped over the top edges of the sill pan flashing. This lap ensures water running down the jambs flows onto — not under — the sill pan.
Head flashing last. The horizontal flashing at the top of the opening is installed last and lapped over the top edges of the jamb flashing. The WRB above the head flashing is then lapped over the top of the head flashing, maintaining the top-down drainage hierarchy.
Building forensics data consistently identifies the sill pan as the dominant failure point in window installations. Water that gets past the outer seal — through wind-driven rain, failed caulk, or capillary wicking — must have somewhere to go. A properly sloped, back-dammed sill pan with correct WRB integration gives it a path to the exterior.
An improperly installed sill — flat instead of sloped, or missing the back-dam, or lapped incorrectly with the WRB — becomes a collection trough. Water sits against the wood. The king studs on either side of the opening absorb moisture. The rot begins, invisibly, behind the window frame. By the time it’s visible from the interior, the structural damage is typically significant and expensive.
This is the detail that separates contractors who have investigated water intrusion callbacks from those who haven’t. Our window installation and replacement article covers how this process should be sequenced from start to finish.
Choosing a window style — casement, double-hung, picture, awning — is a real decision, but it’s a secondary one. The more consequential specification is the glazing performance values, and those should be driven by which direction the window faces.
The NC Triad sits in Climate Zone 4 — a mixed-humid climate where both heating and cooling loads are significant across the year. The right glazing values depend on orientation:
| Orientation | Solar Exposure | Recommended Approach |
|---|---|---|
| North-facing | Minimal direct sun year-round | Low U-factor matters most; SHGC is less critical |
| South-facing | High winter sun angle, lower summer angle | Moderate-to-higher SHGC can support passive heating in winter; roof overhang geometry controls summer gain |
| East-facing | Morning sun, lower intensity | Moderate SHGC is appropriate; morning gain is less problematic |
| West-facing | Afternoon sun, highest intensity and heat load | Low SHGC is a priority to limit cooling demand in summer months |
A west-facing window specified with a high SHGC in the NC Triad is a direct addition to your cooling load every summer afternoon. This is not an aesthetic preference — it’s a building science specification with utility bill consequences. Manufacturers publish SHGC and U-factor values prominently on NFRC labels; these should be part of the window selection conversation before style or color. For a deeper look at how glazing specifications affect long-term performance, the guide on energy-efficient window upgrades covers these tradeoffs in detail.
Permits for window additions are frequently described in contractor guides as a bureaucratic formality. That framing misses what permits actually accomplish.
A permit for a new window addition typically triggers inspection of:
If you’re adding a window to a bedroom — or converting a space into a bedroom — egress compliance is not optional and not approximated. Per IRC Section R310, sleeping rooms require an emergency escape and rescue opening with:
The phrase “net clear opening” is where mistakes happen. This is not the window’s nominal size or even its rough opening size. It is the actual operable area once the frame, sash, hardware, and any fixed glazing are accounted for. A window that appears compliant based on its listed dimensions can fail egress when the actual operable opening is measured.
Window manufacturers publish net clear opening data in their specification sheets. This number should be confirmed against the IRC thresholds before the window is ordered — not after it arrives on the job site. A mid-project window swap is an avoidable expense and delay.
This also matters at resale. A bedroom window that fails egress is a disclosure obligation in most states, and some buyers’ inspectors flag it as a deficiency that must be corrected before closing. Getting this right the first time is both a safety issue and a protection of your home’s market value.
Opening an exterior wall for a new window inevitably disturbs the insulation in the surrounding stud bays. Batts shift, compress, or fall out during framing work. The thermal and moisture performance of the wall in the vicinity of the new opening is temporarily — and sometimes permanently — compromised if this isn’t addressed.
In some jurisdictions, disturbing the wall assembly triggers a requirement to bring the insulation in the affected area up to current energy code minimums. This isn’t punitive — it’s an opportunity that a quality contractor will flag proactively rather than paper over.
Once the structural, weatherproofing, and specification decisions are addressed, the window style selection is a genuinely useful conversation. Here’s a practical breakdown of common window types and where each makes sense:
| Window Type | Operation | Best Use Cases | NC Triad Considerations |
|---|---|---|---|
| Double-hung | Both sashes slide vertically | Bedrooms, living areas, traditional homes | Easy to clean from inside; good egress options available |
| Casement | Hinges on one side, cranks outward | Kitchens, areas needing maximum ventilation | Full opening for airflow; check egress net clear opening spec |
| Awning | Hinges at top, opens outward | Bathrooms, areas prone to rain | Allows ventilation even in light rain; good moisture management |
| Picture (fixed) | Non-operable | Light-focused installations, accent windows | No ventilation; not egress-compliant; best paired with operable units |
| Bay or bow | Combination unit projecting outward | Living rooms, reading nooks | Adds square footage appearance; requires roof or knee wall below |
| Slider | Sashes slide horizontally | Wide openings, contemporary styles | Verify net clear opening against egress thresholds if in a bedroom |
A professionally managed window addition follows a logical sequence that doesn’t cut corners on the steps that matter most:
At Smithrock Roofing, we handle window installations as part of our full exterior services — which means the framing, weatherproofing, and exterior finishing are coordinated by the same experienced team rather than handed off between trades. With 60-plus combined years of experience and a reputation across the NC Triad built on doing things the right way the first time, we approach every window addition with the same attention to detail we bring to every other exterior project we touch.
If you’re thinking about adding windows to your home in Winston-Salem, Greensboro, High Point, Kernersville, Clemmons, Rural Hall, or King, we’re glad to take a look and give you an honest assessment of what the project actually involves — including the structural conditions, the right glazing for your orientation, and the permit requirements specific to your jurisdiction. No pressure, no guessing, just straight answers from people who’ve been doing this long enough to know where things go wrong.
If you’re planning a window addition project in the coming year, three things will set your project up for success before a single stud is cut:
Schedule a structural assessment early in the planning process. The framing conditions inside your wall — existing header depths, stud spacing, load-bearing status — determine almost everything else about scope, timeline, and complexity. Getting eyes on that before you commit to a window size or placement saves you from redesigning mid-project. Ask your contractor to document what they find, not just tell you verbally.
Verify your jurisdiction’s current energy code requirements before selecting glazing. North Carolina adopted updated energy code provisions that affect minimum U-factor and SHGC ratings depending on climate zone and window orientation. What was compliant a few years ago may not pass inspection today. Your contractor or the local building department can confirm exactly what’s required in Winston-Salem, Greensboro, or whichever municipality your project falls under — and knowing this upfront means you’re selecting the right product from the start, not swapping it out after it’s ordered.
Treat the weatherproofing sequence as non-negotiable scope, not an optional upgrade. As flashing and WRB integration standards have tightened, the gap between a window that passes inspection and a window that performs for decades has become more visible. In 2026, ask every contractor you speak with to walk you through their specific flashing sequence — sill pan material, jamb integration, head flashing overlap — before you agree to anything. A contractor who can answer that clearly without hesitation is a contractor who has actually done it correctly.
In most cases, yes. Adding a window to an existing wall — as opposed to replacing an existing window of the same size in the same location — typically requires a building permit because it involves structural work, potential changes to egress compliance, and energy code considerations. The specific requirements vary by municipality, so whether your project is in Winston-Salem, High Point, or Kernersville, the local building department is the authoritative source. A qualified contractor should be pulling that permit on your behalf and coordinating the required inspections.
You generally cannot determine this reliably from visual inspection alone. A wall’s load-bearing status depends on its relationship to the roof framing, floor framing, and foundation system — factors that aren’t visible from the interior surface. An experienced contractor or structural engineer can assess this by examining the framing in the attic or crawl space, reviewing the home’s framing layout, and in some cases opening a small section of the wall. This determination has to happen before any framing is cut, not after.
The rough opening is the framed hole in the wall — defined by king studs, trimmer studs, a header at the top, and a sill at the bottom — into which the window unit is set. The size matters because window manufacturers specify the exact rough opening their unit requires, and deviations in any direction create problems. Too tight, and the window can’t be shimmed level and plumb. Too large, and there’s excessive gap to manage with flashing and insulation. Getting the rough opening dimensioned correctly from the start is one of the details that separates a clean installation from one that causes problems later.
For a single window in a straightforward location — a non-load-bearing wall with accessible framing and no unusual conditions — the physical installation work is typically a one-to-two day project for an experienced crew. What extends the timeline is the permit process, which varies by jurisdiction and can range from a few days to a few weeks depending on workload at the local building department. Structural conditions, interior finishing complexity, and material lead times can also affect the overall schedule. The honest answer is that your contractor should give you a realistic timeline based on your specific conditions, not a generic estimate.
Adding windows to a house is one of the more involved exterior projects a homeowner can undertake — and doing it right means getting the structural work, the weatherproofing, and the permit process handled by people who understand how those pieces connect. Smithrock Roofing has been doing exactly that across the NC Triad for years, and homeowners in Greensboro and Winston-Salem know they can count on straight answers and workmanship that holds up long after the job is done. If you’re ready to talk through what your project actually involves, Contact Smithrock Roofing and let’s start with an honest conversation.
Need a local pro? Learn more about our window replacement in King.
See also: Tin Roofing Contractors: What NC Homeowners Must Know

Smithrock Roofing © Copyright 2026 • All Rights Reserved • Privacy Policy • Maintained by Mongoose Digital Marketing
