
Gutters are one of those things most homeowners never think about, right up until water is pouring over the front edge, pooling against the foundation, or seeping behind the fascia board where nobody can see it. By that point, what started as a straightforward drainage problem has quietly become a wood rot problem, a landscape erosion problem, or worse, a basement moisture problem.
Here in the NC Triad, Winston-Salem, Greensboro, High Point, and the surrounding communities, our weather demands gutters that are properly sized, correctly pitched, and installed with real attention to the details most guides skip entirely. We get warm, wet summers with intense afternoon storms and enough winter freeze-thaw cycles to punish any sealant or hanger that was installed carelessly. A gutter system that was thrown up in a weekend without understanding the engineering behind it will show its flaws within a season or two.
This guide is written for homeowners who want to genuinely understand how gutter installation works, the principles behind the decisions, not just a list of steps. Whether you are evaluating a contractor’s proposal, deciding between DIY and professional installation, or simply trying to understand why your existing gutters are failing, what follows will give you a clear, honest picture.
Walk past any home on a street in Kernersville or Clemmons and the gutters look simple, a trough attached to the house, a pipe running down the side. What is hidden inside that simplicity is a system that has to manage thousands of gallons of water per year, resist thermal expansion across temperature swings of 80 degrees or more, support its own weight plus the weight of standing water, debris, and occasional ice, and do all of that while attached to wood that may or may not be in perfect condition.
When any one of those factors is handled incorrectly, the result is not just a leaking gutter, it is accelerated damage to the fascia, soffit, siding, and foundation. Understanding the engineering helps you ask better questions and recognize quality work when you see it.
Need a hand with this in Winston-Salem, Greensboro and the NC Triad? Call (336) 971-0464 or request a free estimate. Honest answers, no pressure.
Before a single gutter hanger goes into the wall, the fascia board needs to be evaluated. This step is skipped routinely in DIY tutorials, and it is one of the most consequential oversights in residential gutter installation.
The fascia board is the flat, horizontal board running along the lower edge of your roofline. Every gutter hanger drives into it, and into the rafter tails behind it. If the fascia has begun to rot, even soft rot that has not yet changed its outward appearance, torquing a screw or hanger into that wood does two things: it creates a weak attachment point that will fail under load, and it opens the wood further to moisture infiltration.
Look for these indicators before any mounting work begins:
In the NC Triad, fascia rot is common on homes built in the 1970s through 1990s that have gone through multiple gutter cycles without anyone checking the board condition underneath. Replacing or sistering the fascia before installation is not an upsell, it is the only way to ensure the new gutters actually stay where they are put. For a detailed look at what this repair involves, the Fascia & Soffit Repair: Fix It Right the First Time article covers the full scope of what proper fascia restoration requires.
There is a relationship between improperly installed gutters and accelerating fascia deterioration that most homeowners never see until it is advanced. When a gutter is hung at the wrong angle or the back of the gutter sits tight against the fascia with no air gap, water that wicks behind the trough has nowhere to go. It sits against the wood. Over one or two seasons in a humid NC summer, that trapped moisture drives rot from behind, which is invisible from the ground. The gutter looks fine. The fascia is actively deteriorating.
Proper installation leaves the back of the gutter sealed against the fascia through correct drip edge positioning, not through pressing the gutter tight and hoping.
This is one of the most important details in gutter installation, and it is consistently absent from general installation guides.
The drip edge flashing, the metal strip installed along the eave of your roof, is not decorative. It is the interface between your roofing system and your gutter system. Getting this interface right determines whether water enters the drainage path or bypasses it entirely.
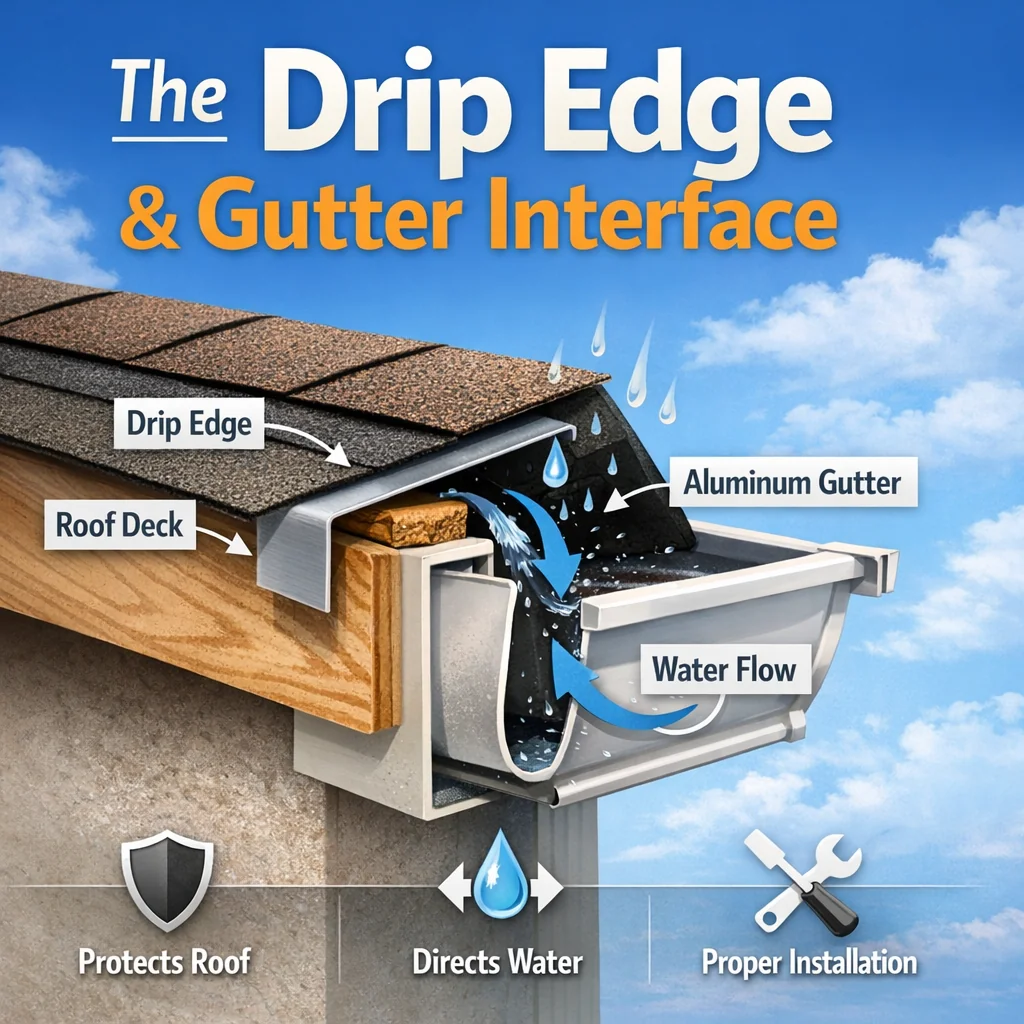
Here is what correct drip edge and gutter alignment requires:
On any re-roofing project, the underlayment sequence matters here. The eave drip edge installs over the underlaymentnot beneath it, specifically because of this water management function. Many DIY failures that appear to be gutter problems are actually roofing installation errors from the job done before the gutters were touched.
When Smithrock handles both roofing and gutters on the same home, this transition is coordinated from the start. Having one contractor responsible for both systems eliminates the finger-pointing that happens when a roofer and a gutter company each blame the other’s work.
The common residential guidance, “use 5-inch gutters for standard homes”is an oversimplification that causes problems on a meaningful percentage of homes.
Gutter sizing is a function of three variables working together:
In our area, heavy rain during peak storm intensity can exceed what many national gutter sizing charts assume as a baseline.
Roof pitch directly affects the velocity of water entering the gutter. A 12:12 pitch roof, one that rises 12 inches for every 12 inches of horizontal run, sheds water dramatically faster than a 4:12 pitch roof of the same square footage. The gutter at the base of a steep roof receives that water at higher velocity with less time to distribute it along the trough.
The industry uses pitch multipliers to adjust drainage area calculations. A rough guide:
| Roof Pitch | Pitch Multiplier | Effective Drainage Area Adjustment |
|---|---|---|
| 4:12 or less | 1.00 | No adjustment needed |
| 5:12 – 6:12 | 1.05 | Add 5% to roof square footage |
| 7:12 – 8:12 | 1.10 | Add 10% to roof square footage |
| 9:12 – 11:12 | 1.20 | Add 20% to roof square footage |
| 12:12 and steeper | 1.30 | Add 30% to roof square footage |
This means a 6:12 pitch roof with 800 square feet of drainage area should be treated as 840 square feet for sizing purposes. A 12:12 pitch roof with the same 800 square feet should be treated as 1,040 square feet. The difference between those two numbers is often the difference between a 5-inch gutter performing adequately and a 6-inch gutter being the correct specification.
The standard rule, ¼ inch of drop for every 10 feet of run, is correct as a starting point. The complications arise at scale and on long runs.
For a 20-foot gutter run with one downspout at the low end, a ¼-inch-per-10-feet pitch means the far end of the gutter sits ½ inch higher than the outlet. That is a gentle, manageable slope that drains well and is barely visible.
Now consider a 60-foot run with a single outlet at one end. Correct pitch means the far end sits 1.5 inches higher than the outlet. Two problems emerge:
The professional solution for any run exceeding 40 feet is either a second downspout at the mid-point or far end, or a center-outlet configuration that splits the effective run length in half. A 60-foot gutter with a center outlet becomes two 30-foot runs in hydraulic terms, each draining efficiently to its own downspout.
There is also a real-world tension between optimal drainage pitch and visual appearance. A ¼-inch-per-10-foot slope is barely perceptible on a 30-foot run. On a 60-foot run on a highly visible front elevation, that 1.5 inches of visible tilt can be noticeable.
Some contractors will reduce the pitch on visually prominent runs to avoid the appearance of a tilted gutter, particularly on homes with very flat architectural lines. The performance tradeoff is slower drainage and longer standing water time. The correct answer depends on the specific roof geometry, drainage area, and rainfall intensity, which is exactly why this is a conversation worth having with your installer before work begins rather than after.
Hanger spacing is the most underappreciated variable in residential gutter installation. Most guides mention attaching brackets “at each rafter” and move on. The engineering behind spacing decisions is considerably more detailed than that.
On homes with open or partial soffits, rafter tail locations are visible. On homes with fully enclosed soffits, which includes the majority of homes across Greensboro, Winston-Salem, and High Point, rafter locations are invisible from outside.
Professionals locate rafter tails using a combination of methods:
Screwing hanger brackets into fascia between rafter tails creates a point load on unsupported wood. Under ice, debris, or sustained water weight, those brackets are the first to pull free, and the gutter comes with them. The “gutter pulled away from the house” failure almost always traces back to hangers that were never anchored into rafter tails to begin with.
The legacy spike-and-ferrule hanger, a long nail driven through the gutter face, through a metal tube (ferrule), and into the fascia, has mostly been replaced in professional work by hidden bracket hangers. The functional difference is significant:
Standard residential hanger spacing is 24 inches on center. In many areas, that is adequate for most of the year. However, winter conditions, particularly during ice storms that can affect higher elevations in our area, can add significant weight to gutters that are already handling debris load.
Recommended spacing adjustments:
| Condition | Recommended Hanger Spacing |
|---|---|
| Standard residential, low-debris roof | 24 inches on center |
| High-debris roof (heavy tree canopy) | 18 inches on center |
| Exposure to ice or snow load | 18 inches on center |
| 6-inch gutters (heavier profile) | 18 inches on center |
| Steep-pitch roof (higher water velocity impact) | 18 inches on center |
The cost difference between 24-inch and 18-inch spacing is modest, a few additional brackets per run. The performance difference over a decade of NC winters and summer storms is substantial.
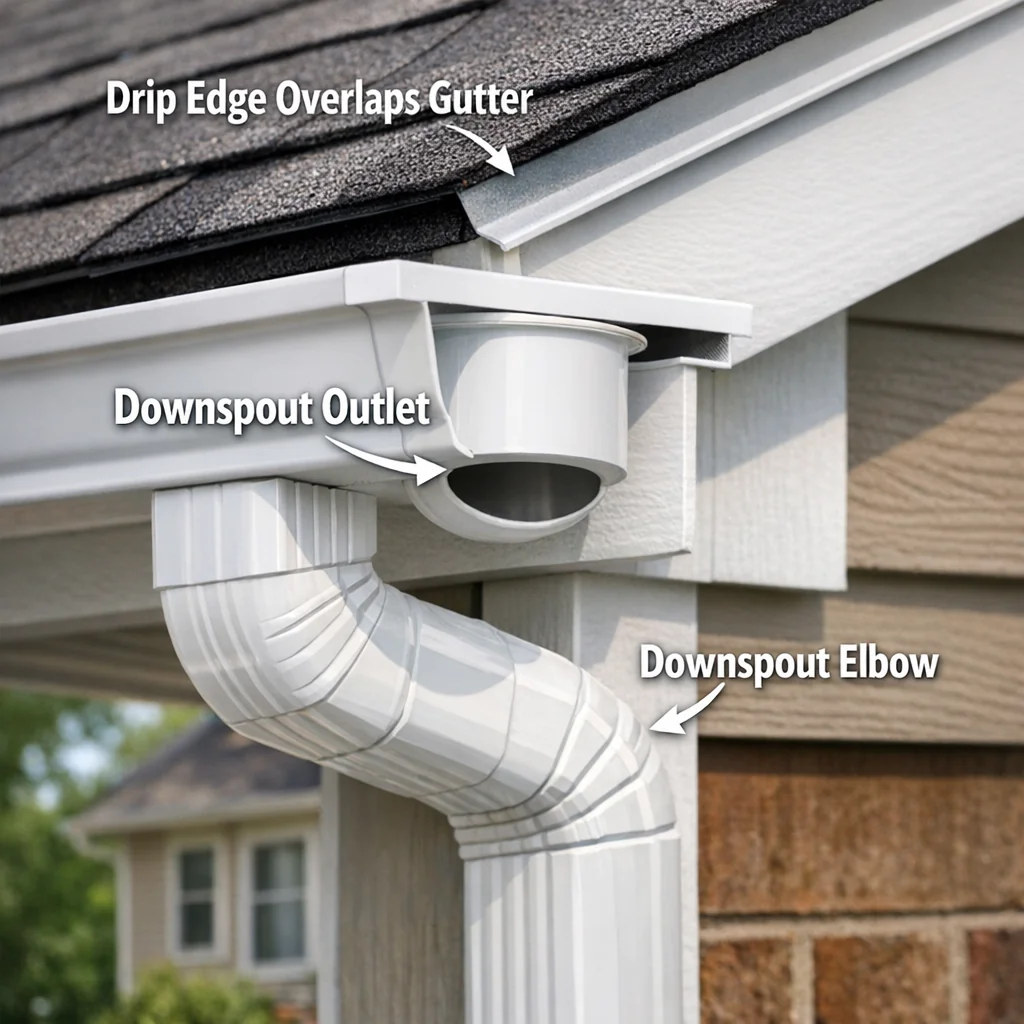
Downspout decisions are often made based on where a pipe will look least obtrusive on the exterior of a home. That is a reasonable consideration, but it should follow hydraulic logic, not lead it.
The two standard residential downspout sizes each have a defined drainage capacity:
In the NC Triad’s summer storm conditions, these capacities should be treated as approximate rather than precise limits. When roof drainage area is close to the maximum for a given downspout size, stepping up is the more conservative choice. For a full breakdown of what downspout work costs when replacement is needed, the Ultimate Guide to Downspout Replacement Prices covers material and labor variables in detail.
Where the outlet, the hole in the gutter trough that feeds the downspout, is located determines how well the entire run drains. The two primary configurations are end-outlet and center-outlet.
End-outlet placement (downspout at the end of the run):
– Water velocity at the far end of the run is low, creating a natural debris accumulation zone opposite the outlet
– The full hydraulic load of the run concentrates at one point
– Effective for runs of 35 feet or less
Center-outlet placement (downspout at the middle of the run):
– Splits the effective hydraulic run in half
– Debris accumulation is reduced because water moves toward the center from both directions
– Dramatically better performance on runs exceeding 40 feet
– Standard practice in commercial gutter installation for this reason
On homes where two roof slopes drain into one continuous gutter run, a common configuration on NC Triad homes with hip or valley roof lines, the outlet must be positioned to account for the combined peak flow from both slopes simultaneously. Treating this as two independent drainage problems on one trough is a common design error.
Aluminum, the dominant gutter material in residential installation, expands and contracts with temperature. Over the temperature range a Greensboro or Winston-Salem home experiences between July and January, a 40-foot aluminum gutter section can expand or contract by approximately 5/16 of an inch. That movement is real, it is cyclical, and it exerts stress on every seam joint and sealant bead in the system.
On runs shorter than 40 feet, this thermal movement is small enough that a properly applied sealant can accommodate it without failing. On runs longer than 40 feet, particularly when sections are joined at a seam rather than being continuous, thermal movement becomes a sealant failure mechanism over time.
The professional approach on long runs includes:
This is a common DIY error worth naming directly: sealant applied to the outside of a gutter seam is cosmetic. It may look like a repair, but the watertight seal in a gutter system must be achieved on the interior trough surfacewhere water contacts the joint. An exterior bead holds nothing back because water pressure at the seam is on the inside of the trough, not the outside.
A correctly installed gutter system that deposits water within 12 inches of the foundation is, in some practical respects, worse than no gutters at all. Where gutters without proper outlet management exist, they concentrate roof drainage, which might otherwise disperse across a broad drip line, into one or two precise points at grade level, directed straight toward the foundation.
Completing the gutter installation means addressing where the water goes after it exits the downspout:
Most residential gutter installations today use seamless gutters, gutters formed from a continuous coil of aluminum stock using a portable roll-forming machine, cut to the exact length of each run on site. The alternative is sectional gutters, which are sold in standard lengths (typically 10 feet) and joined at seams.
The comparison matters because seams are where the most maintenance issues originate, sealant failure, joint separation, and debris accumulation at the step created by overlapping sections.
| Factor | Seamless Gutters | Sectional Gutters |
|---|---|---|
| Seam locations | End caps and outlet connections only | Every 10 feet along the run |
| Leak risk over time | Lower, fewer joints to fail | Higher, each seam is a maintenance point |
| Custom fit | Cut precisely to each run on site | Require trimming and overlap at every joint |
| Installation | Requires professional roll-forming equipment | Accessible as a DIY project |
| Long-run thermal expansion | Managed at end caps and expansion joints | Each seam can accommodate minor movement |
| Appearance | Cleaner, continuous profile | Visible seam lines and rivets along run |
For NC Triad homeowners investing in a quality gutter system meant to last 20 or more years, seamless gutters represent the practical standard. Sectional systems have a role in localized repairs and limited budget situations, but they require more ongoing maintenance to keep seams watertight through the region’s temperature swings and storm events.
Understanding the engineering behind gutters changes how you evaluate a contractor’s proposal. A professional gutter installation is not just about attaching a trough to a house, it is a coordinated system of decisions: fascia condition assessment, pitch calculation relative to run length and outlet position, hanger spacing appropriate to load conditions, drip edge verification, downspout sizing by actual roof drainage area, and outlet management at grade.
At Smithrock Roofing, we have been doing exterior work across Winston-Salem, Greensboro, High Point, Kernersville, Clemmons, Rural Hall, and King for long enough to understand how NC Triad weather stresses a gutter system. Our approach is the same whether we are handling gutters as a standalone project or as part of a complete roofing and exterior job, we look at the whole system, including the drip edge relationship, the fascia condition, and where the water is ultimately going to end up once it leaves the downspout.
If you are experiencing overflow, fascia staining, pooling near the foundation, or gutters that sag or pull away from the house, those symptoms each point to specific installation or maintenance failures, and most of them are correctable with the right diagnosis. We are happy to take a look, walk through what we find, and give you an honest picture of what the right solution is for your home.
The answer depends on what is failing and where. Isolated leaks at a seam or a single damaged section on a sectional gutter system can often be repaired. However, if you are seeing widespread sagging, multiple leak points, gutters pulling away from the fascia along a significant run, or the fascia board itself has softened from prolonged water exposure, replacement is usually the more practical and durable path. A qualified contractor can walk your roofline and give you an honest assessment of whether repair or replacement makes more sense for your specific situation.
Gutter sizing depends on your roof’s drainage area, meaning the square footage of roof surface draining to a given section of gutter, along with the local rainfall intensity the system needs to handle. In the NC Triad, where heavy summer storms can deliver significant rainfall in a short window, undersized gutters overflow before they can drain. Most single-story residential rooflines use five-inch K-style gutters, but steeper roofs, longer runs, or larger drainage areas often call for six-inch gutters. A proper assessment measures actual roof geometry rather than applying a one-size assumption.
For most homes in the NC Triad, cleaning twice per year is the baseline, typically once in late spring after tree pollen and seed pods have dropped, and once in late fall after leaves have finished falling. Homes with significant tree canopy overhead, particularly pine trees that shed needles year-round, may need cleaning three or four times per year to keep outlets and downspouts clear. Clogged gutters are one of the leading causes of overflow, fascia damage, and foundation moisture problems, so consistent cleaning schedules protect the rest of the system.
It can, depending on how the work is done. Gutters attach to the fascia and interact directly with the drip edge, the metal flashing that directs water from the roof deck into the gutter. If gutter installation disturbs or incorrectly positions the drip edge, it can create a pathway for water to infiltrate behind the gutter and behind the fascia, which can also affect the lower course of roofing material. Having gutters installed by a contractor who understands both roofing and gutter systems, and who evaluates the drip edge relationship as part of the job, reduces the risk of installation work that inadvertently creates roofing vulnerabilities.
A well-installed gutter system protects everything below it, the fascia, the siding, the foundation, and the interior of your home, and it works quietly in the background for decades when it is done right. Smithrock Roofing has been handling gutter installations and exterior assessments across Winston-Salem, Greensboro, High Point, and the surrounding Triad communities long enough to know what our area demands and what a properly engineered system looks like from the roofline to the ground. If you are ready for an honest evaluation of your current gutters or want to talk through what a new installation would involve for your home, we are glad to help, Get a Free Estimate and we will take a look together.
Need a local pro? Learn more about our gutter installation and repair in High Point.
See also: Gutter Installation Cost: What Quotes Don’t Tell You

Smithrock Roofing © Copyright 2026 • All Rights Reserved • Privacy Policy • Maintained by Mongoose Digital Marketing
