
Getting a new roof is one of the biggest decisions a homeowner makes. It’s not a purchase you comparison-shop every few years, and unlike a kitchen remodel, you can’t really see the quality of the work from your living room. Most of what separates a roof that holds up beautifully for 40 years from one that starts failing in 15 is hidden under the surface, in the details that never make it into a basic how-to guide.
At Smithrock Roofing, we’ve spent 60-plus combined years installing roofs across Winston-Salem, Greensboro, High Point, Kernersville, Clemmons, and the surrounding NC Triad. We’ve also seen what happens when those hidden details get skipped. This guide is built to close the gap between what most homeowners are told about roof installation and what a seasoned, honest roofer actually knows. No fluff, no sales pressure, just a straight look at what a quality installation actually involves and why each piece matters for your home’s long-term health.
Most articles will give you a numbered list: tear off old shingles, install underlayment, nail down new shingles, done. That framework isn’t wrong, it’s just wildly incomplete. A roof system is exactly that: a system. Every component interacts with the others, and a weakness in one layer doesn’t stay contained. It spreads, quietly, until it becomes a repair bill or a failed warranty claim.
Here’s what a thorough roof installation actually encompasses, and where the work that separates a quality contractor from a cut-rate crew actually happens.
Need a hand with this in Winston-Salem, Greensboro and the NC Triad? Call (336) 971-0464 or request a free estimate. Honest answers, no pressure.
Before any new material touches your roof, the existing deck needs to be evaluated carefully. The deck, typically oriented strand board (OSB) or plywood, is the structural surface your shingles are anchored to. If it’s compromised, no amount of premium material on top will save you.
Competitors often say “inspect for damage” and leave it there. That’s not enough. Here’s what actually matters:
Here’s something most homeowners never hear: ring-shank nails back out over time. After 20 or 30 years, the fastening that holds your roof deck to your rafters may be significantly weakened. A full roof tear-off is the only window you have to assess and correct deck-to-rafter fastening before new material goes on top. A thorough contractor re-nails or re-screws any questionable panels during this phase. Skip it, and you’re building a premium new roof on a foundation that’s already working loose.
The perimeter of your roof is where water is most persistent and most likely to cause problems. Two components handle this: drip edge flashing and ice-and-water shield.
Drip edge is a metal strip installed along eaves and rakes to direct water away from the fascia and into the gutter. The sequencing matters. At the eave, drip edge installs under the underlayment. At the rake (gable edge), it installs over the underlayment. Getting that order wrong creates a path for water to wick behind the metal rather than being shed away from it.
Ice-and-water shield is a self-adhering membrane designed to protect vulnerable areas from water intrusion in the event shingles are compromised. In North Carolina’s climate zone, code requirements apply to eave protection, and any areas prone to ice damming or wind-driven rain, including valleys and around penetrations, benefit significantly from this added protection layer.
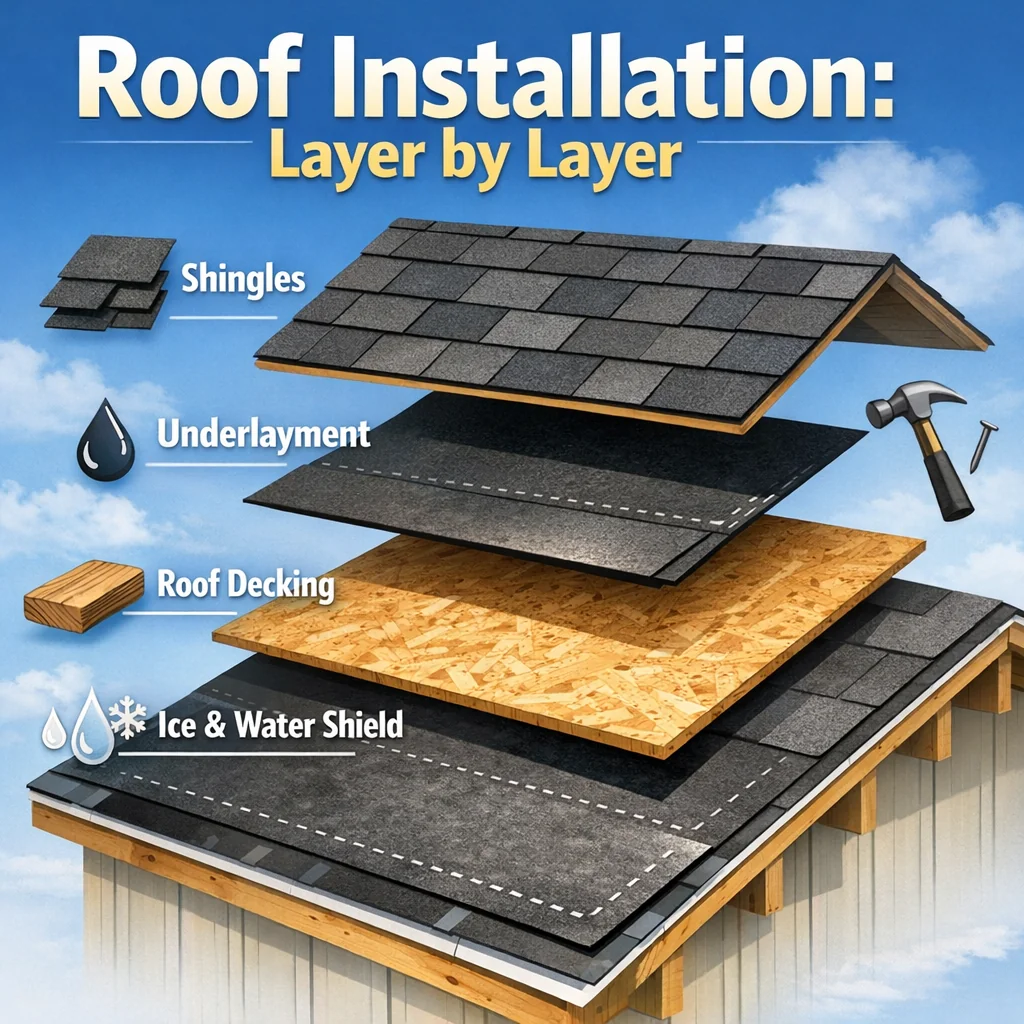
Underlayment is the secondary water barrier between your shingles and your deck. If shingles are ever lifted, cracked, or missing, during a storm, for instance, underlayment is what stands between that exposure and your home’s interior. Treating it as a commodity is a mistake.
| Feature | Traditional Felt (15 lb / 30 lb) | Synthetic Underlayment |
|---|---|---|
| Moisture response | Absorbs moisture, can wrinkle and buckle | Resists moisture, installs and stays flat |
| Worker footing | Better traction when dry | More slippery, safety consideration for crew |
| Weight | Heavier per roll | Lighter, covers more area per roll |
| Tear resistance | Lower, susceptible to wind damage if exposed | Significantly higher |
| Extended rain exposure | Degrades relatively quickly | Holds up well through multi-day installs |
| Wrinkle telegraphing | Yes, wrinkles can show through finished shingles | Minimal, installs flat |
| UV exposure tolerance | Short window before degradation | Extended tolerance, important if weather delays occur |
The practical implication here is significant. In the NC Triad, spring and late-summer installs can run into afternoon thunderstorms or multi-day rain patterns. If your underlayment is installed on a Monday and your crew can’t finish until Thursday, synthetic material maintains its integrity through that window far better than felt. It also installs flat, meaning the surface under your shingles stays smooth, relevant because ridged underlayment can telegraph through the finished shingle layer and affect both appearance and adhesion of the sealant strip.
Starter shingles are a pre-cut course of material installed before the first field shingle row. Most guides mention them briefly. What they don’t explain is that starter shingles serve different structural purposes depending on where they’re placed.
At the eave: The starter course’s primary job is to back the sealant strip on the first course of field shingles. Without it, that bottom row has nothing to bond to, leaving it vulnerable to wind uplift, the first course is always the most exposed.
At the rake: Rake starters close off the open joint at the gable edge. Without a rake starter, that vertical seam is an unprotected path for wind-driven rain. It’s a small detail that’s often overlooked, especially on reroofing jobs where the crew is moving quickly.
This is the detail that separates a roof that holds through a storm from one that loses shingles at 60 mph. And it’s almost never discussed at the level of specificity that homeowners deserve to know.
An architectural (laminated) shingle has three functional zones:
“High-nailing” means fasteners are driven above the nail zone, sometimes by as little as half an inch. The consequences are specific and serious:
A nail that isn’t driven fully flush sits proud of the shingle surface. Under wind load, that raised nail head creates a fulcrum: the shingle below levers against it and lifts. At scale, across thousands of nails on a full roof, under-driven fasteners are a significant vulnerability. Proper nail depth is not negotiable, and it requires attention throughout the install, not just occasional spot-checking.
If underlayment is your second line of defense, flashing is the hand-to-hand combat at every breach point: chimneys, skylights, vents, walls, and valleys. Done well, flashing is watertight for decades. Done poorly, it’s the most common source of leak callbacks.
Step flashing is installed course by course alongside shingles where a roof meets a vertical wall. Each L-shaped piece of metal tucks under a shingle and laps over the one below it, creating an interlocked waterproof seam that flexes with the structure. This is the correct method for sidewall intersections.
Continuous flashing (sometimes called “apron flashing”) is a single long piece of bent metal. It’s simpler to install and appropriate in specific locations, but it doesn’t accommodate the thermal expansion and contraction of a structure over years the way step flashing does. Using continuous flashing where step flashing is required is a shortcut that shows up as a leak, eventually.
A chimney penetrates your roof at a particularly challenging intersection, masonry expands and contracts at a different rate than the surrounding wood structure and metal flashing. This thermal differential, repeated through thousands of heating and cooling cycles, will eventually open a gap in any sealant-only flashing system. Properly installed chimney flashing uses a two-part system:
Counter-flashing seals the top of the base flashing to the chimney without relying on sealant as the primary seal. Sealant is used as a secondary measure, not the primary one. When you see a chimney with just a heavy bead of caulk running along the base, no visible counter-flashing embedded in the mortar, that’s an installation that’s already in the process of failing. For a deeper look at what this type of repair actually costs and involves, see our article on chimney flashing repair cost for NC homeowners.
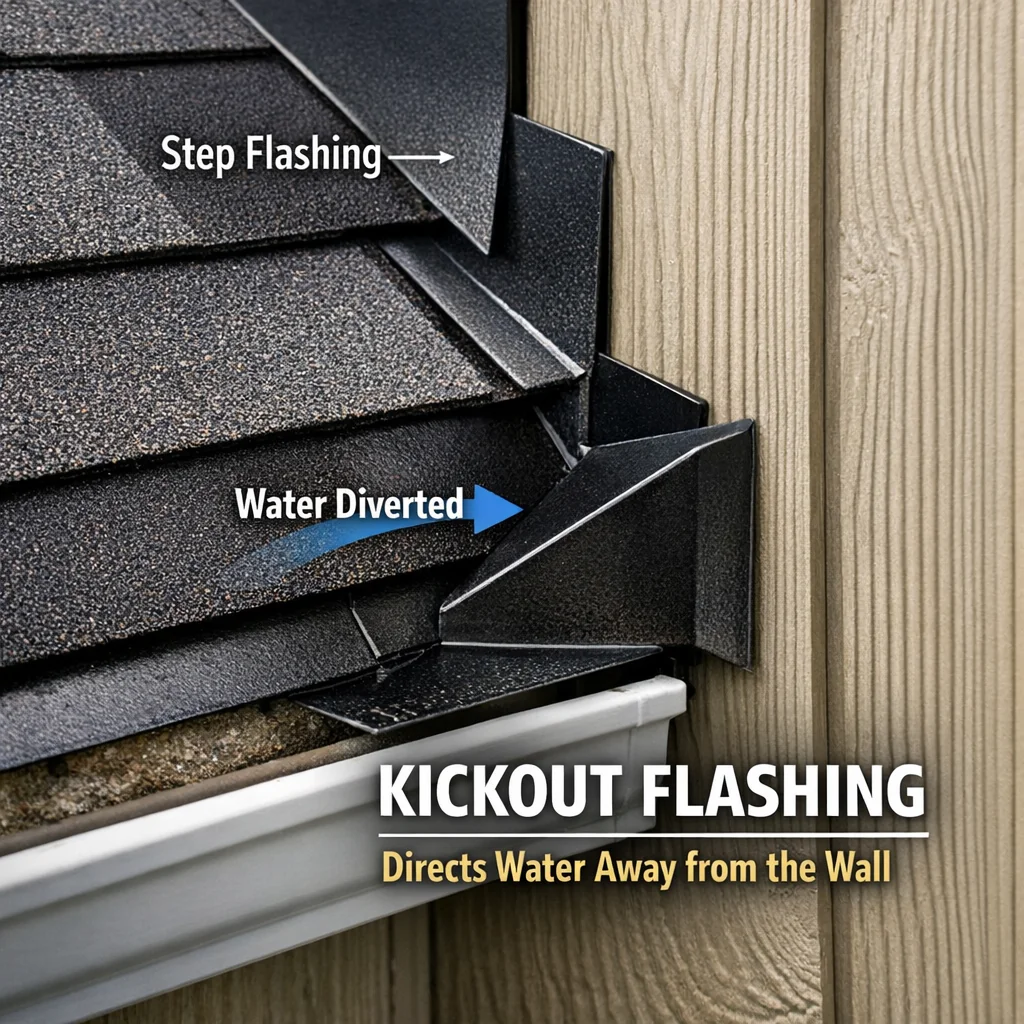
Where a sloped roof terminates at a vertical wall, think a dormer, an addition, or anywhere a roof run ends at siding, there’s a specific and very consequential detail required: kickout flashing, also called diverter flashing.
Without kickout flashing, water running down the roof slope at that termination point has nowhere to go except directly behind the siding and into the wall cavity. It doesn’t announce itself. There’s no immediate drip in the ceiling. The water just routes into the wall, sits in the framing, and begins rotting wood and feeding mold, often for years before any visible damage appears.
Building forensics researchers consistently cite missing kickout flashing as one of the top causes of wall rot and hidden moisture damage in residential structures. The IRC addresses this at R903.2.1, yet it remains routinely omitted on both new installations and reroofing jobs, not because installers don’t know it exists, but because fabricating it properly is fiddly and time-consuming, and on a fast-paced job, it’s easy to skip.
How to check your current roof: Stand at ground level and look at any location where your roofline meets a vertical wall surface and then terminates. At that lower corner, you should see a small piece of metal bent outward, directing water away from the wall. If you see shingles and siding meeting at that corner with nothing redirecting water flow, kickout flashing is missing.
This is the piece of roof installation that almost every competitor skips or treats as a footnote. It shouldn’t be. Improper ventilation is arguably the single most common cause of premature roof failure, and it’s entirely preventable.
Your attic and roofing system work as a thermal and moisture management unit. In summer, heat builds in the attic and bakes shingles from beneath. In winter, warm air from the living space rises into the attic and can condense on cold surfaces, or, in colder climates, create ice dams. The solution to both is balanced airflow: adequate intake at the soffits and exhaust at or near the ridge.
The International Residential Code (IRC) establishes minimum ventilation ratios for residential roofing:
Net free area is the actual unobstructed opening through which air can move, not the gross dimensions of a vent. Different vent types have different NFA ratings, and installers need to account for those ratings when specifying and installing a system.
A common mistake is installing plenty of ridge vent (exhaust) without adequate soffit vent coverage (intake). This creates negative pressure in the attic, the exhaust pulls air from wherever it can find it, including through ceiling penetrations in the living space. The result is a roof that pulls conditioned air out of the home in winter and humid air into the attic in summer. Neither outcome is good for the roof or for energy efficiency.
The reverse, more intake than exhaust, is less damaging but still problematic, as it reduces the drawing effect that makes ridge-and-soffit systems effective.
Most major shingle manufacturers include explicit ventilation compliance language in their warranty terms. A roof installed on an attic that doesn’t meet the IRC ventilation ratio, even if every shingle was nailed correctly, every flashing detail was perfect, and premium material was used throughout, may not be covered by the material warranty if ventilation falls out of compliance. That’s not a technicality buried in fine print. It’s a core condition of coverage.
A roofer who doesn’t ask about your attic ventilation before starting an installation isn’t being negligent by accident, they’re either skipping the diagnostic work or don’t know it’s required. Either way, it’s a red flag worth taking seriously.
Roofing in Winston-Salem, Greensboro, and High Point isn’t the same as roofing in Minnesota or coastal Florida. The NC Triad sits in a climate zone with specific demands that shape how a quality installation should be approached.
The Triad sees genuine four-season weather, summer highs that push into the upper 90s, winter temperatures that dip below freezing, and the humidity swings that come with both. This thermal cycling affects every component of the roof system:
The NC Triad experiences seasonal storm activity, including the tail ends of Atlantic hurricane systems that can push significant wind gusts well inland. Nail placement specifications and wind-rated shingle selection aren’t abstract concerns here. CertainTeed Landmark shingles, installed to manufacturer specifications, carry a wind resistance rating that holds, but only if the installation was done correctly.
North Carolina follows the IRC with state amendments, and local jurisdictions enforce permit and inspection requirements for roofing projects. A licensed contractor familiar with local code requirements handles permit pulls and inspection scheduling as part of the job. This protects the homeowner, documents the work, and ensures the installation meets the standards that affect your home’s insurability and resale value.
A quality roofing contractor doesn’t show up on installation day without having already walked through a thorough pre-installation assessment. Here’s what that assessment should include:
If a contractor shows up to give you a proposal without going into the attic, that’s a gap worth noting. The attic tells you as much about what the roof needs as the roof surface itself does.
The difference between a roof that performs for decades and one that starts failing early almost always comes down to the installer. Materials matter, and premium materials like CertainTeed Landmark shingles are meaningfully better than builder-grade alternatives, but materials installed carelessly underperform their potential every time.
Here’s what to look for when evaluating a roofing contractor:
| Evaluation Factor | What to Look For | Red Flag |
|---|---|---|
| Licensing and insurance | Fully licensed in NC, general liability and workers’ comp | Vague answers or reluctance to provide certificates |
| Manufacturer certification | Certified installer designation from a major manufacturer | “We use good materials” with no specifics |
| Warranty coverage | Both labor warranty and manufacturer warranty clearly stated | Labor warranty under 2 years or not offered |
| Permit handling | Contractor pulls permit and schedules inspection | Suggests skipping permit to “save time” |
| Attic inspection | Checks attic before proposing work | Proposal given without seeing the attic |
| References and reviews | Verifiable local reviews, BBB rating | New company with no local track record |
| Cleanup and site management | Debris removed, magnetic nail sweep, daily cleanup | No mention of cleanup in the scope of work |
| Written contract | Detailed scope of work in writing | Verbal agreement or very vague contract |
Smithrock Roofing carries an A+ BBB rating, holds CertainTeed PREMIER ShingleMark Master Certification, and backs every installation with a 5-year labor warranty alongside CertainTeed’s limited lifetime manufacturer warranty. Those credentials exist because they reflect a standard of work, not just a marketing checklist. You can read what our customers say about the experience on our reviews page.
A roof is protecting everything underneath it, your structure, your belongings, your family, and one of the largest financial investments most people ever make. The details that separate a quality installation from a merely adequate one aren’t visible from the curb. They live in the nail placement, the flashing sequencing, the ventilation balance, and the deck preparation.
When those details are done right, your roof performs as designed, through NC Triad summers, through storm seasons, through the years and decades of thermal cycling that a home’s exterior endures. When they’re skipped, the consequences tend to be quiet at first and expensive later.
If you’re planning a roof installation in Winston-Salem, Greensboro, High Point, Kernersville, Clemmons, or anywhere across the NC Triad, we’re happy to start with an honest conversation about what your home actually needs. No pressure, no shortcuts, just straight answers from people who’ve been doing this long enough to know exactly what’s at stake.
Most residential roof installations in the Winston-Salem and Greensboro area are completed in one to two days for standard-sized homes, weather permitting. Larger or more complex rooflines, homes requiring significant deck repair, or projects involving additional ventilation work may take longer. A reputable contractor will give you a realistic timeline before work begins, not an optimistic estimate designed to win the bid.
Yes. In most local jurisdictions, a permit is required for a full roof replacement. Your contractor should pull the permit on your behalf and schedule the required inspection upon completion. If a contractor suggests skipping the permit to save time or money, treat that as a serious warning sign, permitted work protects your home’s resale value and your insurance standing.
A manufacturer warranty covers defects in the roofing materials themselves, shingles, underlayment, and related components, and is issued by the product manufacturer. A labor warranty is provided by the installing contractor and covers workmanship errors, such as improper nailing, flashing failures, or installation mistakes. Both are important. A quality installation should include a meaningful labor warranty alongside the manufacturer’s coverage, because most leak-related failures in the first several years trace back to installation, not the materials.
The honest answer depends on several factors: the age of your current roof, the extent and pattern of damage, the condition of the underlying deck, and whether ventilation issues have shortened the system’s effective lifespan. Isolated storm damage on a relatively young roof may be addressable with targeted repairs. Widespread granule loss, multiple failing areas, or a roof approaching or past its expected service life typically point toward replacement. A thorough inspection, including the attic, gives you the information needed to make that call confidently. Our article on roof repair vs. replacement in Winston-Salem walks through the key criteria in detail.
Homeowners across Winston-Salem and High Point trust Smithrock Roofing because the work speaks for itself, CertainTeed PREMIER ShingleMaster certified, A+ BBB rated, and backed by a 5-year labor warranty on every installation. If you’re ready to get straight answers about what your home actually needs, we’re here to help.
Need a local pro? Learn more about our roofing services in Greensboro.
See also: Roof Replacement Contractor: What Experts Won’t Tell You
See also: Gutter Installation Cost: What Quotes Don’t Tell You

Smithrock Roofing © Copyright 2026 • All Rights Reserved • Privacy Policy • Maintained by Mongoose Digital Marketing
