
Installing a metal roof is one of the more significant upgrades a homeowner can make. Done correctly, it delivers decades of reliable performance with minimal maintenance. Done poorly, with the wrong underlayment, a misaligned panel layout, or fasteners driven without understanding how metal moves, it creates problems that can take years to surface and cost far more to correct than the original installation.
That gap between “done correctly” and “done poorly” is wider than most online guides acknowledge. The basic steps are easy enough to find: put down underlayment, install panels, flash the penetrations, cap the ridge. But the details that separate a roof that performs for 40 years from one that starts showing leaks or corrosion in year seven? Those rarely make it into the how-to articles.
This guide is built around those details. Whether you’re a homeowner trying to understand what your contractor should be doing, someone weighing a DIY installation on an outbuilding, or just researching the process before making a decision, what follows will give you a real picture of what a proper metal roof installation looks like from the ground up.
Before getting into the steps, it helps to understand the core property that governs every metal roofing decision: metal moves.
Asphalt shingles are relatively inert. They absorb minor thermal expansion without meaningful dimensional change. Metal panels, whether steel, aluminum, or copper, expand and contract with temperature in a way that directly affects how they must be fastened, how their underlayment must be selected, and how their layout must be planned.
Steel expands at approximately 0.0000065 inches per inch per degree Fahrenheit. On a 40-foot steel panel experiencing a 100°F temperature differential (routine on a dark-colored south-facing roof in a NC summer), that translates to roughly 0.31 inches of longitudinal movement. That number might sound small. Multiplied across dozens of panels over thousands of thermal cycles across a 40-year lifespan, it determines whether your fastener holes stay tight or elongate into leak points.
Every decision downstream of this, underlayment choice, fastener type, panel gauge, layout planning, connects back to managing that movement responsibly.
Need a hand with this in Winston-Salem, Greensboro and the NC Triad? Call (336) 971-0464 or request a free estimate. Honest answers, no pressure.
Two primary panel systems dominate residential metal roofing: exposed fastener and standing seam. Understanding the difference upfront shapes every subsequent installation decision.
Exposed fastener panels (often called corrugated or R-panel) are installed with screws driven through the panel face directly into the roof deck. They’re more affordable to install and work well on agricultural structures, outbuildings, and steeper residential roofs.
The trade-off: because the fastener penetrates the panel, thermal movement is transferred directly to the fastener hole. This is why proper exposed fastener installation uses slotted holes at specific locations to allow panels to slide on the fastener shank rather than buckle between fixed points. This is not a detail many general guides address, but skipping it is one of the primary causes of fastener-related leaks on aging exposed fastener roofs.
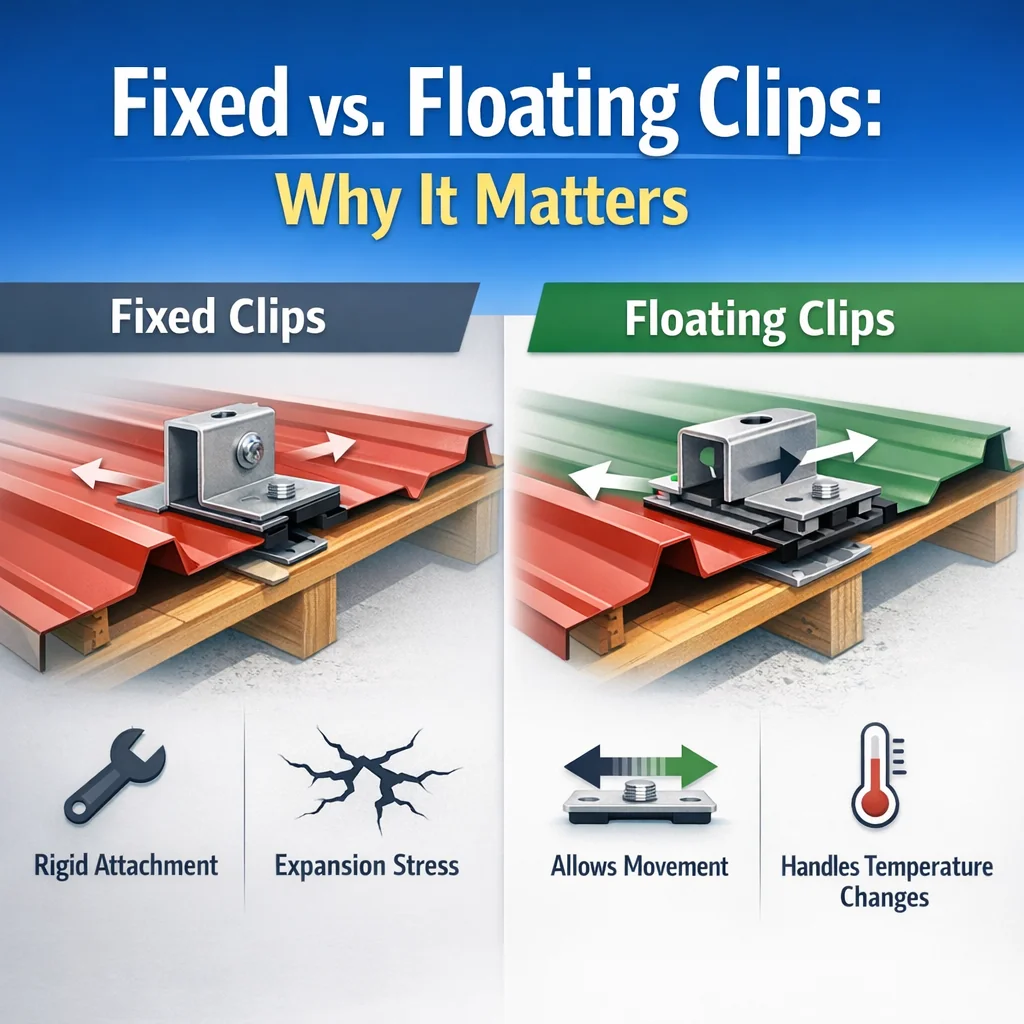
Standing seam panels connect to the roof deck through concealed clips rather than exposed screws. The panel face remains unpenetrated. Clips are available in fixed and floating (sliding) configurations, and the selection between them is determined by panel length and expected thermal range.
A floating clip allows the panel to slide freely over the clip as it expands and contracts. A fixed clip locks the panel at a specific point. On a properly engineered standing seam roof, the fixed clip is placed at the panel midpointallowing the panel to breathe equally in both directions. Placing fixed clips at one end of a long panel run concentrates all thermal stress at one location, a detail that matters significantly on south-facing slopes in the NC Triad, where summer roof surface temperatures regularly exceed 150°F.
Underlayment sits between your roof deck and your metal panels. It protects the deck during installation, provides a secondary moisture barrier, and, critically, must be chemically compatible with the panel material above it.
This last point is where most installation guides go silent, and where real-world failures originate.
The majority of residential metal roofing panels are manufactured with a Galvalume coatingan aluminum-zinc alloy applied to steel that provides corrosion resistance. Galvalume performs exceptionally well when correctly specified and installed.
The problem: certain rubberized asphalt self-adhering underlayments contain compounds that are chemically aggressive to aluminum-zinc coatings when in sustained direct contact, particularly in humid conditions. The resulting corrosion is localized, occurs at the contact interface beneath the panel, and produces pinhole rust that appears unrelated to any visible surface damage. By the time a homeowner notices staining or panel failure, the underlayment has been silently working against the roof for years.
The fix is not to avoid self-adhering membranes, they remain the best option for leak protection in valleys and at penetrations. The fix is to:
| Underlayment Type | Galvalume Compatible | Best Application | Notes |
|---|---|---|---|
| Synthetic non-woven (polyester/polypropylene) | Yes | Full deck coverage; general use | Low moisture retention; good long-term performance |
| Self-adhering rubberized asphalt | Verify by product | Valleys, penetrations, eaves | Must confirm compatibility rating before use with Galvalume |
| Self-adhering modified bitumen | Verify by product | High-risk zones | Same compatibility verification required |
| Traditional felt (30 lb) | Yes | Temporary protection; moderate-slope roofs | Prone to moisture absorption; not ideal long-term beneath metal |
| Ventilated batten over membrane | Yes (with any compatible membrane) | All metal applications; ideal for NC climate | Eliminates contact concern; provides condensation control |
Condensation beneath metal roofing is an underappreciated problem in our area. Warm, humid summers combined with cold winter nights create conditions that produce significant dew point differentials between the interior attic space and the underside of cold metal panels.
When warm, moisture-laden attic air contacts the underside of cold metal panels, it condenses. Over time, this moisture drips onto the roof deck, saturating insulation and promoting wood rot, entirely below the metal surface, invisible from above. A properly ventilated underlayment assembly or batten system allows that air gap to carry moisture away before it accumulates. This is not an optional refinement for NC homes; it is a legitimate moisture management strategy for our climate. If you’re also evaluating the full cost picture before committing to a metal roof, our roofing cost guide for NC Triad homeowners breaks down what drives pricing in this region.
Here is where most online installation guides do homeowners a genuine disservice: they tell you to snap a chalk line and start at the rake opposite the prevailing wind. On a perfectly square roof, that works. On a real residential roof, which may have framing tolerances, additions, dormers, or hip configurations, starting without a layout calculation produces a final panel at the far rake that is either a sliver or an awkward overlap.
A sliver panel is not just an aesthetic problem. A panel with insufficient width has fewer fastener points, reduced edge engagement, and is the most likely panel on the roof to lift in high wind, which matters in an area like the NC Triad that sees periodic severe thunderstorm activity and, occasionally, tropical storm remnants.
Before the first panel goes on the roof, experienced installers work through this sequence:
This planning step takes 20 minutes. Skipping it can produce a layout problem that is visible from the street and structurally problematic at the rake edge.
If you’ve read any metal roofing installation guide, you’ve encountered the warning: don’t overtighten your screws. The neoprene washer will compress, deform, and fail to seal. That’s accurate as far as it goes. But there’s considerably more to fastener performance than washer compression.
A properly driven roofing screw does three things simultaneously: it pulls the panel to the deck, it compresses the neoprene washer to a specific engagement depth (firm contact without distortion), and it engages the substrate with enough thread purchase to resist wind uplift across the panel’s service life.
When any of these three functions fails, the roof leaks, lifts, or both.
One dimension of fastener selection that almost no online guide addresses: pull-through resistance varies significantly by substrate.
A #10 self-drilling screw driven into 7/16-inch OSB has a meaningfully lower pull-through value than the same screw driven into 3/4-inch plywood. In high wind events, this difference matters. Local building codes in our area increasingly incorporate wind uplift calculations into permit requirements for roofing work. A contractor who selects fasteners based on panel requirements without accounting for the actual sheathing type and thickness is not doing the full calculation.
When in doubt, a longer screw with more thread engagement, or supplemental fastener points in field areas, is the responsible adjustment for thinner or lower-density sheathing.
Flashing is listed as a step in virtually every metal roofing guide. The actual logic that governs which flashing goes where, in what order, and why is almost never explained. That omission is significant, because flashing sequencing errors are the most common source of post-installation callbacks on otherwise well-installed metal roofs.
Flashing works on one principle: water must always be shed from a higher layer onto the surface of a lower layer, never tucked beneath it. Reversing this relationship at any point creates a reservoir where water collects against a joint rather than being directed away from it.
Applied to a metal roof:
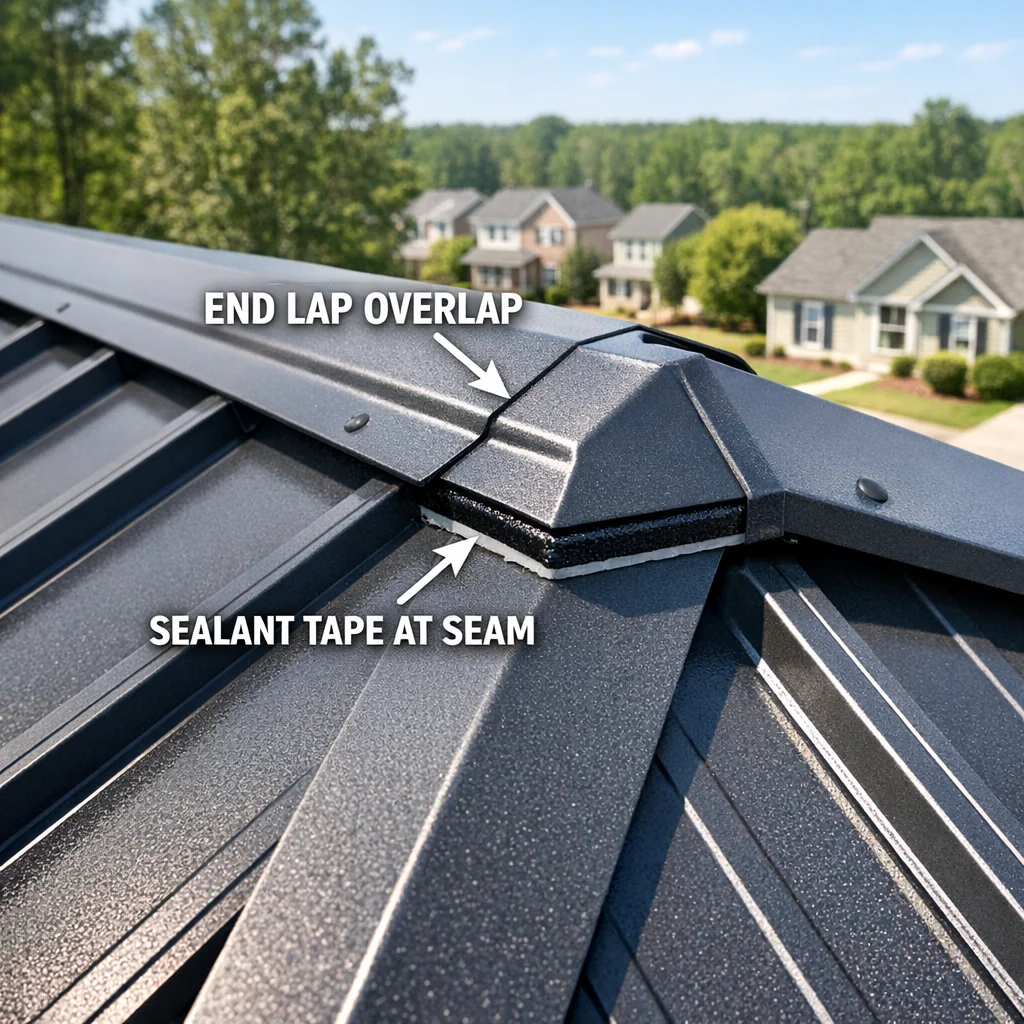
Ridge cap installation looks straightforward, panels that straddle the peak and shed water to both sides. The failure point is almost always at end lapswhere two ridge cap sections meet along the ridge run.
The correct installation overlaps the upper piece over the lower piece by a manufacturer-specified distance (commonly 6 inches minimum), with sealant tape applied at the lap before fastening. When this overlap is undersized, or when sealant is applied only at fastener points rather than continuously across the lap, wind-driven rain pushes water up and under the overlap and enters the ridge from the one place on the roof with zero drainage slope.
On longer ridge runs, this is the first place a roof leaks after a severe storm, not because the panels failed, but because the ridge cap was treated as an afterthought rather than a precision detail. For homeowners who’ve already experienced storm-related damage, our article on storm damage roof repair for NC Triad homeowners covers the full assessment and repair process.
Metal roofing panels are manufactured in several gauges, with 26-gauge and 29-gauge being the most common in residential applications. The difference in metal thickness is approximately 0.008 inches. The difference in performance is considerably larger than that number suggests.
| Characteristic | 26-Gauge | 29-Gauge |
|---|---|---|
| Panel thickness | ~0.0179 in | ~0.0141 in |
| Oil-canning susceptibility | Lower | Higher |
| Spanning capability | Greater | Less |
| Weight | Heavier | Lighter |
| Long-term dent resistance | Better | Moderate |
| Recommended application | Residential; low-slope | Agricultural; steep-pitch outbuildings |
Oil-canningthe visible waviness that appears on flat-faced metal panels, is a function of panel stiffness relative to span. Thinner 29-gauge panels deflect more between fastener points, and this deflection is visible as a subtle rippling across the panel face in low-angle light. On a residential home, this is the difference between a roof that looks premium and one that looks inexpensive from the driveway. It is a specification decision made before installation begins, and one that affects the visual outcome of the finished roof permanently.
For most residential applications in the Triad area, 26-gauge panels represent the appropriate baseline specification. 29-gauge has its place, primarily on agricultural and accessory structures where the aesthetic consideration is lower, but it should be a deliberate choice, not a default.
Metal roofing is often installed directly over an existing attic system without any adjustment to the ventilation balance. This is a mistake that causes real damage slowly and invisibly.
Here’s the issue: metal panel profiles, particularly through-fastened panels with raised ribs, restrict airflow at the eave intake in ways that asphalt shingles do not. If the ventilation balance in your attic depended on free airflow beneath shingle tabs at the eave, that pathway changes when a metal panel is installed over it. The result is reduced intake volume, which throws off the ridge-to-eave ventilation ratio, reduces attic air exchange, and allows heat and moisture to accumulate above the insulation line.
Over time, this manifests as elevated attic temperatures (higher cooling loads in summer), moisture accumulation in insulation, and accelerated deterioration of the roof deck, which is now trapped beneath a metal roof that will likely outlast the deck it’s attached to if nothing is done.
Before installation on any occupied structure with a conditioned or semi-conditioned attic:
A metal roof is a long-term investment. The structure beneath it should be protected with the same care given to the roof surface itself.
There is a version of metal roofing installation that is appropriate for experienced DIYers: a simple single-slope outbuilding or workshop on a straightforward 3:12 or steeper pitch, with exposed fastener panels and no penetrations to flash.
For occupied residential structures, homes with attics, HVAC penetrations, chimneys, dormers, or valleys, the variables described throughout this guide interact in ways that require professional judgment and accountability. Thermal movement calculations, underlayment compatibility verification, panel layout redistribution on non-square roofs, flashing sequencing, gauge specification, ventilation re-evaluation, these are decisions that affect the performance of the roof for 40 years. Errors in any of them are typically invisible until they’ve already caused damage.
At Smithrock Roofing, we’ve spent 60+ combined years working on homes across Winston-SalemGreensboro, High Point, Kernersville, Clemmons, and the surrounding NC Triad. We use premium materials, verify compatibility specifications before anything goes on a deck, and we stand behind our work with a 5-year labor warranty. If you’re considering a metal roof for your home, we’re happy to walk through the options with you, no pressure, just honest answers about what makes sense for your structure, your attic, and your long-term goals.
Before beginning any metal roofing project, whether you’re managing it yourself or working with a contractor, three steps will meaningfully improve your outcome:
1. Request a Thermal Movement Compatibility Report from Your Panel Supplier
In 2026, several major metal roofing manufacturers now offer project-specific documentation that confirms clip spacing, panel gauge, and underlayment compatibility for your roof’s square footage and regional temperature range. Ask for this before material orders are placed. It eliminates guesswork on expansion allowances and gives you written documentation if a warranty question arises later.
2. Use a Drone-Based Roof Measurement Service Before Finalizing Your Material Order
Services like EagleView or GAF’s measurement platform provide dimensionally verified takeoffs that account for hip returns, valley lengths, and penetration perimeters, geometry that hand-measured estimates routinely undercount. Ordering panels to a verified takeoff reduces waste, prevents mid-job material shortages, and gives your installer a layout document they can work from directly.
3. Schedule a Pre-Installation Attic Ventilation Audit
As covered throughout this guide, metal roofing changes the thermal dynamics of the roof assembly. Before installation begins, have a qualified contractor or energy auditor document your existing net free ventilation area against the square footage of conditioned attic space. In North Carolina’s mixed-humid climate, getting this baseline measurement in writing protects you, and your insulation, before the new roof goes on.
See also: Roofing Repair Contractors: Hire Right & Avoid Costly Mistakes
In many cases, yes, but with important conditions. Most building codes allow one layer of existing roofing beneath a new metal roof, provided the deck beneath is structurally sound and flat. Before deciding to overlay, a contractor should inspect for soft spots, moisture damage, and any shingle ridging that would telegraph through the panels. In North Carolina’s climate, an overlayment also requires careful attention to ventilation, since the air channel beneath the metal can be compromised if the existing shingle surface traps moisture. Whether to tear off or overlay is a decision best made after a physical deck inspection, not a general rule applied from a distance.
A standing seam metal roof installed with correct underlayment, proper clip spacing for thermal movement, and compatible flashing details is routinely documented at 40 to 70 years of service life. Exposed fastener panels, installed correctly with maintained fasteners and gaskets, typically perform in the 25 to 40-year range. Our area’s combination of summer heat, occasional ice events, and high humidity in the shoulder seasons makes proper underlayment selection and ventilation more consequential here than in drier climates, which is why installation quality affects longevity as much as the panel itself.
Standing seam panels connect through a concealed clip system, meaning no fastener penetrates the panel face. This allows the panel to move freely with thermal expansion, eliminates the most common source of metal roof leaks, failed fastener gaskets, and produces the clean, uninterrupted line most homeowners associate with residential metal roofing. Exposed fastener systems use screws driven directly through the panel surface, which are effective and cost-efficient for agricultural and outbuilding applications, but require periodic inspection and re-torquing on residential roofs with significant temperature swings. For a primary residence in the Triad, standing seam is the appropriate long-term choice in most situations.
Yes, and the relationship is more nuanced than most marketing language suggests. A bare metal surface reflects solar radiation effectively, but what matters to your conditioned space is what happens in the attic assembly beneath the panel. Without adequate ventilation, a metal roof can actually increase attic temperatures because the surface heats rapidly and that heat conducts into a poorly ventilated space. With correct ventilation, verified net free area, functioning ridge and soffit pathways, a metal roof in combination with a radiant barrier or reflective underlayment can meaningfully reduce attic temperatures and cooling loads. The panel alone doesn’t determine energy performance; the full assembly does.
Metal roofing done right is one of the most durable investments a homeowner can make, but the details that determine whether a roof lasts 15 years or 50 years are in the planning, the material compatibility, and the installation precision, not just the panel itself. The team at Smithrock Roofing has put that precision to work for homeowners across Winston-Salem and Greensboro for decades, and we approach every project with the same standard: verify before you install, and stand behind what you build. If you’re ready to talk through what a metal roof would actually look like for your home, we’d be glad to start that conversation, Get a Free Estimate and let’s figure out what makes sense for your structure.

Smithrock Roofing © Copyright 2026 • All Rights Reserved • Privacy Policy • Maintained by Mongoose Digital Marketing
