
When a window goes in correctly, you never think about it again. It opens smoothly, stays weathertight through a summer thunderstorm, and keeps your energy bills in check through a winter cold snap. When it goes in wrong, you might not know for two or three years, until you notice a soft spot on the interior drywall, a sash that suddenly won’t latch, or a cold draft you can’t quite locate.
That gap between a good installation and a bad one isn’t always visible on the day of the job. It’s hidden in the sequencing, the order and method in which flashing layers integrate with your wall system, the way air sealing ties into the existing barrier, and whether the installer actually assessed your rough opening before sliding a new window into it.
At Smithrock Roofing, we’ve been serving homeowners across Winston-Salem, Greensboro, High Point, Clemmons, King, and the surrounding NC Triad for years. Our team brings 60+ combined years of exterior experience to every project, and windows are part of that. We see the aftermath of installations done without enough care, and we know the details that prevent those problems in the first place.
This guide is built around what a building scientist checks that most installation guides never mention. If you’re considering window replacement or installation, this is the information that actually protects your home.
Most homeowners, and honestly, too many contractors, think of a window as a standalone product. You order it, frame the opening, set the unit, seal around it, and move on. That mindset is where most installation failures begin.
A window is a penetration through your home’s building envelope. Every exterior wall is a system of layers working together to manage water, air, and temperature. The moment you cut an opening for a window, you interrupt those layers. A proper installation restores that system integrity. A careless one creates gaps that behave like hidden plumbing, channeling water and air into places they should never reach.
For homes in the NC Triad, this matters more than it might in a drier climate. The Piedmont region receives significant annual rainfall, and seasonal humidity swings are substantial. Walls breathe, expand, and contract. Wood framing moves. These conditions amplify small installation errors over time.
Understanding that reality shapes every decision in a quality installation, from rough opening sizing to the type of flashing tape selected for your specific wall assembly.
Need a hand with this in Winston-Salem, Greensboro and the NC Triad? Call (336) 971-0464 or request a free estimate. Honest answers, no pressure.
Before any installation begins, the right approach has to be established. There are two categories: pocket (insert) replacement and full-frame replacement. The choice isn’t a preference, it’s a structural and moisture assessment.
A pocket replacement drops a new window unit into the existing frame, leaving the exterior trim, interior casing, and frame structure in place. It’s faster and less disruptive. But it’s only appropriate under specific conditions.
Pocket replacement is appropriate when:
– The existing frame is structurally intact with no rot or deformation
– Moisture meter readings on the sill and jamb framing are within acceptable range (typically below 19% for dimensional lumber)
– The rough opening dimensions are consistent and square
– The existing exterior cladding around the window is sound and properly integrated
Pocket replacement is NOT appropriate when:
– There’s any visible rot, soft spots, or discoloration in the sill area
– Previous water staining is present on interior drywall near the window corners
– The frame feels soft or flexible under hand pressure
– The existing flashing is compromised or absent
Installing a new window over a damaged frame doesn’t solve the problem. It conceals it, temporarily, while the moisture and rot continue behind your new unit.
Full-frame replacement removes the existing window, frame, and exterior trim down to the rough opening framing. This allows a complete inspection of the rough opening structure, proper integration of new flashing into the wall system, and a fresh start on air and water management at that opening.
Full-frame work is more involved, but for homes where the previous installation wasn’t detailed correctly, it’s often the only way to actually fix the problem rather than paper over it. Our window replacement guide for NC Triad homeowners covers how to evaluate which approach is right for your specific home.
This is where professional installations separate from average ones. The concept is straightforward once you understand it, but the execution requires discipline and sequencing awareness.
Your exterior wall is a drainage plane system. It’s designed to shed water outward and downward at every layer, the same principle as roof shingles. Each layer must overlap the one below it, so any water that gets past the outer layer is directed outward, not inward.
At a window opening, three elements must be integrated in the correct sequence:
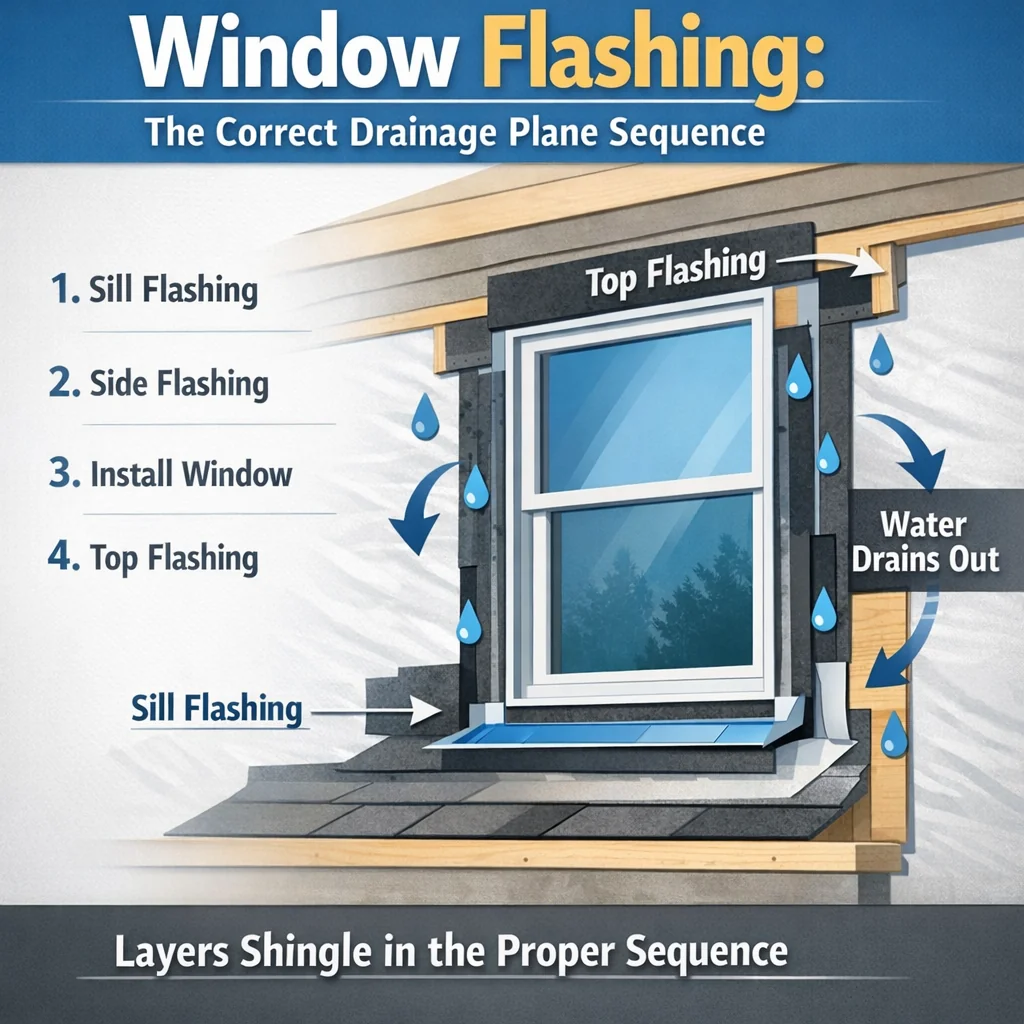
When the WRB is lapped over the head flashing instead of under it, the system reverses. Water running down the wall gets directed behind the head flashing and directly into the wall cavity. This is the most common installation error in residential window replacement, and it produces damage that typically doesn’t appear until years after the installation, by which point the original installer is long gone.
The same logic applies at the sill. If the sill pan tape doesn’t extend behind the WRB flap at the bottom of the opening, there’s a gap where water can track behind the pan and into the framing.
Verifying correct drainage plane layering isn’t difficult, but it requires an installer who understands why the sequence matters, not just what the sequence is.
Self-adhered flashing tapes are the standard for sealing the rough opening perimeter. They work well, when matched to the right substrate. This is a detail that rarely appears in installation guides but causes real-world failures.
Different sheathing materials have different surface characteristics, and flashing tapes have specific adhesion requirements:
| Sheathing Type | Adhesion Consideration | Typical Requirement |
|---|---|---|
| OSB (Oriented Strand Board) | Rough, variable surface; resin content affects bond | Primer often required for long-term adhesion |
| Plywood | More consistent surface than OSB | Most tapes adhere well; follow tape manufacturer spec |
| ZIP System Sheathing | Proprietary surface; requires ZIP-compatible tape | Use manufacturer-specified tape only |
| Glass Mat Gypsum Sheathing | Moisture-resistant but porous surface | Surface primer strongly recommended |
| Rigid Foam Sheathing | Smooth but low surface energy | Many standard tapes have poor long-term adhesion; butyl-based tapes perform better |
| Stucco / Cementitious | High alkalinity; rough texture | Compatibility varies significantly by tape product |
Surface temperature also matters. Most self-adhered tapes require a minimum surface temperature, often around 40°F, for proper adhesion. In the NC Triad, winter installations in King or Rural Hall during a cold stretch can fall below that threshold without anyone on the crew noticing. A tape that appears stuck during installation may fail to fully bond and can peel at the corners within a few seasons.
A knowledgeable installer checks the product data sheet for the tape against the actual sheathing type on your home before the job starts, not after.
Every installation guide covers this: get the window level, plumb, and square before fastening. It’s true and necessary. But stopping there misses what happens to that window after the truck pulls away.
Wood-framed homes in our area move. Seasonal humidity swings cause framing members to expand and contract. Long-term settlement, wind loads, and racking forces, lateral stresses that push a wall out of perfect geometry, all affect the rough opening your window sits in.
A window frame responds to racking stress by deforming into a parallelogram shape. The corners shift. The sashes start to bind. The latches no longer align. Homeowners almost always diagnose this as a hardware problem and replace the operator hardware or adjust the latch, when the actual issue is that the window has racked out of square because of how it was fastened.
The Window and Door Manufacturers Association (WDMA) specifies that rough openings should typically be sized with a defined tolerance beyond the window unit’s frame dimensions, enough space to allow shimming and adjustment, but not so much that the shimming becomes the primary structural bearing for the unit.
An oversized rough opening forces the installer to use excessive shimming, which creates bearing points rather than distributed support along the frame. Over time, those point loads cause frame deflection. An undersized opening forces the frame into the opening under stress, pre-loading it before it ever sees a wind load.
Proper fastening doesn’t just mean “screw it in securely.” A correctly engineered fastening schedule fixes the window on one plane while allowing controlled tolerance for movement on the other. This accommodates the settlement and seasonal shift that will happen without transferring that movement as stress into the window frame itself.
This is the kind of detail that separates installers who’ve done thousands of windows from those who’ve done dozens.
Ask most homeowners what makes a window installation airtight and they’ll say “spray foam.” They’re not wrong, but they’re describing a tool, not a system. How and where that foam is applied determines whether it actually works.
In a properly detailed wall assembly, the air control layer, the continuous plane that stops air from moving through the wall, is established before the window goes in. Whether that layer is the structural sheathing, a fluid-applied membrane, or the WRB, it exists as a defined plane in the wall.
When a window is installed, it must tie into that existing plane. The air seal at the rough opening perimeter should be a continuous connection between the window frame and the air control layer in the wall.
When installers spray-foam the rough opening perimeter as the primary air sealing strategy after the window is set, they’re frequently creating a new, disconnected air seal that doesn’t connect to the wall’s existing air control layer. The foam seals the gap between the window frame and the rough framing, but if the air barrier is actually at the sheathing plane behind the WRB, that foam is sealing the wrong location.
Spray foam, particularly low-expansion polyurethane foam in a can, shrinks slightly as it cures. At the head and jamb corners, where foam is compressed into an irregular void, that shrinkage creates small air pathways at the corners. These are invisible to the naked eye and don’t register as drafts you can feel with your hand. They only show up under a blower door test, which measures total air leakage through the building envelope.
For homeowners in Winston-Salem or Greensboro who are investing in window replacement in Winston-Salem to improve energy efficiency, a window that passes visual inspection but fails air continuity is a performance gap that will show up in utility bills for years.
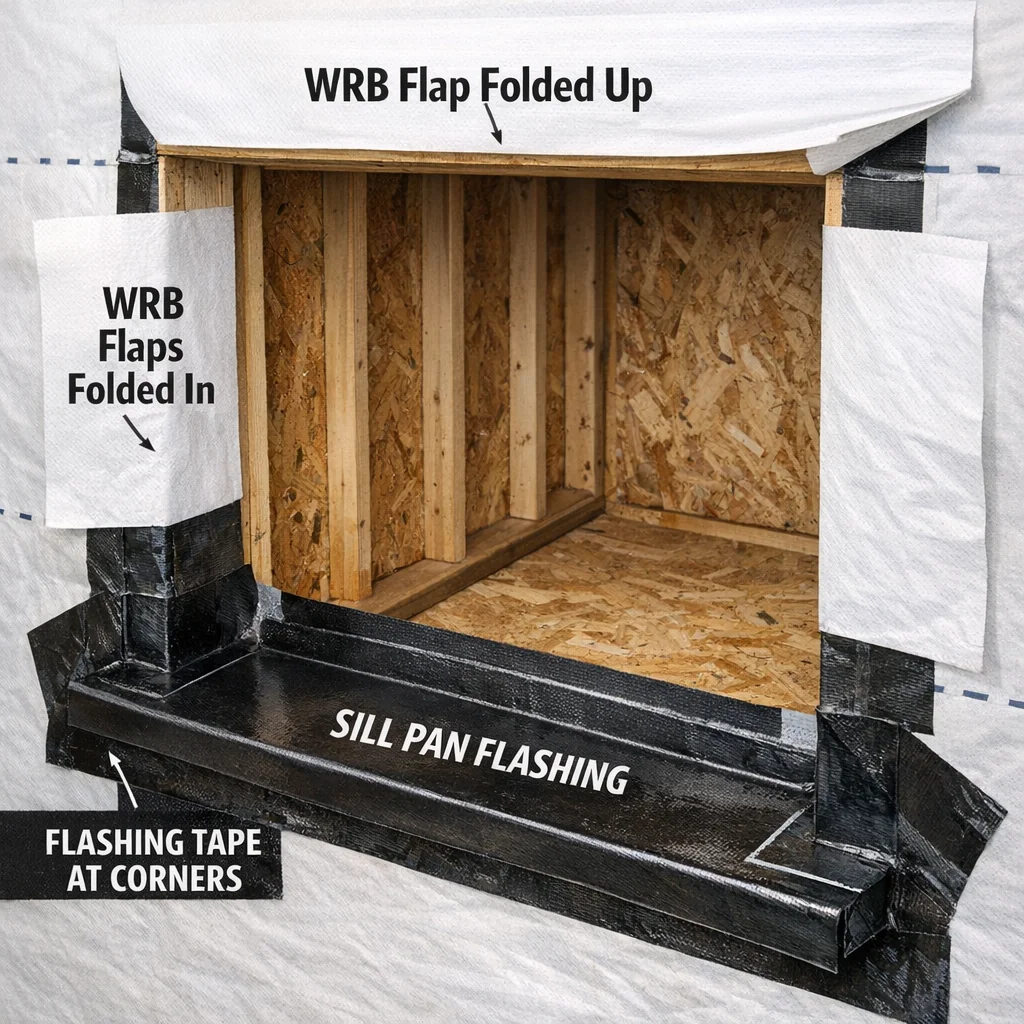
A correct approach:
The exterior caulk line at the perimeter of the trim is a cosmetic detailnot a primary water or air seal. Relying on it as the primary defense is one of the most common oversimplifications in residential window installation.
Another gap in most installation guides: the assumption that the process is the same regardless of what’s on the outside of your home. It isn’t.
The exterior cladding type fundamentally changes the installation sequence, the flashing integration method, and the risk profile of the work.
Vinyl siding is a drainage-based cladding, water that gets behind it is intended to drain down and out at the bottom. This system is forgiving if the WRB integration is correct. Window installations in vinyl-sided homes require careful integration at the head, where the J-channel or under-sill trim must direct water outward rather than allowing it to migrate behind the siding above the window.
Fiber cement is more demanding because cut edges are vulnerable to moisture. Head flashing integration must account for proper clearance between the siding bottom edge and the flashing, and all cut edges need to be field-primed. The head flashing geometry must direct water past the siding course below it, not allow it to pool against an exposed cut edge.
Brick veneer installations are significantly more complex. Brick is a reservoir claddingit absorbs moisture and releases it inward. The drainage plane behind the brick and the weep system at the base of the veneer are critical. Window installations in brick homes typically require custom flashing fabrication at the head, and disturbing the brick veneer around the window opening is often necessary to restore a proper drainage path. Shortcuts here lead to chronic moisture problems.
Stucco is the highest-risk cladding for window installations because it’s a face-sealed system, it relies on the stucco surface being perfectly intact to stay watertight. Any penetration through stucco, including window installation work, must be re-sealed with precision. The transition from window flashing to stucco is a known failure point; proper installation uses a weep screed or drainage detail at the sill to allow any incidental water to escape rather than tracking behind the stucco into the framing.
A professional installation doesn’t end when the window is set and the tools are put away. Quality assurance at this stage is what separates a reliable installation from one that just looks right on the day.
Operability checks: Every sash should open, close, and lock smoothly without binding. Binding that appears immediately is often a shimming or squareness issue. Binding that develops weeks after installation suggests the window is racking under load.
Visual drainage plane inspection: Before the exterior is closed up, a knowledgeable installer or inspector should be able to verify that the flashing layers are correctly sequenced. Once the cladding goes back on, this is no longer visible.
Interior inspection for compressed foam: At the interior rough frame joint, the foam fill should be consistent and not over-expanded. Over-expanded foam can bow the window frame inward, causing operational problems and frame stress.
Thermal imaging: For homeowners committed to performance, a thermal image of the rough opening area taken during cold weather will reveal air leakage pathways that are otherwise invisible. This is standard practice on high-performance residential projects and increasingly available from qualified contractors.
Water spray testing: On projects where performance standards are a priority, water spray testing per ASTM E1105 applies controlled water pressure to the exterior of the installed window to verify no water infiltration under simulated weather conditions.
Most residential installations won’t include all of these steps, but knowing they exist, and asking your installer which verification steps they perform, tells you a great deal about their approach to quality.
Window manufacturers offer substantial warranties, many covering the insulated glass unit for decades. But those warranties carry installation requirements that are specific and non-negotiable. Certain installation practices silently void coverage, and manufacturers have the right to deny claims when installation documentation doesn’t match their requirements.
Common warranty invalidation triggers include:
Asking your installer to confirm that the installation method meets the specific manufacturer requirements for the window unit you’ve purchased isn’t overcautious, it’s how you protect a significant investment.
The difference between a reliable window installation and a problematic one usually isn’t visible on a finished job site. Here’s what to ask before the job starts:
At Smithrock Roofing, we approach window installation the same way we approach every exterior project: as a system, not a task. Our team’s 60+ combined years of experience means we’ve worked through a wide range of conditions, the humidity, the seasonal movement, the variety of cladding types across Winston-Salem, High Point, Greensboro, and the surrounding communities. We carry that knowledge into every opening we work on.
If you’re planning a window replacement and want to talk through what your specific home actually needs, we’re straightforward about it. No pressure, no upsell, just honest answers from a team that knows exterior systems from the outside in. You can also explore our Windows service to learn more about what we offer.
The decision depends on the condition of the existing frame, not a contractor’s default preference. If the rough opening, sill, and surrounding framing are structurally sound and free of rot or moisture damage, a pocket replacement can be appropriate. If there’s any deterioration in the frame, sill, or surrounding sheathing, or if you want to change the window’s size or improve rough opening waterproofing from scratch, full-frame removal gives you the access to do it right.
Most early failures trace back to installation deficiencies rather than product quality. The most common culprits are improper WRB integration at the head flashing, flashing tape that wasn’t compatible with the sheathing type, air sealing gaps at the interior rough opening, or fastener patterns that don’t match manufacturer requirements. A window that’s correctly flashed, air-sealed, and fastened will routinely outperform the same unit installed carelessly, by years.
It can, in two ways. First, some window manufacturers void structural or performance warranties if installation deviates from their specified methods, including using the wrong fastener type or skipping required flashing sequences. Second, if improper installation leads to water intrusion and interior damage, some insurance claims are complicated by evidence that the installation was non-compliant. Always confirm your installer is following manufacturer specs for the specific unit you purchased.
For a straightforward replacement project, most crews complete individual window installations in a few hours per opening. A whole-house replacement on a typical single-story home can often be completed in one to two days under normal conditions. Complications like deteriorated framing, non-standard rough openings, or exterior cladding integration can extend that timeline, which is a normal part of the job, not a red flag, as long as your contractor is upfront about it before work starts.
Window installation done right is a long-term investment in your home’s comfort, efficiency, and structural integrity, and getting there starts with working alongside a team that understands the specific conditions of where you live. For homeowners across Winston-Salem and Greensboro, Smithrock Roofing brings more than six decades of combined exterior experience to every project, with the kind of regional knowledge that only comes from working on NC Triad homes year after year. If you’re ready to talk through what your home actually needs, we’re here for that conversation, Get a Free Estimate and let’s start with an honest look at your project.
See also: How to Install Metal Roofing: Avoid Costly Mistakes

Smithrock Roofing © Copyright 2026 • All Rights Reserved • Privacy Policy • Maintained by Mongoose Digital Marketing
